Crochet Bobble Stitch: A Comprehensive Guide for Creative Projects
Crochet Bobble Stitch!
Crochet enthusiasts often seek new and exciting stitch patterns to add flair and texture to their projects. One such stitch that has gained popularity is the bobble stitch. Whether a beginner or an experienced crocheter, mastering the bobble stitch opens up creative possibilities for your crochet projects. In this comprehensive guide, we’ll explore the ins and outs of crocheting with bobble stitches, from understanding the basic principles to incorporating them into your patterns. Additionally, we’ll provide step-by-step instructions and resources, including video tutorials, to help you perfect this fun and versatile stitch.
You’ll find affiliate links within this post. If you decide to purchase through these links, I may earn a modest commission at no extra cost. Additionally, please review my privacy policy for more details.
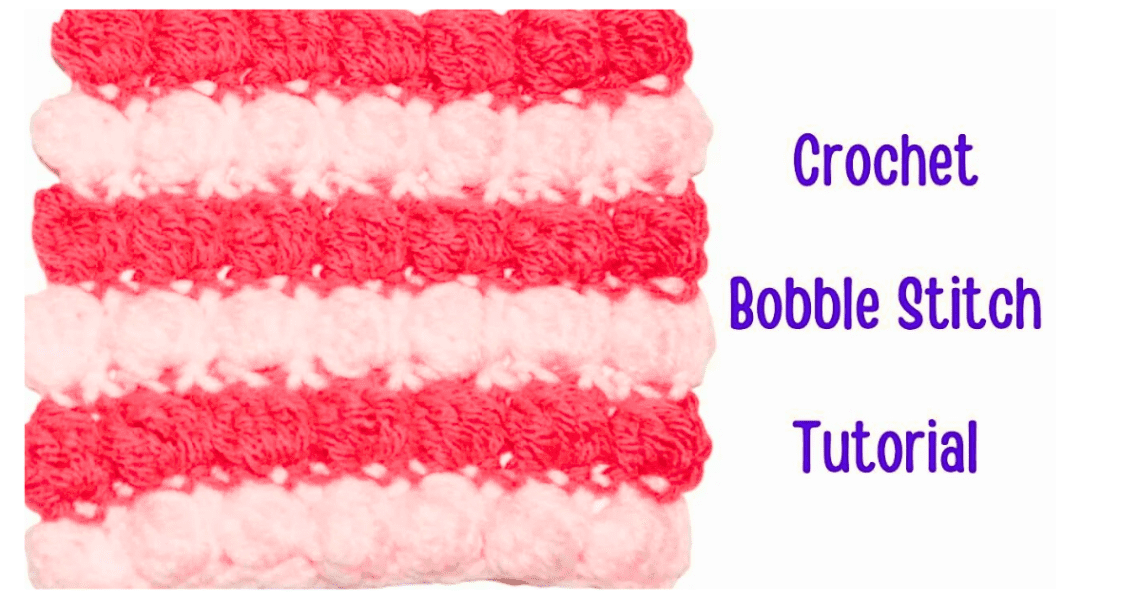
The bobble stitch is a fun crochet stitch that creates raised, textured “bobbles” or “puffs” on your fabric. It’s perfect for adding dimension and visual interest to various projects, from baby blankets to cozy afghans and everything in between. To crochet bobble stitches, you’ll typically work them on the right side of the fabric, with the wrong side rows often consisting of simpler stitches like single crochet or double crochet to create a smooth background for the bobbles.
✨ We hope you enjoyed these photos! If so, please consider sharing them on Pinterest by clicking the Pin Button on each image. Your support helps us connect with more people and spread creativity. Thank you so much! 💖
Click the Links for Your Materials
All Colors of Yarn Click Here
- Crochet hook
- Tapestry needle
- Stitch marker
Today, I’m excited to guide you through creating the captivating Bobble Stitch. I’ve used impeccable medium worsted yarn for this demonstration paired with a K hook. This stitch is ideal for blankets or washcloths; you can experiment with any yarn type. The Bobble Stitch is crafted with a five-double cluster and a single crochet. So, let’s dive in!
To kickstart your project, slip a knot onto your hook and chain. Remember, you’ll need an odd number of chains plus one extra. I’ll chain 14 stitches for this demonstration, though you can adjust based on your project’s dimensions. As you work your single crochet across each chain, maintain a steady rhythm until you reach the end.
In the next row, chain three and initiate a four-double crochet cluster within the same stitch. This cluster will form the core of our Bobble Stitch. Proceed by working your single crochet in the subsequent stitch, ensuring a smooth transition between stitches. It’s crucial to maintain consistent tension as you go.
Creating the Bobble Stitch involves a repetitive yet rewarding process. Yarn over and execute five double crochet together to sculpt the distinctive Bobble. This process entails strategically leaving loops on your hook, creating a fuller, more textured appearance. Remember, precision is vital to achieving the desired effect.
As you progress, alternate between the Bobble Stitch and single crochets, maintaining a harmonious pattern. Ensure your chains are neither tight nor loose, allowing ample space for the Bobble Stitch to bloom.
Once you’ve completed your Bobble Stitch row, continue with the same color or introduce a new hue for added flair. Chain one and seamlessly transition into single crocheting across, ensuring each Bobble Stitch receives attention.
Repeat this alternating pattern of Bobble Stitch and single crochet rows, watching your project take shape with each hook pass. Remember to maintain consistency in tension and stitch count for a polished finish.
Upon reaching your desired length, secure your yarn and weave in any loose ends for a clean, professional look. And there you have it – a stunning creation adorned with the intricate Bobble Stitch.
If you have any questions or need further clarification, please contact me. Thank you for joining me on this Bobble Stitch journey—happy crocheting! If you enjoyed this tutorial, don’t forget to subscribe for more crafting inspiration.
You’ll need to start with an odd number of stitches in your foundation chain to begin crocheting bobble stitches. Once your foundation chain is complete, you’ll work your first row of double crochet stitches, setting the stage for the bobble row. The bobble row is where the magic happens, as you create clusters of stitches that form the signature bobbles. These bobbles are typically made by working several incomplete stitches into the same stitch or space and then joining them together to create a raised, rounded effect.
A classic bobble stitch often consists of several double crochet stitches or half double crochet stitches worked together in the same stitch, with a slip stitch to join them at the top. However, there are many variations of the bobble stitch, including the popcorn stitch, puff stitch, and cluster stitches, each with a unique texture and appearance. Experimenting with stitch patterns and color changes can yield stunning results in your crochet projects.
One great way to learn how to crochet bobbles is by following along with video tutorials on platforms like YouTube. Many experienced crocheters share their expertise through step-by-step demonstrations, making it easier for beginners to master new stitches. Written crochet patterns often include detailed instructions for creating bobble stitches and helpful tips and tricks for achieving the best results.
When crocheting with bobble stitches, it is essential to keep track of the number of loops on your hook and maintain consistent tension throughout your work. Since bobble stitches can be yarn eaters, especially when using worsted weight yarn or thicker yarns, you may need to budget accordingly and have plenty of yarn on hand for larger projects.
In conclusion, crochet bobbles are a fantastic way to add texture and visual interest to your projects, whether you’re a seasoned crocheter or just starting out. By mastering the basic principles of the bobble stitch and experimenting with different stitch patterns and color changes, you can create stunning pieces that showcase your creativity and skill. Remember to keep track of your stitch count, maintain even tension, and have fun exploring the endless possibilities of this versatile stitch. Happy crocheting!
To Find All My Crochet Jewel Patterns, Click Here
Click Here for My Ravelry Patterns


