How to Crochet an Adorable Cat Tutorial
by Amy Lehman | February 1, 2024 5:08 am
How to Crochet a Cute Cat
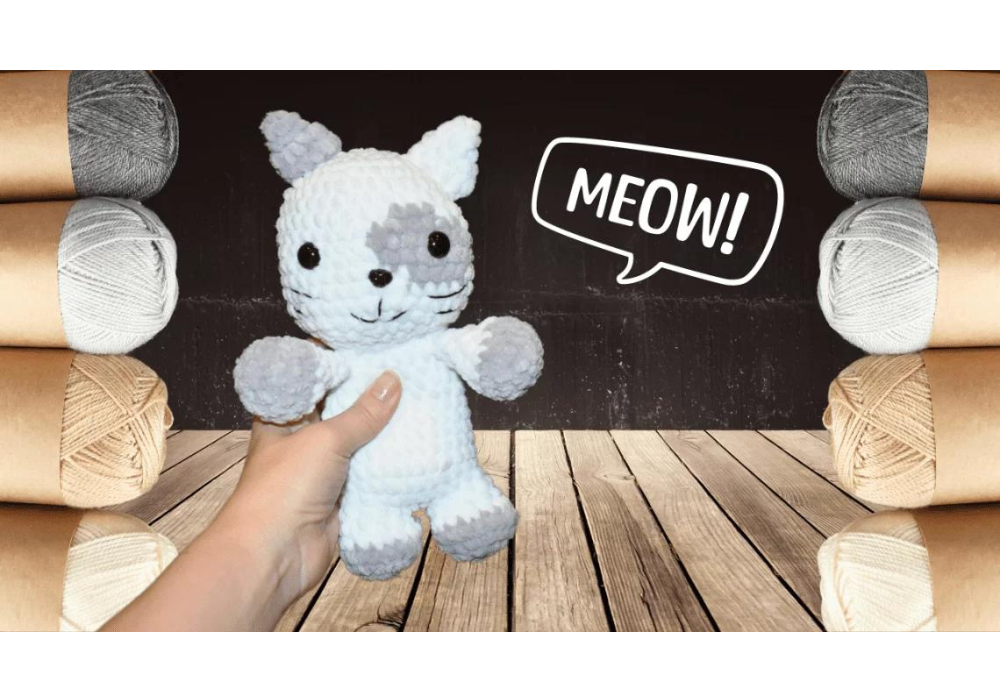
You are calling all cat lovers and crochet enthusiasts! If you’re looking for the purr-fect project, look no further. Dive into adorable feline creations with our free crochet cat pattern. Whether you’re a seasoned pro or just starting with your first amigurumi project, this easy-to-follow pattern is a great way to hone your skills and create a cute cat companion. Join the happy crocheters community and make your little cat with this free amigurumi pattern.
This post contains affiliate links. If you purchase through these links, I may earn a modest commission at no extra cost. Please review my privacy policy[1] for more details.
✨ We hope you enjoyed these photos! If so, please consider sharing them on Pinterest by clicking the Pin Button on each image. Your support helps us connect with more people and spread creativity. Thank you so much! 💖
To get started, gather your materials. For the perfect finishing touch, you’ll need a 4mm crochet hook, worsted-weight yarn in your primary color, a stitch marker, a yarn needle, and safety eyes (8mm). We recommend using acrylic yarn for durability, but feel free to get creative with different yarn weights and textures for a personalized touch.
Begin with the magic ring to create a seamless start, and follow the detailed instructions, including basic crochet stitches like single crochets and double crochets. Make sure to utilize the invisible decrease for a polished look. As you work through the continuous rounds, use the stitch marker to keep track of your progress. Don’t forget the magic circle technique for the cat’s whimsical features.
Experiment with different colors for a calico or tabby cat appearance for a unique twist. The pattern also includes instructions for kitty mods, allowing you to tailor your creation to match your favorite feline friend or family member.
**Materials You’ll Need:**
Click the Links for Your Materials
All Colors of Yarn Click Here[2]
- Crochet hook
- Tapestry needle
- Stitch marker
Yarn- Parfait Chunky or your choice of Velvet yarn[3], weight 6
Hook size- G hook, 4mm
Black Safety Eyes- 18mm
- Yarn needle
- Stitch markers
- Scissors
- Stuffing material
Abbreviations:
sc=single crochet, sl st=slip stitch
ch=chain, 2sctog= 2 single crochet together dec
This Cat Measures about 9.5 inches long.
Skills Needed: You can Find these Beginner stitches on my crochet playlist and channel
Click Here for the Beginner Stitches Playlist Videos:[4]
Click Here for the Crochet Cat Video Tutorial[5]
Legs: Grey and White yarn (start the legs, then you will work on the body from the legs) If you need more help, please refer to the cat video[6]. This entire pattern is done with a G hook.
Start with the legs first to create the body! Make 2
With grey yarn
Rnd 1: 6 sc in the Magic Circle. — 6 sc
Rnd 2: 2 sc in each stitch around — 12 sc (use stitch markers to keep track of your rounds.)
Rnd 3: sc, 2 sc increase, — 18 sc
Rnds 4: sc around — 18 sc
Sl st with white yarn; the cat video shows how to sl st if you need more help.
Rnd 5: *sc, 2sctog, *Repeat around — 12 sc
Rnds 6–7: sc around twice. Fasten off, stuff the legs — 12 sc
Second leg: **Repeat the leg the same as the first leg to round 7
At the end of round 7, ch 2 from one of the legs.
Rnd 8: Connect the first leg with sc, then sc in the next 11 sc, sc in the two chains of chain 2, sc in the next 12 sc, sc in the two chains of chain 2, — 28 sc,
Rnd 9: *sc in the next 13 sc, 2 sc in the next sc, *Repeat two times total,
— 30 sc
Rnds 10–13: sc in each stitch around. — 30 sc (4 rounds total)
Rnd 14: *sc in the next 13 sc, 2sctog decrease, *Repeat twice total — 28 sc
Rnd 15: sc in each stitch around — 28 sc
Rnd 16: *sc in the next 5 sc, 2sctog, 4 times total, stuff the body — 24 sc
Rnds 17–18: sc in each stitch around — 24 sc
Rnd 19: sc in the next two sc, 2sctog, 6 times, sl st — 18 sc
Arms:
Make 2
With Grey yarn
Rnd 1: In the Magic ring, work 6sc — 6 sc, work in continuous rounds without a sl st, and use a stitch marker.
Rnd 2: 2 sc in each stitch around — 12 sc
Rnd 3: *sc, 2 sc, *Repeat around, — 18 sc
Rnd 4: sc around — 18 sc
Sl st with white yarn.
Rnd 5: *sc, 2sctog decrease,*Repeat around — 12 sc
Rnd 6: *sc, 2sctog dec, Repeat 4 times, — 8 sc, stuff the hands, lightly stuff the arms.
Rnds 7–9: sc around for 3 rounds. Sl st at the end.
Attach the arms on both sides of the body by the head with your yarn needle.
Head: White yarn
Eyes Found on Amazon[7]
White yarn, then the patch will be done with grey yarn (optional).
2 Eyes. 13mm
Rnd 1: 7 sc in the Magic Circle. ‑ 7 sc
Rnd 2: 2 sc in each stitch around — 14 sc (use stitch markers to keep track of your rounds.)
Rnd 3: *1 sc, 2 sc in the next stitch around, *Repeat around — 21 sc
Rnd 4: *1 sc in the next two stitches, 2 sc in the next stitch around, *Repeat around — 28 sc
Rnd 5: *1 sc in the next three stitches, 2 sc in the next stitch around, *Repeat around — 35 sc
Rnds 6–7: sc in each stitch around — 35 sc
This next step creates a grey patch on the eye. If you don’t want a patch, continue with your white yarn.
Rnd 8: sc in the next 17 sc with white yarn, slip your grey yarn through the loop to continue with grey yarn (best shown in the video), sc with grey yarn in the next 3 sc, then slip your white yarn with white yarn to sc in the next 15 sc — 35 sc
Rnd 9: sc with white yarn in the next 16, sc in the next 6 sc with grey yarn, sc with white yarn in the next 13 sc — 35 sc
Rnd 10: sc with white yarn in the next 16, sc in the next 10 sc with grey yarn, sc with white yarn in the next 9 sc — 35 sc
Rnd 11: sc with white yarn in the next 17, sc in the next 7 sc with grey yarn, sc with white yarn in the next 11 sc — 35 sc
Rnd 12: sc with white yarn in the next 19, sc in the next 4 sc with grey yarn, sc with white yarn in the next 12 sc — 35 sc
Rnd 13: sc in each stitch around ( add eyes around rounds 11, about 3 inches apart) — 35 sc
Rnd 14: *sc in the next three stitches, 2sctog decrease, *Repeat around it. — 28 sc
Rnd 15: *sc in the two next stitches, 2sctog decrease, *Repeat around — 21 sc
Rnd 16: *sc, 2sctog, *Repeat around ‑14 sc
Stuff the head with stuffing; there will be an opening so it won’t be closed all the way.
Fasten off. You will connect the head to the body with white yarn and yarn needle. Connect the loops of the head to the loops of the body and sew them together.
Ears: Make 2, White yarn
Make one grey and one white ear, I liked to sew the grey ear on the opposite side ot the grey patch.
Rnd 1: In Magic Ring, work 4 sc, sl st (make the stitches loose so you can get back into them with the rnd 2.)
Rnd 2: 2 sc around, — 8 sc
Rnd 3: *sc, 2 sc around *Repeat around — 12 sc
Rnd 4: *sc in each sc around, Fasten off, sew the ears on top of the head, on both sides about 2 inches apart.
Tail: Grey yarn
Rnd 1: In Magic Ring, work 5 sc, sl st
Rnd 2: 2 sc around, — 10 sc
Rnds 3–7: sc in each stitch around, 5 rounds total. Fasten off. Sew on the tail in the center bottom of the body.
Nose: I did buy mine on Amazon, or you can make one.
Take Pink Size 4 yarn, sew on a triangle nose with your yarn needle, and dash lines for the mouth. Make a line below the nose and two side lines for a smiley face.
Whiskers: Take a yarn needle with Size 4 black yarn, and make 2 dash lines on both sides of the nose for Whiskers.
Final: Make sure to weave in your loose ends.
Congratulations, you finished the Crochet Kitty Cat Pattern!
Watch our video tutorial for additional guidance, especially if you’re a beginner crocheter. The video breaks down each step, making it easy to follow along. Plus, we’ve added some helpful tips and tricks for quick projects and color changes.
Once you’ve completed the last stitch, whip stitch the ears and attach the safety nose for that extra touch of charm. Insert a pipe cleaner into the tail to make it possible, turning your finished cat into a delightful cat toy or a quirky addition to your home decor.
This free crochet cat pattern is an easy pattern for all skill levels and a great pattern for creating cute animal crochet patterns. Share your finished cat on our Facebook page or other social media platforms – we love seeing the unique twists our community adds to their creations! Whether it’s a special gift for a cat-loving friend or a personal use project, these free cat crochet patterns are a fantastic way to use up leftover yarn and create lasting memories. Happy crocheting!
To Find All My Crochet Jewel Patterns, Click Here

Click Here for My Ravelry Patterns


Crochet Hats for Beginners Book For Sale — Click Here

Crochet For Beginners Book for Sale — Click Here
- privacy policy: https://amysdiyfrugallife.com/privacy-policy/
- All Colors of Yarn Click Here: https://amzn.to/3C32rNX
- Parfait Chunky or your choice of Velvet yarn: https://amzn.to/3Yu6nyQ
- Beginner Stitches Playlist Videos:: https://www.youtube.com/playlist?list=PLDU4IrQAuYqrUtVH0UWJUUdqljBIUV4ZD
- Click Here for the Crochet Cat Video Tutorial: https://youtu.be/pAetfiM9P0w
- cat video: https://youtu.be/pAetfiM9P0w
- Eyes Found on Amazon: https://amzn.to/45OUiXv
- [Image]: https://www.ravelry.com/people/amray767
- [Image]: https://www.awin1.com/cread.php?awinmid=6220&awinaffid=470125&platform=dl&ued=https%3A%2F%2Fwww.etsy.com%2Fshop%2FAmyCreativeCreations%3Fref%3Dseller-platform-mcnav
- [Image]: https://amzn.to/2ILFrGN
- [Image]: https://amzn.to/2HVIis6
Source URL: https://amysdiyfrugallife.com/how-to-crochet-a-cat-tutorial-a-step-by-step-guide-to-making-your-own-adorable-feline-friend/


