Crafting a Crochet Dreamcatcher: A Step-by-Step Guide
by Amy Lehman | October 20, 2023 3:41 am
How to Crochet a Dreamcatcher
Dreamcatchers are traditionally known for their mystic properties, which are said to filter out bad dreams while allowing the good ones to pass through. We’ll explore creating your crochet dreamcatcher using various techniques, such as single, double, and more. This easy crochet project is perfect for experienced enthusiasts and inexperienced crocheters looking for a fun and thoughtful gift idea. We’ll even provide step-by-step tutorials and free crochet patterns to guide you on your dreamcatcher journey.
You’ll find affiliate links within this post. If you decide to purchase through these links, I may earn a modest commission at no extra cost. Additionally, please review my privacy policy[1] for more details.
Dreamcatchers have their roots in Native American culture, where they were believed to be special decorative items that warded off bad dreams. They were traditionally made using a metal ring, intricate patterns, and a web design that resembled a spider’s web. Crochet dreamcatchers beautifully capture the essence of these traditional designs with a chic crochet twist. You’ll need an embroidery hoop or a hula hoop as your base to start your project.
✨ We hope you enjoyed these photos! If so, please consider sharing them on Pinterest by clicking the Pin Button on each image. Your support helps us connect with more people and spread creativity. Thank you so much! 💖
*Basic Crochet Stitches:*
For those new to crochet, fret not. This is an easy crochet project to hone your crochet skills. You’ll begin with simple stitches like single crochet (sc), double crochet (dc), and slip stitch (sl st). The magic ring technique is often used to create the central circle of the dreamcatcher, from which the rest of your crochet work will flow.
*Choosing Yarn and Colors:*
You have the freedom to choose from different colors of yarn to match your home decor or the recipient’s preferences. The white yarn is a popular choice for a classic look, but red heart classic crochet thread, cotton yarn, or even a mix of vibrant colors can add a unique and cheerful touch.
*The Crochet Process:*
As you crochet your dreamcatcher, follow a free pattern or video tutorial for complete instructions. You’ll work in rounds, creating the look of a dreamcatcher’s web in the center and attaching it to the metal or embroidery hoop. Use chains (ch) to create spaces (ch‑1 sp) for the web to form. For a more intricate touch, consider using doily dreamcatcher patterns that add a touch of elegance to your project.
In this crochet dreamcatcher tutorial, you’ll learn how to make a beautiful, crocheted dreamcatcher in just a few easy steps.
This Dreamcatcher tutorial is a must-watch for learning how to crochet. After watching this tutorial, you’ll have everything you need to start crocheting dreamcatchers of your own! You’ll be able to follow the step-by-step instructions easily and have a beautiful, crocheted dreamcatcher in no time!
Please provide a link to my blog if you want to share my content. However, I kindly request that you refrain from copying and posting my patterns on your website. You are welcome to sell any items you create using my patterns, but please refrain from selling the patterns themselves, as they are offered for free. Thank you for your understanding and support!
Click the Links for Your Materials
All Colors of Yarn Click Here[2]
Orange Medium Worsted Yarn
- Crochet hook
- Tapestry needle
- Stitch marker
Abbreviations:
sc=single crochet
dc=double crochet
Rnd 6: sl st wtih White yarn, when you sc in the chain 2 space and dc, wrap your yarn around the metal ring to attach your sc around the metal ring too, *work 2 sc in the chain 2 space and sc around the metal ring for each dc, sc in the next 4 dc and the metal ring, *Repeat around, sl st in the sc. Fasten off and Weave in the ends.
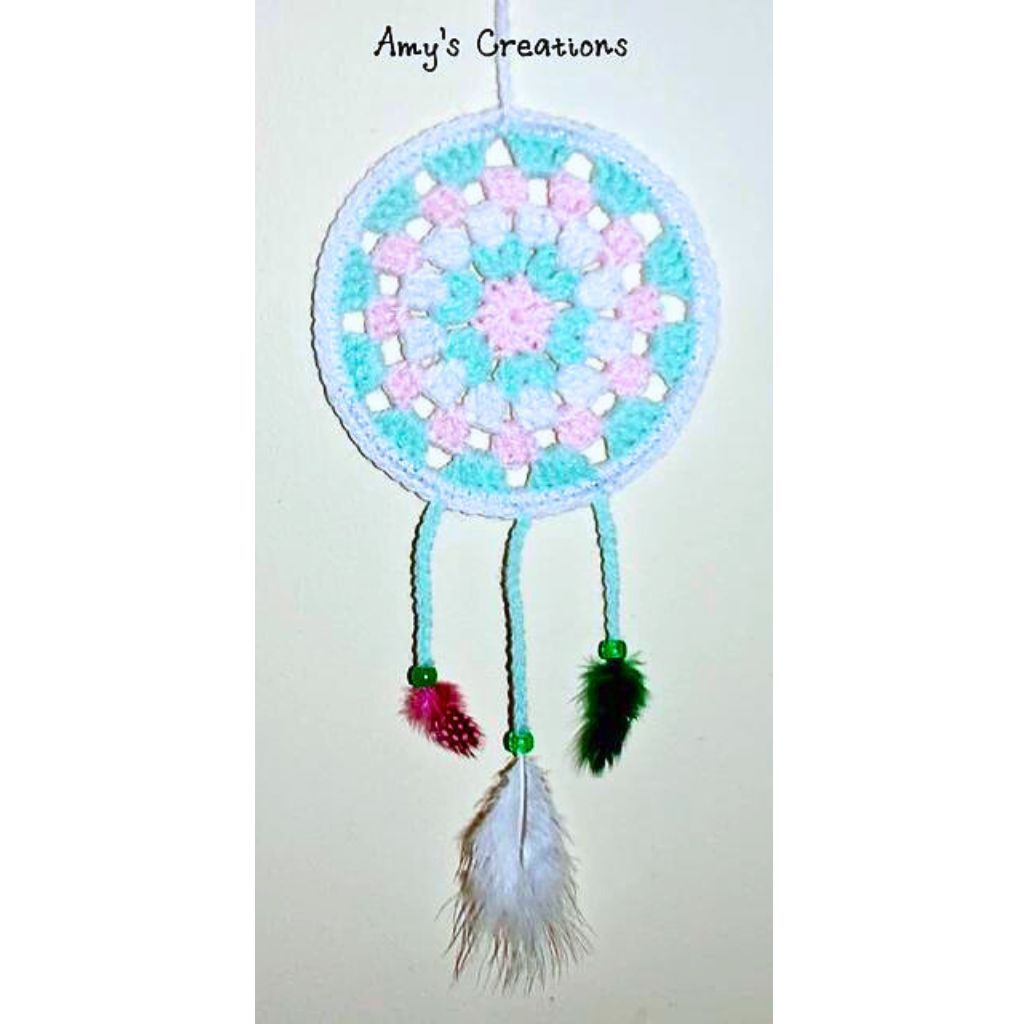
Feather hangers: Directly below on the opposite side. sl st into the sc, and chain 18, slip on the bead and tie a feather on the end and hot glue the bead and feather.
Sl st with green yarn to the left of the chain 18, in the next 5 sc, and chain 14, slip on the bead and tie a feather on the end and hot glue the bead and feather. Weave in the ends with your yarn needle.
Print the Entry on the top of the page to print the pattern!
Click Here for Crochet Poncho Patterns[4]

Click Here for a Crochet Bow Tutorial
*Finishing Touches:*
Once you’ve finished crocheting the web, it’s time to embellish your dreamcatcher. Add yarn tassels, beads, or feathers to the bottom for a unique final product. The long adjustable string will allow you to hang your dreamcatcher in the perfect spot.
Crocheting your dreamcatcher is a fun and creative project, and the finished product makes for a very thoughtful gift. Whether you’re an experienced crochet enthusiast or a beginner, the step-by-step tutorials and free crochet patterns make it accessible to all. This special decorative item adds a touch of whimsy to your living room and carries the mystic properties associated with traditional Native American dreamcatchers. So, channel your inner creativity, choose your color palette, and let your crochet skills take you on a journey to create beautiful dreams and filter out the bad ones with your very own crochet dreamcatcher. Sweet dreams, and good luck with your crochet adventure!
To Find All My Crochet Jewel Patterns, Click Here

Click Here for My Ravelry Patterns


Crochet Hats for Beginners Book For Sale — Click Here

Crochet For Beginners Book for Sale — Click Here
- privacy policy: https://amysdiyfrugallife.com/privacy-policy/
- All Colors of Yarn Click Here: https://amzn.to/3C32rNX
- Wire Ring:: https://amzn.to/4fhhp1w
- Click Here for Crochet Poncho Patterns: https://amysdiyfrugallife.com/poncho-shawls/
- [Image]: https://amysdiyfrugallife.com/crochet-a-simple-bow-tutorial-for-beginners-step-by-step-instructions/
- [Image]: https://www.ravelry.com/people/amray767
- [Image]: https://www.awin1.com/cread.php?awinmid=6220&awinaffid=470125&platform=dl&ued=https%3A%2F%2Fwww.etsy.com%2Fshop%2FAmyCreativeCreations%3Fref%3Dseller-platform-mcnav
- [Image]: https://amzn.to/2ILFrGN
- [Image]: https://amzn.to/2HVIis6
Source URL: https://amysdiyfrugallife.com/how-to-crochet-a-dreamcatcher-pattern-tutorial/

