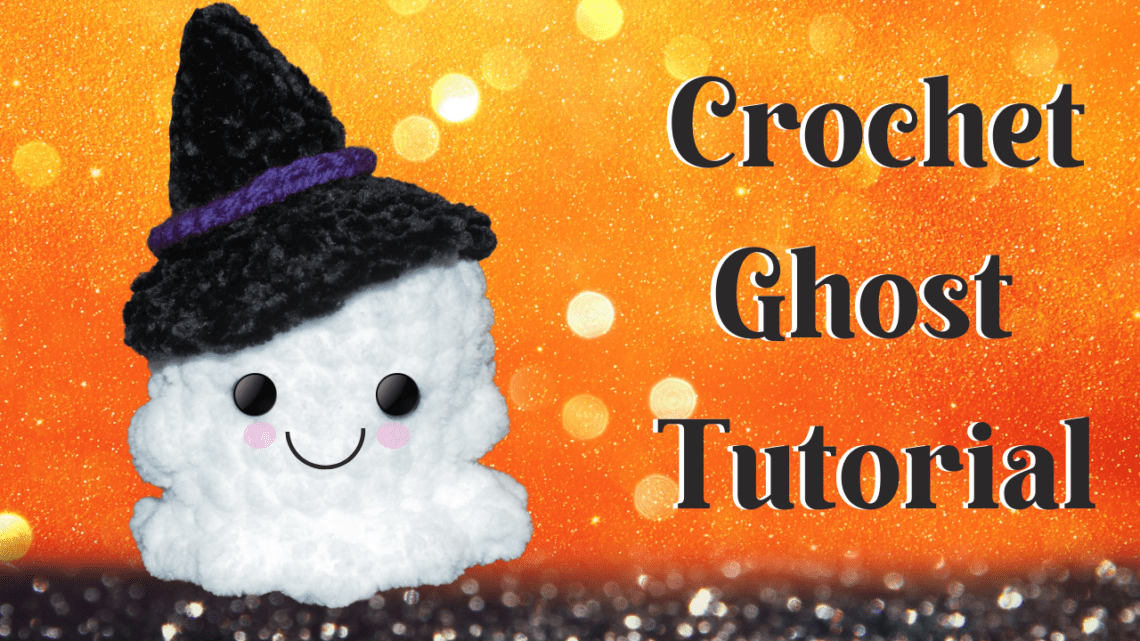
How to Crochet a Ghost: A Spooky DIY Guide

Crochet Ghost Plushie
Get ready to embrace the spooky season with a cute little crochet ghost, perfect for your Halloween decorations! This free crochet pattern will guide you through creating an amigurumi ghost that is both adorable and easy to make. Whether you’re a beginner or an experienced crocheter, you’ll find this pattern simple to follow, using basic stitches like single crochet and double crochet. With a few materials, including bulky yarn, a crochet hook size of your choice, and some mm safety eyes, you’ll have your very own friendly ghost ready to haunt your home.
This post contains affiliate links. If you purchase through these links, I may earn a modest commission at no extra cost. Please review my privacy policy for more details.
To start your ghost, you’ll use a magic ring, a common technique in amigurumi patterns that allows you to begin with a tight, closed loop. After creating the magic ring, you’ll work in rounds, using single crochet stitches and increasing in the back loop of some stitches to shape the ghost’s body. For a neat finish, be sure to use a stitch marker to keep track of your rounds. As you continue, you’ll add details like the ghost’s arms, starting with the first arm and working to the second arm. Don’t forget to insert safety eyes before finishing the head to give your ghost its personality.
✨ We hope you enjoyed these photos! If so, please consider sharing them on Pinterest by clicking the Pin Button on each image. Your support helps us connect with more people and spread creativity. Thank you so much! 💖
Click the Links for Your Materials
- White Yarn
- Black yarn
- Safety eyes
- Crochet hook
- Tapestry needle
- Stitch marker
- Polyfill stuffing

Abbreviations:
ch=chain
sc=single crochet
dc=double crochet
sl st=slip stitch
2sctog= 2 single crochet together decrease
Supplies:
Click the Links for Your Materials
I used Size 6 White Chunky Yarn and Velvet Black Yarn
G hook, Yarn needle, eyes
To create a crochet ghost plushie, you’ll follow a basic amigurumi pattern with simple stitches and techniques. Here’s a brief outline of the steps:
Materials:
White yarn (Worsted weight or chunky for a larger plushie)
Safety eyes (6mm or 8mm, depending on the size of your plushie)
Stuffing (Polyester fiberfill)
-Tapestry needle
Rnd 1: In the Magic Circle, work 6 sc, sl st (use a stitch marker to keep track of your rounds)
Rnd 2: 2 sc in each stitch around, work in continual rounds — 12 sc
Rnd 3: *sc, 2 sc, *Repeat around, — 18 sc
Rnd 4: *sc in the next two stitches, 2 sc, *Repeat around, — 24 sc
Rnds 5–7: *sc in each sc around, *Repeat for 3 times total
Eyes: insert your eyes about inch apart, the row above the arms.
Rnd 8: Bobble Stitch for the arm, *yarn over, insert your hook, yarn over and draw up your loop, *Repeat 4 more times, yarn over and pull through. sc in the next 8 sc, create a bobble stitch for the next arm, sc around to the stitch marker.
Rnds 9–10: sc in each stitch around twice, then sl st
Rnd 11: In the back loop, sc in each stitch around, sl st
Rnd 12: *sc in the next two stitches, 2 sctog decrease, *Repeat around, sl st
Rnd 13: *sc, 2sctog decrease, *Repeat around
Rnd 14: *2sctog decrease, *Repeat around, sl st, Fasten off
Go Back to the Rnd 11, sl st into the back loop, *sc, hdc, sc in one stitch, sl st into the next stitch, *Repeat around, sl st Fasten off. Weave in your ends.
Optional: Witch Hat
Black Velvet Yarn, G hook
Rnd 1: Work 6 sc in the Magic Circle, sl st ‑6sc
Rnd 2: *sc in the next 2 sc, 2sc, *Repeat around, work in continual rounds no sl st ‑8 sc
Rnd 3: *sc in each sc around, *Repeat around, ‑8 sc
Rnd 4: *sc in the next 3 sc, 2sc, *Repeat around, ‑10 sc
Rnd 5: *sc in each sc around, *Repeat around, ‑10 sc
Rnd 6: *sc in the next 4 sc, 2sc, *Repeat around, ‑12 sc
Rnd 7: *sc in each sc around, *Repeat around, ‑12 sc
Rnd 8: *sc in the next 5 sc, 2sc, *Repeat around, ‑14 sc
Rnd 9: *sc in each sc around, *Repeat around, sl st ‑14 sc
Rnd 10: In the Back Loop, *sc in the next 3 sc, 2sc, *Repeat around, sl st
Rnd 11: *sc in the next 2 sc, 2sc, *Repeat around
Rnd 12: *sc, 2sc, *Repeat around, sl st Fasten off
Add a purple accent around the hat, with a F hook, ch 25, sl st. place it around the base of the hat. Sew it in or hot glue gun it around the base. You can hot glue gun the hat to the ghost or sew it on. My daughter liked to take it off and on so we didn’t attach it.
This plushie can be customized by adjusting the size, adding accessories, or changing yarn colors. It’s a fun and quick project, perfect for Halloween or as a cute gift.
As you progress, you’ll find instructions to create the ghost’s cute face and a witch hat to add a festive touch. This pattern also offers tips on how to finish stuffing your ghost, thread the yarn tail, and make an invisible join for a seamless look. For those who prefer thicker yarn or a bigger ghost, you can easily adjust the pattern by using chunky yarn weight and a larger hook size. The ghost can be personalized with different yarn colors, and for a polished finish, consider using blanket yarn for a soft, plush feel.

Click Here for More Crochet Amigurmi Patterns
This free crochet ghost pattern is perfect for creating your own spooky yet cute little ghost just in time for Halloween. With clear instructions and basic stitches, this project is suitable for all experience levels. If you prefer a more detailed guide, there’s a full video tutorial available, along with an ad-free PDF version of the pattern at an additional cost. Once finished, your little fella will make a delightful addition to your Halloween decor, or a thoughtful handmade gift. Share your finished product on social media and join a Facebook group or Ravelry store to connect with other crochet enthusiasts. Don’t forget to check out the pattern designer’s other free patterns, like the free bat crochet pattern, to expand your collection of spooky season decorations!
To Find All My Crochet Jewel Patterns, Click Here

Click Here for My Ravelry Patterns


Crochet Hats for Beginners Book For Sale — Click Here

Crochet For Beginners Book for Sale — Click Here
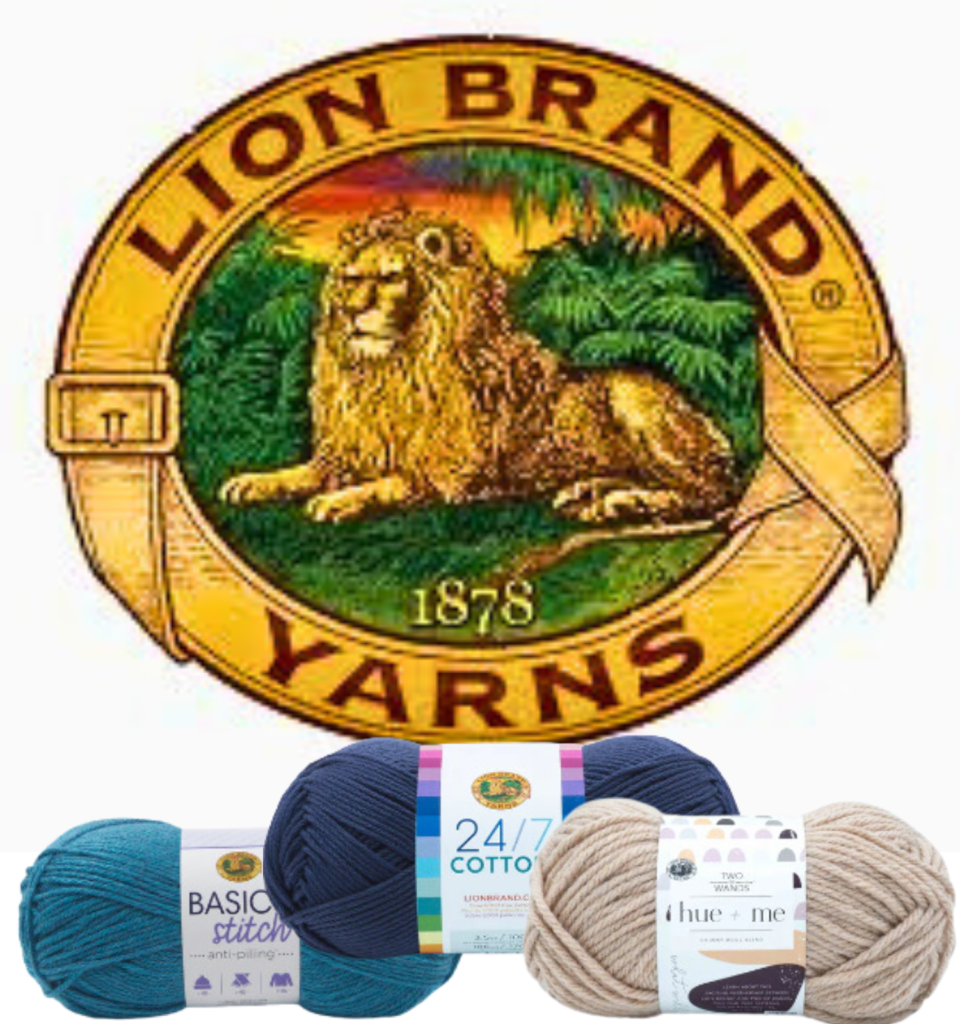
Click Here fo Lion Brand Yarn and Free Patterns

I’m using Rakuten to get Cash Back at my favorite stores. Hate for you to miss out, so join now with my invite and you’ll get $30 after you spend $30.* Click Here for Cash Back


5 Comments
Debra Sundhausen
I have a question about this pattern.
How to Crochet a Ghost: A Spooky DIY Guide
I want to make some to give away, they are so cute. I read the patterns before I start to work on them and I can’t find row 9 of the ghost. Am I just missing it?
Amy Lehman
it was a typo on the numbers, fixed now
Debra Sundhausen
Thank you, I finished one. It is a very cute ghost and a great pattern.
Debra Sundhausen
Thank you , I already finished one. It is a very cute pattern that is easy to follow.
Amy Lehman
Yay! Glad you liked it!