Create Adorable Mouse Hats with Our Crochet Tutorial
by Amy Lehman | October 28, 2023 3:45 am
How to Crochet a Mouse Hat!
Crochet hats are an excellent way to stay warm during winter while showcasing creativity. In this free crochet hat pattern, we will guide you through creating an adorable mouse hat that is perfect for all ages. Whether you’re a beginner crocheter or an experienced one, this easy project will be a great addition to your collection of crocheted beanies. It is a fantastic gift and can be customized with different color options and yarn weights. So, grab your crochet hook and embark on a fun and cozy journey in the crochet world. Happy crocheting!
You’ll find affiliate links within this post. If you decide to purchase through these links, I may earn a modest commission at no extra cost. Additionally, please review my privacy policy[1] for more details.
Body:
**Materials You’ll Need:**
- Worsted weight yarn in your favorite colors
- Bulky weight yarn for the faux fur pom pom
- 5 mm (size J) crochet hook
- Yarn needle
- Stitch marker
- Tapestry needle
- Scissors
**Skill Level:**
This easy crochet hat pattern suits new crocheters and experienced crafters alike. The basic crochet stitches used in this pattern include single crochet, slip stitch, half double crochet, and double crochet.
**Size Guide:**
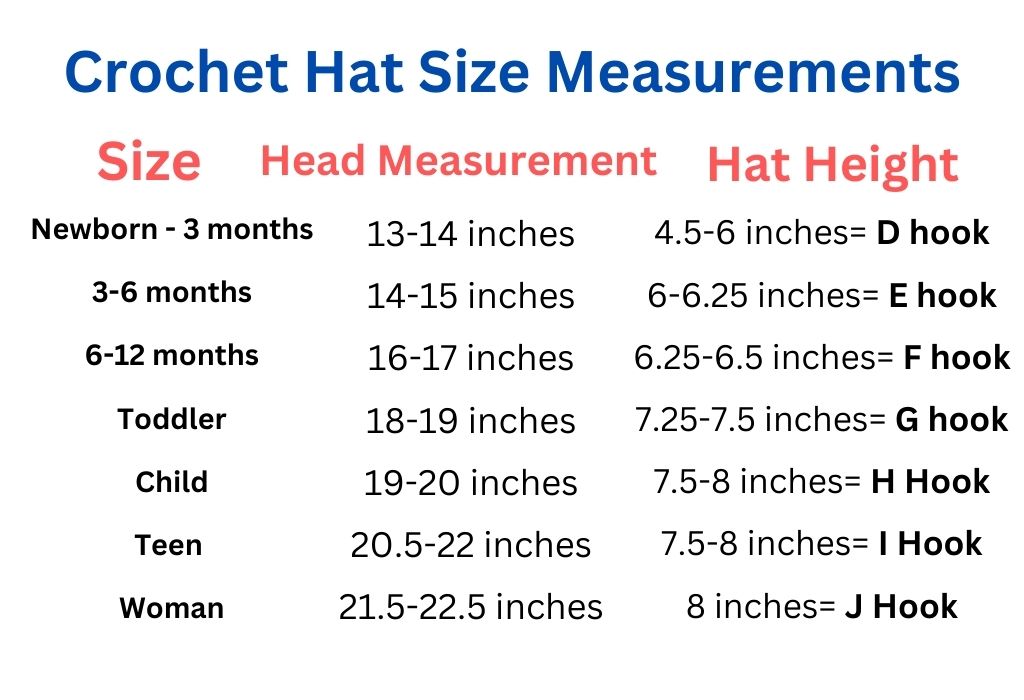
Before starting, it’s a good idea to check the crochet hat size chart to ensure the perfect fit for the recipient. You can easily adjust the pattern to fit any head size, from adult medium to children’s sizes.
**Pattern Instructions:**
**Foundation Chain:** Start with a long tail and create a foundation chain that matches the head size you’re crocheting for.
**Hat Height:** Continue crocheting in the back loop for the entire hat to create a ribbed texture. Repeat the single crochet in the back loop for the desired hat height.
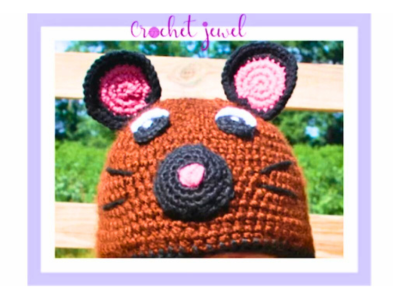
Create this fun crochet mouse-inspired hat to make your child look like a mouse. This crochet animal hat is made with caron soft medium worsted yarn. My daughter enjoyed wearing this crochet hat daily!
child 3–10 yrs, head cir., 19″-20 1/2 ““, hat length= 7.5”=H hook

Materials:
Brown, Black, White, and Pink Yarn
Instructions: H hook
With Black yarn for the Edge, sc around once, Fasten off.
Mouth/muzzle: G hook, Black Yarn
rnd 1. chain 3, join with sl st. to create a ring
rnd 2. 10 sc into the ring, sl st. join ‑10sc
rnd 3. *2sc in the next stitches, *Repeat to finish around ‑20sc
rnd 4. *1 sc in the next st, 2sc in the next st, *Repeat, sl st. ‑30sc
rnd 5. 1 sc in the next 2 stitches, 2sc in the next st, *Repeat, sl st. ‑40sc
Take Pink yarn and sew in a nose in the center of the circle over and over until it looks like a nose, then put cotton balls in the center when you sew it on to make it look 3 dimensional. Place in the center of the hat
Whiskers: Black yarn 2 pieces of 2 inches of yarn on each side, sew them on.
Eyes: Make 2, G Hook, black yarn
rnd 1. chain 2, sc 5 times from 2nd chain from the hook
rnd 2. 2sc in each chain, sl st. join (10 st.) top part of the eye, single crochet 8 sc with white, and sew white yarn into the center of the eye a couple of times to make the center of the eye with white yarn.
Ears: Make 2 Ears, G Hook, Pink and Black Yarn
Start with Pink yarn
rnd 1. chain 3, join with sl st. to create a ring
rnd 2. 10 sc into the ring, sl st. join ‑10sc
rnd 3. *2sc in the next st, *Repeat to finish round ‑20sc
rnd 4. *1 sc in the next st, 2sc in the next st, *Repeat, sl st. ‑30sc
rnd 5. Change to black yarn, *1 sc in the next 2 stitches, 2sc in the next st, *Repeat, sl st. ‑40sc
Weave in all the ends and cut your yarn. At the end, place the mouth in the center of the hat, place the whiskers on the side of the mouth about 1 inch away, place the eyes above the mouth, and place the ears on top of the hat on each side, about 2 inches apart.
Print the Entry on the top of the page to print the pattern!
Click Here for More Crochet Hat Patterns

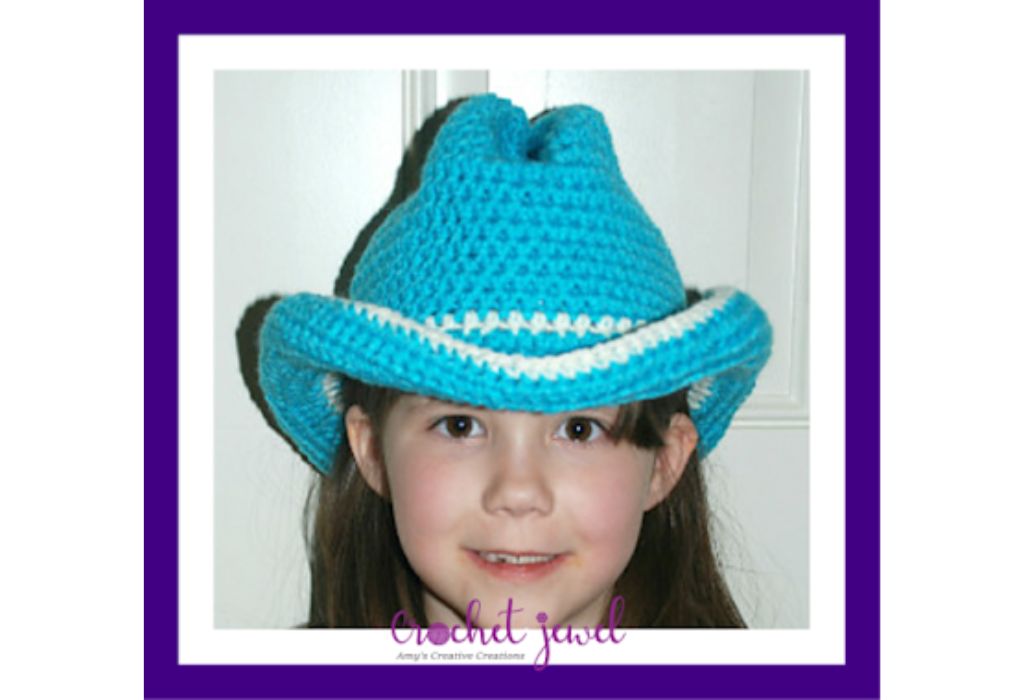
Click Here for a Crochet Cowboy Hat Pattern
**Decrease Rounds:** To shape the top of the hat, you’ll start decreasing the number of stitches. Follow the pattern instructions for the decreased rounds.
**Mouse Ears:** Create two mouse ears by following the pattern instructions. These will be attached to the top of the hat.
**Pom Pom:** Make a faux fur pom pom using bulky weight yarn. Please attach it to the top of the hat.
**Finishing:** Weave in any yarn tails, and your crocheted mouse hat is ready to keep you cozy during the cold weather.
Crocheting a mouse hat is a delightful and easy project that allows you to explore different yarn weights, colors, and patterns. This free crochet hat pattern is a perfect fit for beginners and experienced crocheters, and it’s an excellent way to create unique and personalized gifts for your loved ones. So, gather your materials, check out the video tutorial in our Facebook group, and enjoy making this cute and cozy hat. With the satisfaction of a finished hat and a new addition to your crocheted projects, you’ll be thrilled to have added this pattern to your collection. Don’t forget to share your creations on social media, and if you use any affiliate links, please review our privacy policy. Happy crocheting!
To Find All My Crochet Jewel Patterns, Click Here

Click Here for My Ravelry Patterns

- privacy policy: https://amysdiyfrugallife.com/privacy-policy/
- How to Crochet For Beginners Playlist — Click Here: https://www.youtube.com/playlist?list=PLDU4IrQAuYqrUtVH0UWJUUdqljBIUV4ZD
- [Image]: https://amysdiyfrugallife.com/how-to-crochet-cowboy-or-cowgirl-hat-pattern/
- [Image]: https://www.ravelry.com/people/amray767
- [Image]: https://www.etsy.com/shop/AmyCreativeCreations?ref=seller-platform-mcnav
Source URL: https://amysdiyfrugallife.com/how-to-crochet-a-mouse-hat-pattern/

