Cozy Crochet Plaid Hat: Stylish Winter Accessory
by Amy Lehman | October 23, 2023 6:12 am
How to Crochet a Plaid Hat
Crochet hats are a fantastic way to embrace the winter season in style. In this tutorial, we’ll show you how to create an easy crochet hat pattern with a plaid design that is perfect for keeping warm and looking fashionable during the colder months. Whether you’re a beginner crocheter or an experienced crafter, this free crochet pattern offers a great project to work on. We’ll guide you through using basic crochet stitches like single crochet and double crochet, as well as essential techniques such as the back loop, slip stitch, and more. You can customize your hat with various yarn weights and styles to create the perfect fit for any head size. Plus, we’ve included a video tutorial to make the process even more accessible, and we’ll discuss different yarn weights and hook sizes to help you choose the best materials for your project. Get ready for some “happy crocheting” and learn how to crochet a plaid hat that’s cozy and makes for a fantastic gift.
You’ll find affiliate links within this post. If you decide to purchase through these links, I may earn a modest commission at no extra cost. Additionally, please review my privacy policy[1] for more details.
To begin your crochet adventure, the foundation chain sets the stage for your hat. We’ll explore the first stitch and repeat rows to ensure your project progresses smoothly. As you work on the hat’s body, don’t forget to use a stitch marker to keep track of your progress and switch colors for a plaid effect if desired.
✨ We hope you enjoyed these photos! If so, please consider sharing them on Pinterest by clicking the Pin Button on each image. Your support helps us connect with more people and spread creativity. Thank you so much! 💖
The choice of yarn is essential for achieving the desired look and feel. Depending on your preference, you can use worsted, bulky, super bulky, or even aran-weight yarn. Each brings its unique texture and warmth to the project.
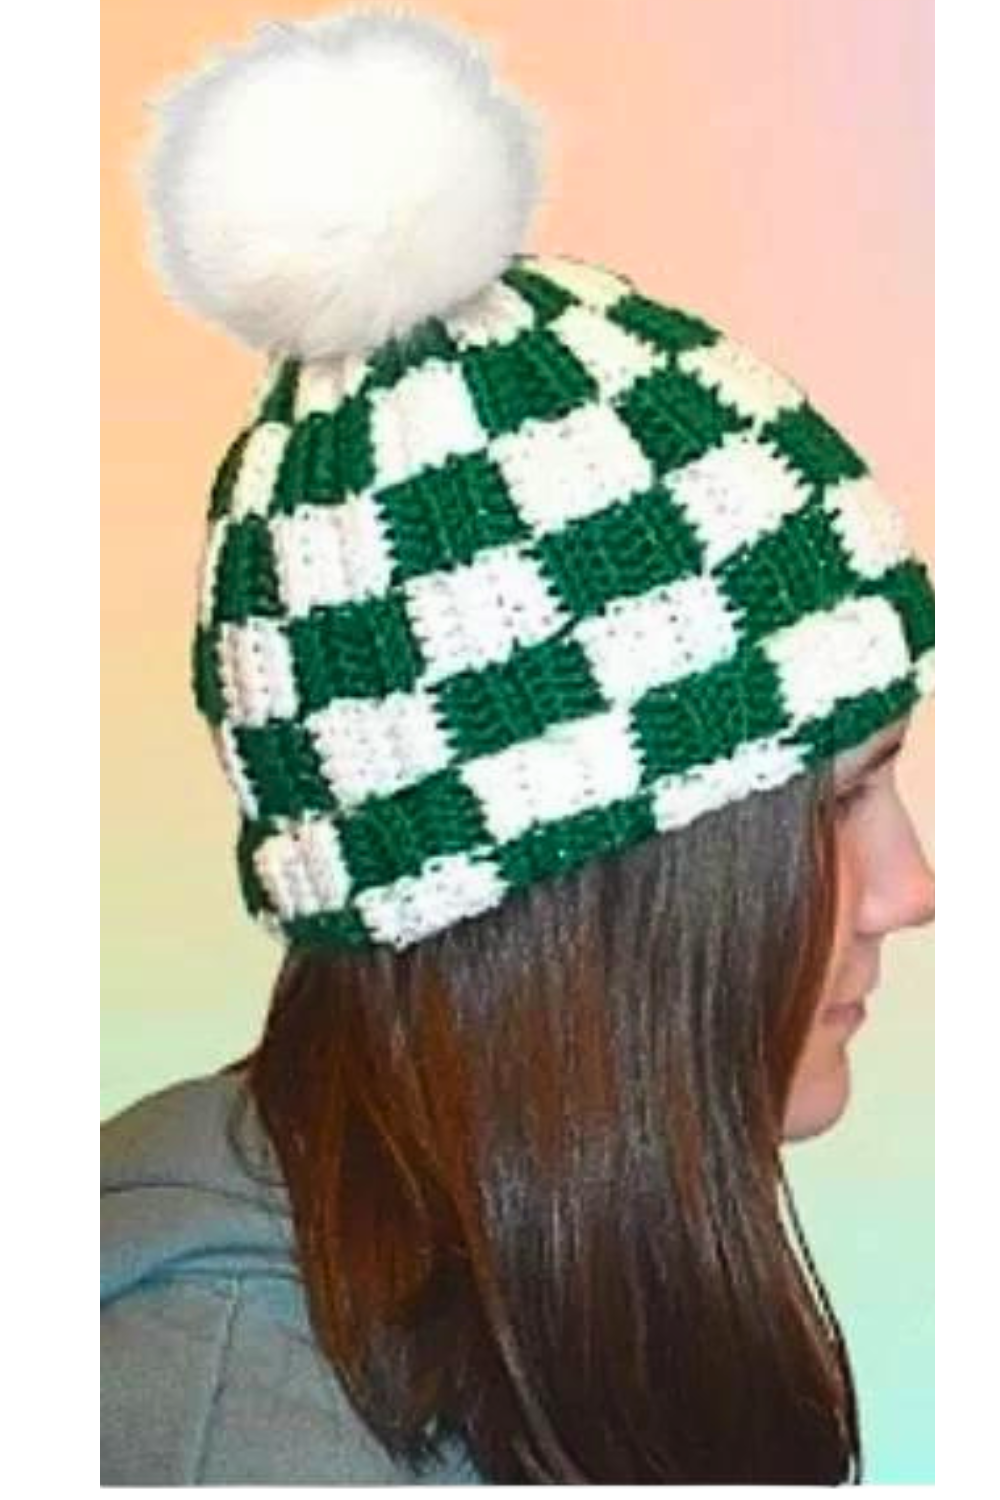
This crochet checkered hat was made with medium worsted yarn and an H hook. An H hook will make it tighter, which is best. You can make it bigger by adding more rows. This crochet hat is done in multiples of 5 plus 1. This easy crochet beanie for beginners turned out so cute! In this crochet plaid hat tutorial, we’ll show you how to make a crochet plaid hat for beginners! This hat has three different plaid designs, so it’s perfect for anyone who wants to try a new crochet pattern! If you’re new to crochet or want a fun project to work on, this crochet plaid hat is perfect! We’ll show you how to crochet the hat using basic and advanced techniques, and then we’ll show you how to add the finishing touches. So grab a yarn needle and a set of crochet hooks, and let’s start on this fun hat!
Click the Links for Your Materials
All Colors of Yarn Click Here[2]
- Crochet hook
- Tapestry needle
- Stitch marker
Abbreviations:
sc=single crochet
sl st=slip stitch
ch=chain
dc=double crochet
hdc=half double crochet
Row 1: start with white yarn and H hook, I did chain count of 46 which is done in multiples of 5 plus 1.
In the 2nd chain from the hook, work a hdc, hdc in the next 3 chains, *on the next hdc, yarn over, insert your hook in the chain, yarn over and draw up your three loops, but don’t pull through your three loops with the white yarn to complete the hdc, but instead pull through with your opposite color of yarn, I used green yarn, then pull through with the green yarn (best shown in the video) to complete the hdc to change colors.
Make sure to run your white yarn along side, hdc in the next 4 chains, *Repeat, work the next hdc, but color change with white yarn, explained above.
**Repeat the next 5 hdc each way for each color.
Rows 2–3. *Repeat the next two rows the same way as Row 1. Start with a Ch 1, Then start with white yarn again, work 5 hdc in the back loops, but when you get to the 5th hdc, make sure to switch to the color of yarn to green, and complete the 5th hdc in the new color of yarn.
Then work the next square with the new color, alternating between the two colors for each square. Complete three rows of same color, then switch to the next three rows with a different color of yarn.
Rows 4–6: You will color change this time, so you will slip in your other color of yarn, which will be green yarn to start. So you had three rows of white in the first square, and you will need three rows of green, work 5 hdc in the back loops, but when you get to the 5th hdc, make sure to switch color of yarn to white, and complete the 5th hdc in the new color of yarn, make sure to run your other non working yarn along side.
Then work the next square with the new color, alternating between the two colors for each square.
***Repeat between Rows 4–6, but after three rows of the same color, change your color to the opposite color. I did 42 rows, if its too tight, continue onto for a few more rows.
Fasten off and weave in your ends. Fold in half and sew the ends together. Then take your yarn and yarn needle and weave the needle in and out on the top, then cinch it closed.
I added a pom on top by sewing it on. I found the poms on Amazon. I hope you enjoyed this easy crochet beanie for beginners!
Print the Entry on the top of the page to print the pattern!
You’ll also want to consider your crochet hook size, typically recommended in millimeters (mm). We’ll discuss which size to use for the specific yarn you’ve chosen to achieve the perfect crochet hat pattern. Furthermore, we’ll delve into the importance of gauge swatches to ensure your hat fits just right.
As you reach the top of the hat, you’ll learn how to systematically decrease the number of stitches. Techniques like half-double crochet and slip stitches are crucial in shaping the hat to achieve the desired height and style.
The finishing touches are equally crucial in crafting the perfect crochet hat. Depending on your preference, you can add a yarn or faux fur pom-pom. Additionally, we’ll discuss how to weave in the yarn tail and create a clean, polished look for your hat.
In conclusion, crochet hats are a practical solution for cold weather and a creative and fun project for crafters of all levels. With the knowledge gained from this tutorial, you can confidently create a beautiful and stylish plaid hat using an easy crochet hat pattern. Whether you’re into messy bun hats, slouchy hats, or crocheted beanies, this tutorial provides a versatile approach to hat-making.
Feel free to explore different color combinations and yarn weights to make your hat unique. And remember, these crocheted hats make great gifts for family and friends. You can even share your finished projects on social media or join a crochet community like a Facebook group to connect with fellow crafters and gain inspiration. So, grab your favorite yarns and crochet hook, and let’s start crafting the perfect crochet hat pattern that will keep you warm and stylish in the winter. Happy crocheting!
To Find All My Crochet Jewel Patterns, Click Here

Click Here for My Ravelry Patterns


Crochet Hats for Beginners Book For Sale — Click Here

- privacy policy: https://amysdiyfrugallife.com/privacy-policy/
- All Colors of Yarn Click Here: https://amzn.to/3C32rNX
- [Image]: https://amysdiyfrugallife.com/crochet-a-balaclava-ski-mask-hat-a-step-by-step-guide/
- [Image]: https://www.ravelry.com/people/amray767
- [Image]: https://www.awin1.com/cread.php?awinmid=6220&awinaffid=470125&platform=dl&ued=https%3A%2F%2Fwww.etsy.com%2Fshop%2FAmyCreativeCreations%3Fref%3Dseller-platform-mcnav
- [Image]: https://amzn.to/2ILFrGN
- [Image]: https://amzn.to/2HVIis6
Source URL: https://amysdiyfrugallife.com/how-to-crochet-a-plaid-hat-pattern-tutorial/


 [3]
[3]