How to Crochet Jar and Bottle Gripper Opener Tutorial
by Amy Lehman | November 8, 2023 7:06 am
How to Crochet a Jar and Bottle Opener
Struggling to open stubborn jars and bottles? Say goodbye to frustration and hello to convenience with a handy crochet jar and bottle gripper opener! Whether you’re dealing with tight lids in the kitchen or struggling with slippery bottles in the bathroom, crocheting a gripper opener is a practical and functional solution that will make your life easier.
This post contains affiliate links. If you purchase through these links, I may earn a modest commission at no extra cost. Please review my privacy policy[1] for more details.
In this tutorial, we’ll guide you through crocheting a jar and bottle gripper opener step by step, from selecting the perfect yarn and hook size to mastering the essential stitches and techniques needed to create this helpful accessory. Whether you’re a seasoned crocheter or a beginner looking for a simple and rewarding project, this tutorial is designed to be accessible and enjoyable for crafters of all skill levels.
✨ We hope you enjoyed these photos! If so, please consider sharing them on Pinterest by clicking the Pin Button on each image. Your support helps us connect with more people and spread creativity. Thank you so much! 💖
Materials Needed:**
You’ll need a few supplies, including a crochet hook, yarn in your desired color, scissors, and a tapestry needle. Choosing a soft and durable yarn ensures your opener’s comfortable grip and longevity.
Crochet Basics:**
Before we begin the project, familiarize yourself with the basic crochet stitches, such as the chain stitch, single crochet, and slip stitch. If you’re new to crocheting, plenty of online resources and tutorials are available to help you master these essential techniques.
Click the Links for Your Materials
All Colors of Yarn Click Here[2]
- Crochet hook
- Tapestry needle
- Stitch marker
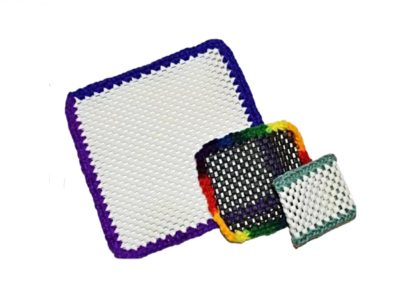
Hi, I will show you how to make these can bottle grippers. Here’s how you can do it. Cut shelf liners from places like Family Dollar or the Dollar Store into rectangles or squares. Once your squares are ready, you’ll crochet around the edges. I’m going to demonstrate how to do this with a single crochet.
You can use shelf liners like those in dollar stores or cut them up from places like Family Dollar. Next, I will show you how to crochet around the edges. I’ll use Super Saver stripes Red Heart yarn for this example, but you can use any medium worsted yarn. I also used a Dainty hook. The size of your hook may vary depending on the holes in your shelf liners. To start, create a slip stitch to attach your yarn.
Depending on the size of the holes, you may want to do two single crochets in each hole. I’ll demonstrate by doing one single crochet, then two in the next. Continue this pattern until you’ve worked your way around the entire square. Once you’ve gone all around, slip stitch to complete the edge. After that, use your yarn needle to weave in the ends. Chain one, pull through, and then cut the yarn with scissors. You can hide the end on the backside where it won’t be visible. That’s how you complete this project.
This project can be adapted to different shapes. For a bottle gripper, you can make a smaller strip by crocheting a rectangle about two inches across and then sew it together to fit around a bottle. You can also add a decorative trim around it. Like the one I’ve made, the square gripper measures six inches, while the smaller one measures four inches by four inches. The possibilities are endless, and this is a fun and practical project. Thanks for watching, and don’t forget to subscribe for more creative ideas!
Print the entry at the top of the page to print the pattern!
Click Here for Crochet Blanket Patterns[3]
Creating the Gripper Opener:**
Begin by crocheting a strip of fabric about 2–3 inches wide and long enough to wrap around the lid of your jars or bottles. You can adjust the length according to your specific needs. Use single crochet stitches for a tight and sturdy texture.
Click Here for the Slouchy Hat Pattern
Consider working in a ribbed pattern by alternating front and back loop single crochet stitches to enhance the grip. This will provide extra traction when you’re opening stubborn lids.
Customization:**
Feel free to personalize your gripper opener by choosing colors and yarn types that match your kitchen or personal style. You can add decorative elements like buttons, flowers, or other embellishments to make it unique.
Crocheting a jar and bottle gripper opener is a practical and fun project that combines the beauty of handmade crafts with functionality. With time and effort, you can create a helpful tool that makes your daily life easier and adds warmth and creativity to your kitchen. Enjoy the satisfaction of knowing you made it yourself, and never struggle with stubborn lids again. Happy crocheting!
To Find All My Crochet Jewel Patterns, Click Here

Click Here for My Ravelry Patterns


Crochet Hats for Beginners Book For Sale — Click Here

Crochet For Beginners Book for Sale — Click Here
- privacy policy: https://amysdiyfrugallife.com/privacy-policy/
- All Colors of Yarn Click Here: https://amzn.to/3C32rNX
- Click Here for Crochet Blanket Patterns: https://amysdiyfrugallife.com/blanket/
- [Image]: https://www.ravelry.com/people/amray767
- [Image]: https://www.awin1.com/cread.php?awinmid=6220&awinaffid=470125&platform=dl&ued=https%3A%2F%2Fwww.etsy.com%2Fshop%2FAmyCreativeCreations%3Fref%3Dseller-platform-mcnav
- [Image]: https://amzn.to/2ILFrGN
- [Image]: https://amzn.to/2HVIis6
Source URL: https://amysdiyfrugallife.com/how-to-crochet-jar-and-bottle-gripper-opener-tutorial/


