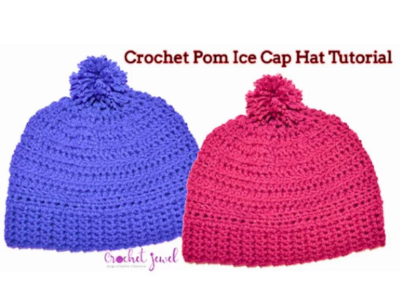
Create Your Own Cozy Pom Pom Hat: Easy Crochet Pattern Tutorial
by Amy Lehman | October 23, 2023 11:39 pm
How to Crochet a Pom Hat
Prepare to add a dash of style and warmth to your winter wardrobe with the Crochet Pom Pom Hat! This classic accessory combines the timeless charm of a cozy beanie with the playful flair of a fluffy pom pom, making it a must-have for chilly days and frosty nights.
Crocheted pom pom hats are practical and versatile, providing a fashionable way to stay snug and chic when the temperature drops. Whether you’re hitting the slopes, running errands in the city, or simply enjoying a brisk walk in the park, a crocheted pom hat adds a touch of whimsy and personality to any outfit.
You’ll find affiliate links within this post. If you decide to purchase through these links, I may earn a modest commission at no extra cost. Additionally, please review my privacy policy[1] for more details.
✨ We hope you enjoyed these photos! If so, please consider sharing them on Pinterest by clicking the Pin Button on each image. Your support helps us connect with more people and spread creativity. Thank you so much! 💖
**Selecting the Right Yarn**: The first step in creating a perfect crochet hat pattern is choosing the best yarn for the job. Depending on your preference, you can opt for worsted weight yarn, bulky weight yarn, super bulky yarn, aran weight yarn, or even chunky yarn. The choice of yarn will influence the warmth and texture of your hat.
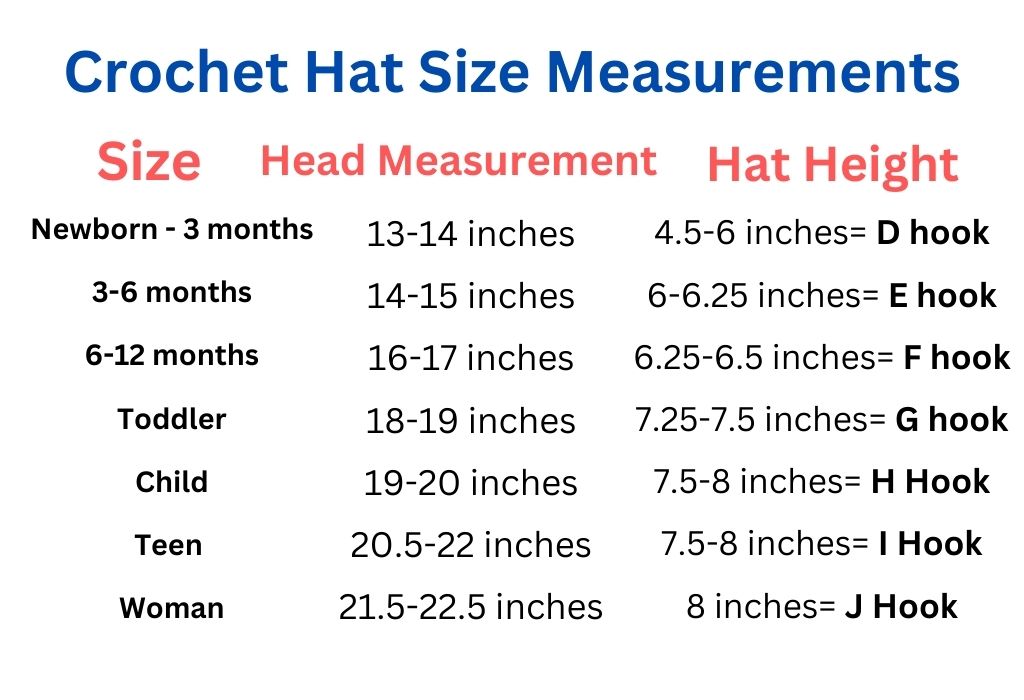
**Choosing a Crochet Hook Size**: Match your crochet hook size to your chosen yarn weight.
**Foundation Chain and Row**: Create a foundation chain matching your head size. This ensures a perfect fit. Next, you’ll work the first stitch into the foundation chain and proceed with basic crochet stitches like single crochet, half double crochet, and double crochet stitches to build the hat’s height.
**Back Loop Technique**: To add a unique texture to your hat, consider working in the back loop of each stitch. This technique can create a ribbed effect that adds style to your design.
**Increase and Decrease Stitches**: Depending on your hat’s style, you may need to increase or decrease the number of stitches as you progress. Pay attention to the pattern instructions to achieve the desired shape.
Abbreviations
ch=chain
sl st=slip stitch
hdc=half double crochet
2hdctog=2 half double crochet together
Click the Links for Your Materials
All Colors of Yarn Click Here[2]
- Crochet hook
- Tapestry needle
- Stitch marker
I hook, medium worsted yarn
Rows 1: chain 7, sc in the 2nd chain from the hook and sc in each chain across,
Rows 2–63: ch 1, sc in each sc across, Turn, I did this for the brim for 63 rows, you will need to place around your head above your ears.
Connect the ends and slip-stitch them together.
Rnd 1: ch 1, hdc in each stitch you can find, sl st in beginning hdc
Rnd 2: ch 1, hdc in each stitch around, sl st in beg hdc
Rnd 3: Turn your hat around so the seam is inside, ch 1, hdc in each backloop around, sl st beg hdc
Rnd 4: ch 1, hdc in each stitch around, sl st beg hdc
Rnd 5: ch 1, hdc in each backloop around, sl st beg hdc
Rnd 6: ch 1, hdc in each stitch around, sl st beg hdc
Rnd 7: ch 1, hdc in each backloop around, sl st beg hdc
Rnd 8: ch 1, hdc in each stitch around, sl st beg hdc
Rnd 9: ch 1, hdc in each backloop around, sl st beg hdc
Rnd 10: ch 1, *hdc in the next two stitches, 2dhctog decrease, *Repeat around, sl st in beg hdc
Rnd 11: ch 1, *hdc in the next three backloops, 2hdctog decrease in the next two backloops together, *Repeat around, sl st beg hdc
Rnd 12: ch 1, *2hdctog in the next two stitches for a decrease, *Repeat around, sl st beg hdc
Rnd 13: ch 1, *2hdctog in the next two stitches for a decrease, *Repeat around, sl st beg hdc
Now sew the hole close.
To make a pom, I wrapped the yarn around all my fingers, tied a knot in the middle, cut both ends, and trimmed the pom. This is best seen in the video. Sew the pom on your hat. I hope you enjoyed the easy crochet beanie for beginners!
Print the Entry on the top of the page to print the pattern!

Click Here for a Crochet Slouchy Hat Pattern
**Slip Stitch and Stitch Marker**: Use the slip stitch (sl st) to join rounds and a stitch marker to keep track of your work as you repeat rows. This ensures your hat comes together flawlessly.
**Adding a Pom Pom**: Nothing says “crochet hats” more than a playful faux fur pom pom. You can easily attach one to the top of the hat for added charm.
**Variety of Hat Styles**: Whether you’re aiming for a slouchy hat or a classic beanie, this tutorial guides various hat styles, making it a versatile resource for crocheters.
**Gauge Swatch**: For those who aim for the perfect fit, creating a gauge swatch is recommended to ensure your stitches match the pattern’s specifications.
In conclusion, crocheting your hats is not only an easy project but also a creative and rewarding one. With this free crochet hat pattern and the provided video tutorial, you’ll be on your way to crafting beautiful crochet hats in no time. The possibilities are endless, whether you’re making them for yourself or as great gifts for friends and family. So, gather your materials, grab your favorite yarns, and follow the steps outlined in this tutorial to create your perfect crochet hat pattern. Happy crocheting! And don’t forget to share your finished hats on social media or in your favorite crochet group – your work is bound to inspire other new and seasoned crocheters alike. If you have any questions or need extra guidance, please refer to our privacy policy or reach out for support.
To Find All My Crochet Jewel Patterns, Click Here

Click Here for My Ravelry Patterns


Crochet Hats for Beginners Book For Sale — Click Here

Crochet For Beginners Book for Sale — Click Here
- privacy policy: https://amysdiyfrugallife.com/privacy-policy/
- All Colors of Yarn Click Here: https://amzn.to/3C32rNX
- [Image]: https://amysdiyfrugallife.com/crochet-an-easy-slouchy-hat-tutorial/
- [Image]: https://www.ravelry.com/people/amray767
- [Image]: https://www.awin1.com/cread.php?awinmid=6220&awinaffid=470125&platform=dl&ued=https%3A%2F%2Fwww.etsy.com%2Fshop%2FAmyCreativeCreations%3Fref%3Dseller-platform-mcnav
- [Image]: https://amzn.to/2ILFrGN
- [Image]: https://amzn.to/2HVIis6
Source URL: https://amysdiyfrugallife.com/how-to-crochet-pom-pom-hat-pattern-tutorial/


