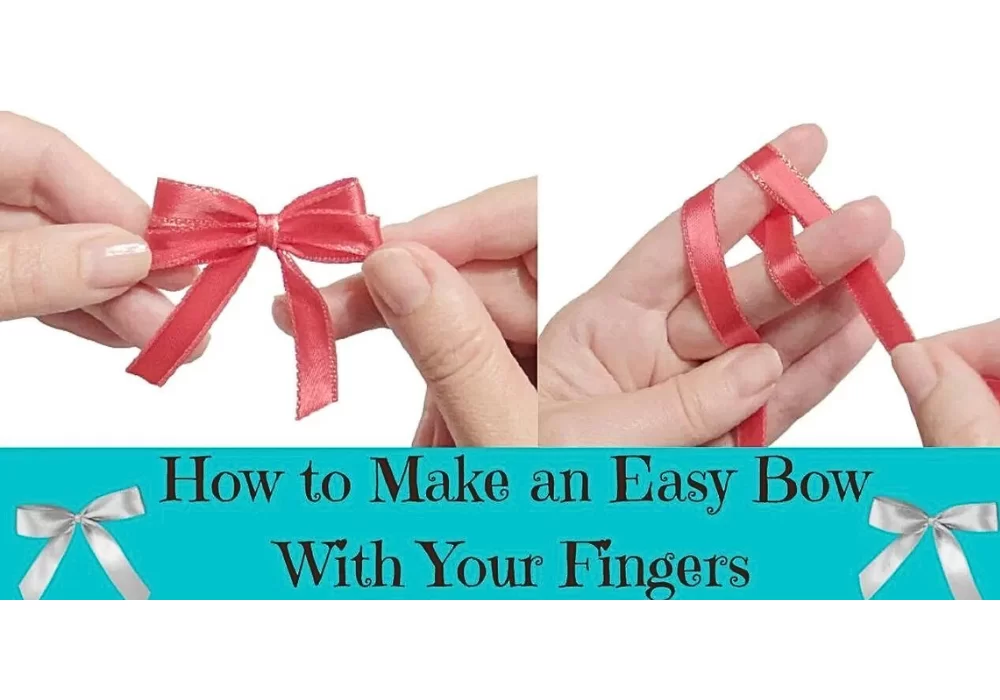
How to Make a Handmade Ribbon Bows with Your Fingers Tutorial
by Amy Lehman | November 9, 2023 7:27 am
How to Make a Handmade Ribbon Bows with Your Fingers
Creating handmade ribbon bows with your fingers is a delightful and creative way to add a personal touch to gifts, decorations, and crafts. With just a few simple materials and a dash of imagination, you can make charming bows that stand out. In this tutorial, we’ll guide you through crafting beautiful ribbon bows using your fingers as the main tools. This hands-on approach is fun and allows for greater control and precision in your bow-making.
You’ll find affiliate links within this post. If you decide to purchase through these links, I may earn a modest commission at no extra cost. Additionally, please review my privacy policy[1] for more details.
✨ We hope you enjoyed these photos! If so, please consider sharing them on Pinterest by clicking the Pin Button on each image. Your support helps us connect with more people and spread creativity. Thank you so much! 💖
*Handmade ribbon bows:** To start, gather your materials. You’ll need a ribbon, scissors, and a flat surface to work on. The ribbon’s width will determine the size of your bow, so choose accordingly.
**Finger weaving:** Begin by unrolling a ribbon section and leaving a tail that will hang down. Use your thumb and index finger to create a loop, ensuring the tail end stays in place. This loop will be the center of your bow.
**Looping and twisting:** Continue using your fingers to make loops on both sides of the central loop. As you create loops, gently twist and overlap them to form the bow’s layers. You can make as many loops as you’d like, depending on the fullness you desire for your bow.
Material: Buy Ribbon Here[2]
In this tutorial, I will show you how to make an easy bow. You wrap it around your fingers and do precisely what I’m doing. I’ll have this video in slow motion so you can follow me step by step. You wrap it around your two fingers and then do a crisscross. Bring it back over and around; this will give you a two-bow effect for an easy bow you can use for any project or present. It’s straightforward to do, so then you cross it over.
After you do those simple steps, you might have to rewind and watch it again. Okay, I will show you again so you know how to loop it around all of your fingers. It does take practice, and you may need to stop it and go back. As shown, you’ll tuck it under the last part and loop it around. The back will be the front part of the bow, and then it will be twisted back around.
Then you’ll loop it under and wrap it around, so go up and under and pull it, creating a knot. I’m going to show you one more time. Okay, I will show you how to loop it under again so it makes a knot.
Okay, that’s after it’s tied and secured; you will take it off your fingers and then cut the ends. You can use a thicker ribbon or thinner ribbon, too. On your fingers, you would have to take it down a little bit on your finger so there is enough room, and then your bow is complete. It’s pretty straightforward, and this is great for any package or project you’re working on or a crochet pattern.
Print the entry at the top of the page to print the pattern!
Click Here for Crochet Blanket Patterns[3]
**Securing the bow:** Once you’re satisfied with the size and shape of your bow, cut the ribbon, leaving another tail that matches the initial tail’s length. Thread this tail through the central loop and tie a knot to secure the bow’s shape.
**Final adjustments:** Fluff and adjust the loops until your bow looks how you want it. You can trim the tails to your preferred length and shape the loops for a polished finish.
Click Here for the Bow Pattern
Creating handmade ribbon bows with your fingers is a rewarding craft that allows you to customize your projects with a personal touch. You can craft beautiful bows that enhance your gifts, decorations, and crafts with some practice. This finger-based approach provides a unique and hands-on experience for bow-making, ensuring that your creations stand out and reflect your creativity. So, the next time you need a ribbon bow, why not try making one with your fingers for that extra special touch? Enjoy the art of handmade ribbon bows!
To Find All My Crochet Jewel Patterns, Click Here

Click Here for My Ravelry Patterns


Crochet Hats for Beginners Book For Sale — Click Here

Crochet For Beginners Book for Sale — Click Here
- privacy policy: https://amysdiyfrugallife.com/privacy-policy/
- Buy Ribbon Here: https://amzn.to/3YXDigE
- Click Here for Crochet Blanket Patterns: https://amysdiyfrugallife.com/blanket/
- [Image]: https://www.ravelry.com/people/amray767
- [Image]: https://www.awin1.com/cread.php?awinmid=6220&awinaffid=470125&platform=dl&ued=https%3A%2F%2Fwww.etsy.com%2Fshop%2FAmyCreativeCreations%3Fref%3Dseller-platform-mcnav
- [Image]: https://amzn.to/2ILFrGN
- [Image]: https://amzn.to/2HVIis6
Source URL: https://amysdiyfrugallife.com/how-to-make-a-handmade-ribbon-bows-with-your-fingers-tutorial/


