Step-by-Step Guide: How to Crochet a Daisy Granny Square Bag
by Amy Lehman | June 22, 2024 4:55 pm
Crochet a Daisy Granny Square Bag
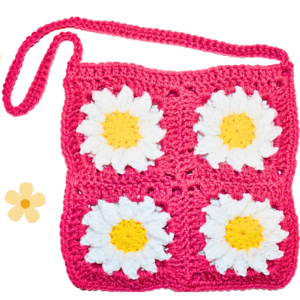
The Summer Days Daisy Bag, a delightful crochet accessory, combines the charm of granny squares with the beauty of crochet daisies. Using techniques like the magic circle and various stitches, including double crochet (dc) clusters and single crochet (sc) stitches, this bag is a must-have for breezy summer days. The appealing color combinations and the intricate design make it a favorite part of many crochet enthusiasts’ collections. Whether you’re a seasoned crocheter or a beginner looking for a new project, this daisy granny square bag offers a beautiful way to showcase your skills.
This post contains affiliate links. If you purchase through these links, I may earn a modest commission at no extra cost. Please review my privacy policy[1] for more details.
Creating this daisy granny square bag involves several detailed steps, each contributing to the final beautiful product. Start by making the daisy centers using a magic circle and worsted-weight yarn in the color of your choice. Insert the hook into the magic ring and work a series of double crochet clusters. Transition to the petals with a new color, working treble crochet clusters into each chain space to form the daisy petals.
Next, build the granny square around the daisy center. Using a contrasting background frame color highlights the daisy, working in double crochet stitches. The corners of the square are formed with dc crochet clusters, while the sides are filled with basic stitches, creating a balanced and symmetrical square pattern. Use a tapestry needle to weave in the yarn tails for a neat finish.
To crochet 4 treble crochet (tr) stitches together, start by yarning over twice and inserting your hook into the designated stitch. Yarn over again and pull through the stitch, leaving you with 4 loops on your hook. Yarn over and pull through the first two loops, then yarn over and pull through the next two loops, leaving you with 2 loops on your hook. Repeat this process three more times: yarn over twice, insert the hook into the same or next stitch as per your pattern, yarn over and pull through the stitch, yarn over and pull through the first two loops, and then yarn over and pull through the next two loops. Each repetition will add loop to your hook. After completing this process four times, you will have 5 loops on your hook. Finally, yarn over and pull through all 5 loops to complete the 4 treble crochet together (4 tr tog) stitch, effectively decreasing the stitches and creating a unified pattern effect.
✨ We hope you enjoyed these photos! If so, please consider sharing them on Pinterest by clicking the Pin Button on each image. Your support helps us connect with more people and spread creativity. Thank you so much! 💖
Abbreviations:
dc=double crochet
tr=treble crochet
sc=single crochet
sl st=slip stitch
H hook
Rnd 1: with yellow yarn, In the Magic Circle, ch 3, work 11 dc, sl st Fasten off
Rnd 2: sl st into the dc with white yarn, ch 4, work 3 treble crochet together, *ch 3, work 4 treble crochet together, at the end sl st on top ch 3. *Repeat for 12 petals. Fasten off.
Rnd 3: sl st with pink yarn, ch 3, 2 dc in the ch 3 space, 3 dc in the next space, *3 dc, ch 2, 3 dc in the next space, 3 dc in the next two spaces, *Repeat around, to end sl st on top ch 3. Fasten off.
*After you create 8 Granny Squares, you will sew them together. Best shown in the video. *Repeat this again.
Step one: (You will do these steps twice) Take two squares and place them with the right sides (the outside of the daisy) facing each other. sc in the space twice, then sc in the next 12 sc across, end with 2 sc in the last space. This is only straight across. Now take another two squares and place them with the right sides (the outside of the daisy) facing each other. Continue on with sc in the space twice, then sc in each stitch across, end with 2 sc in the last space.
Now take on the back side with the daisy facing outward, Repeat with sc in the space twice, then sc in each stitch across, in the center, work 2 sc in the space, ch 1, 2 sc in the next space, sc across, end with 2 sc in the last space. Fasten off. You now have 4 squares connected with sc. Repeat this once more.
Now place the 4 connected squares on top of each other with the right side of the daisy facing outside since that will be the outside of the bag. Start on the side with 2 sc, then sc in each stitch around, and 2 sc in each space. when you are on the sides with two chain spaces, work 2 sc in the next ch space, ch 1, 2 sc in the next space, sc across to the next chain space, sc around until the next ch space. Leave the top open. Fasten off. Weave in ends.
On top, ch 3, 2 dc in the ch space, *dc in each stitch, 2 dc in each chain space, *Repeat around. sl st in the ch 3. Fasten off.
Hande: on the side, sl st into the stitch, chain 75 or how long you’d like the handle, sl st on the opposite side. sc in the next stitch, sc in each chain to the other side, sc in the next stitch to connect. Fasten off. Weave in your ends.
The Daisy Granny Square Bag is not just a practical accessory; it’s a celebration of crochet artistry and creativity. With free crochet patterns available, and inexpensive ad-free PDFs for those who prefer a printed copy, making this bag is accessible to all. The joy of creating a beautiful, handmade item is amplified when shared on social media, where the project can inspire others. Whether using lion brand yarn or other preferred brands, the result is a stunning, personalized bag perfect for summer outings. So grab your crochet hook and cotton yarn, follow the easy-to-understand pattern, and enjoy making your very own Summer Days Daisy Bag.
How to Watch Videos in Slow Motion — if the video is too fast — Click Here!
How to Crochet For Beginners Playlist — Click Here
Click Here for Crochet Amigurumi Patterns
Experimenting with different shades and colors can create a stunning visual effect for those looking to add a unique touch to their daisy granny square bag. Consider using colors of the non-binary flag for a bold and inclusive statement, or choose pastel tones for a softer look. The color of the daisy center and petals can be swapped to match your style, making each bag a special arrangement of your creativity. With the plethora of free patterns and video tutorials available, along with affiliate links for purchasing materials, this project is both accessible and customizable. The finished product is not just a bag but a representation of your skill and artistic expression, perfect for adding a handmade touch to any outfit.
To Find All My Crochet Jewel Patterns, Click Here

Click Here for My Ravelry Patterns

- privacy policy: https://amysdiyfrugallife.com/privacy-policy/
- [Image]: https://www.ravelry.com/people/amray767
- [Image]: https://www.etsy.com/shop/AmyCreativeCreations?ref=seller-platform-mcnav
Source URL: https://amysdiyfrugallife.com/step-by-step-guide-how-to-crochet-a-daisy-granny-square-bag/


