Learn How to Crochet a Witch’s Hat with Our Enchanting Tutorial
by Amy Lehman | October 25, 2023 1:03 am
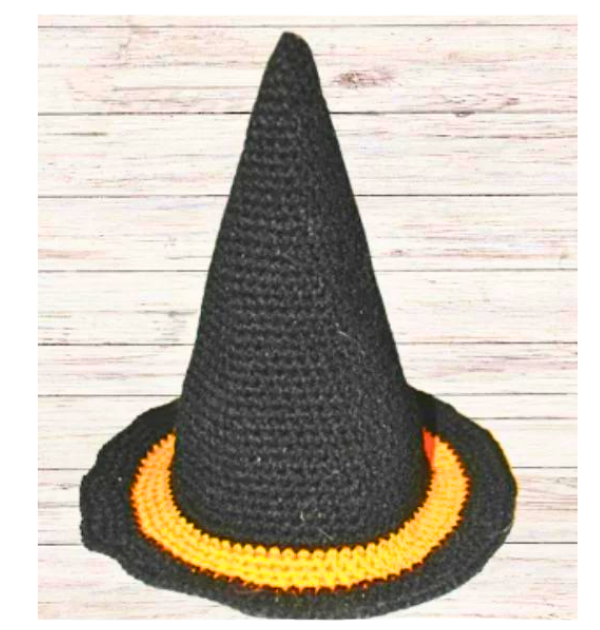
How to Crochet a Witch’s Hat
Welcome to this crochet tutorial, where we will guide you through “How to Crochet a Witch’s Hat Pattern.” Whether you’re a seasoned crocheter or just starting out, this easy crochet hat pattern is perfect for all skill levels. We’ll cover essential crochet techniques to create a stylish winter witch hat, including single crochet, slip stitch, back loop, and more. With the help of this free crochet pattern and video tutorial, you’ll be able to make great gifts or stylish accessories for yourself.
You’ll find affiliate links within this post. If you decide to purchase through these links, I may earn a modest commission at no extra cost. Additionally, please review my privacy policy[1] for more details.
✨ We hope you enjoyed these photos! If so, please consider sharing them on Pinterest by clicking the Pin Button on each image. Your support helps us connect with more people and spread creativity. Thank you so much! 💖
**Materials:** To start this project, you’ll need worsted weight yarn, an I crochet hook, a yarn needle, stitch markers, and a tapestry needle. Choose your favorite yarns or experiment with different color combinations to make your witch’s hat unique.
**Foundation Chain:** Begin with a foundation chain that matches the head size you’re crocheting for. You can use a crochet hat size chart as a reference.
**Basic Stitches:** Learn and master basic crochet stitches, such as single and slip stitches, to create a sturdy and warm hat.
Please provide a link to my blog if you want to share my content. However, I kindly request that you refrain from copying and posting my patterns on your website. You are welcome to sell any items you create using my patterns, but please refrain from selling the patterns themselves, as they are offered for free. Thank you for your understanding and support!
Click the Links for Your Materials
All Colors of Yarn Click Here[3]
rnd 1. work 5sc in ring, join with sl st. ‑5sts.
rnd 2. work 1sc in each stitch around, ‑5 sts. (you don’t need a slip stitch for the rest of the hat, work in continual rounds and use a marker to keep track of your rounds)
rnd 3. work 2sc in each stitch around, ‑10sts.
rnds 4–5. work 1sc in each stitch around, ‑10sts. Twice
rnd 6. *work 2sc in the next stitch, 1sc in the next stitch, *repeat around ‑15sts.
rnds 7–8. work 1sc in each stitch around, ‑15sts. Twice
rnd 9. *work 2sc in the next stitch, 1sc in the next two stitches, *repeat around ‑20sts.
rnds 10–11. work 1sc in each stitch around, ‑20sts. Twice
rnd 12. *work 2sc in the next stitch, 1sc in the next three stitches, *repeat around ‑25sts.
rnds 13–14. work 1sc in each stitch around, ‑25sts. Twice
rnd 15. *work 2sc in the next stitch, 1sc in the next four stitches, *repeat around ‑30sts.
rnds 16–17. work 1sc in each stitch around, ‑30sts. Twice
rnd 18. *work 2sc in the next stitch, 1sc in the next five stitches, *repeat around ‑35sts.
rnds 19–20. work 1sc in each stitch around, ‑35sts. Twice
rnd 21. *work 2sc in the next stitch, 1sc in the next six stitches, *repeat around ‑40sts.
rnds 22–23. work 1sc in each stitch around, ‑40sts. Twice
rnd 24. *work 2sc in the next stitch, 1sc in the next seven stitches, *repeat around ‑45sts.
rnds 25–26. work 1sc in each stitch around, ‑45sts. Twice
rnd 27. *work 2sc in the next stitch, 1sc in the next eight stitches, *repeat around ‑50sts.
rnds 28–29. work 1sc in each stitch around, ‑50sts. Twice
rnd 30. *work 2sc in the next stitch, 1sc in the next nine stitches, *repeat around ‑55sts.
rnds 31–32. work 1sc in each stitch around, ‑55sts. Twice
rnd 33. *work 2sc in the next stitch, 1sc in the next ten stitches, *repeat around ‑60sts.
rnds 34–35. work 1sc in each stitch around, ‑60sts. Twice
rnd 36. *work 2sc in the next stitch, 1sc in the next eleven stitches, *repeat around ‑65sts.
rnd 37. work 1sc in each stitch around, ‑65sts. For these rounds I used a slip stitch.
Switch to orange yarn with a slip stitch for the orange strip.
rnds 38–41. work 1sc in each stitch around, sl st., 4 times, ‑65 sts, sl st. fasten off and weave in the endsBrim: Switch back to black yarn with a slip stitch,
rnd 42. *work 2sc in the next stitch, 1sc in the next 4 stitches. *repeat sl st.
rnd 43. *work 2sc in the next stitch, 1sc in the next 5 stitches. *repeat sl st.
rnd 44. *work 2sc in the next stitch, 1sc in the next 6 stitches. *repeat sl st.
rnd 45. single crochet in each stitch around, sl st. fasten off.Try a smaller or larger hook for bigger or smaller size, or increase or decrease some rows.
Click Here for More Crochet Holiday Patterns

- privacy policy: https://amysdiyfrugallife.com/privacy-policy/
- How to Crochet For Beginners Playlist — Click Here: https://www.youtube.com/playlist?list=PLDU4IrQAuYqrUtVH0UWJUUdqljBIUV4ZD
- All Colors of Yarn Click Here: https://amzn.to/3C32rNX
- [Image]: https://amysdiyfrugallife.com/how-to-crochet-a-pumpkin-pattern-tutorial/
- [Image]: https://www.ravelry.com/people/amray767
- [Image]: https://www.awin1.com/cread.php?awinmid=6220&awinaffid=470125&platform=dl&ued=https%3A%2F%2Fwww.etsy.com%2Fshop%2FAmyCreativeCreations%3Fref%3Dseller-platform-mcnav
- [Image]: https://amzn.to/2ILFrGN
- [Image]: https://amzn.to/2HVIis6
Source URL: https://amysdiyfrugallife.com/how-to-crochet-a-witchs-hat-pattern-tutorial/

