How to Crochet a Fun Dora Inspired Hat Pattern Tutorial
How to Crochet a Dora Hat
Crocheting hats are a beloved pastime for many, and there’s nothing quite like the satisfaction of creating your very own warm and stylish headwear. In this guide, we’ll walk you through crocheting a Dora Hat, a versatile and trendy accessory perfect for the winter season. Whether you’re a seasoned crocheter or just starting, this easy crochet hat pattern with step-by-step instructions, a video tutorial, and a free crochet pattern is designed to suit all skill levels.
You’ll find affiliate links within this post. If you decide to purchase through these links, I may earn a modest commission at no extra cost. Additionally, please review my privacy policy for more details.
✨ We hope you enjoyed these photos! If so, please consider sharing them on Pinterest by clicking the Pin Button on each image. Your support helps us connect with more people and spread creativity. Thank you so much! 💖
The Dora Hat combines classic crochet techniques with a modern twist, making it an excellent project for beginners and experienced crocheters. To get started, you’ll need the following materials:
– Worsted weight yarn, chunky yarn, or any of your favorite yarns, depending on your desired hat style.
– A crochet hook in the recommended size (usually a size J or 6 mm hook).
– A tapestry needle for weaving in yarn ends.
– A stitch marker to keep track of your rounds.
– A yarn needle for sewing on any embellishments.
– A faux fur pom pom for that trendy finishing touch (optional).
Remember, with affiliate links, you can support your crochet hobby by earning a small commission when others purchase your recommended materials. So, grab your hooks and yarn, follow this perfect crochet hat pattern, and get ready for some happy crocheting. Stay warm and stylish this winter with your own Dora Hat – it’s a great project for new crocheters and seasoned pros alike!
Supplies:
Scissors
Click the Links for Your Materials
– Crochet hook
– Tapestry needle
– Stitch marker
– Polyfill stuffing
How to Crochet For Beginners Playlist – Click Here

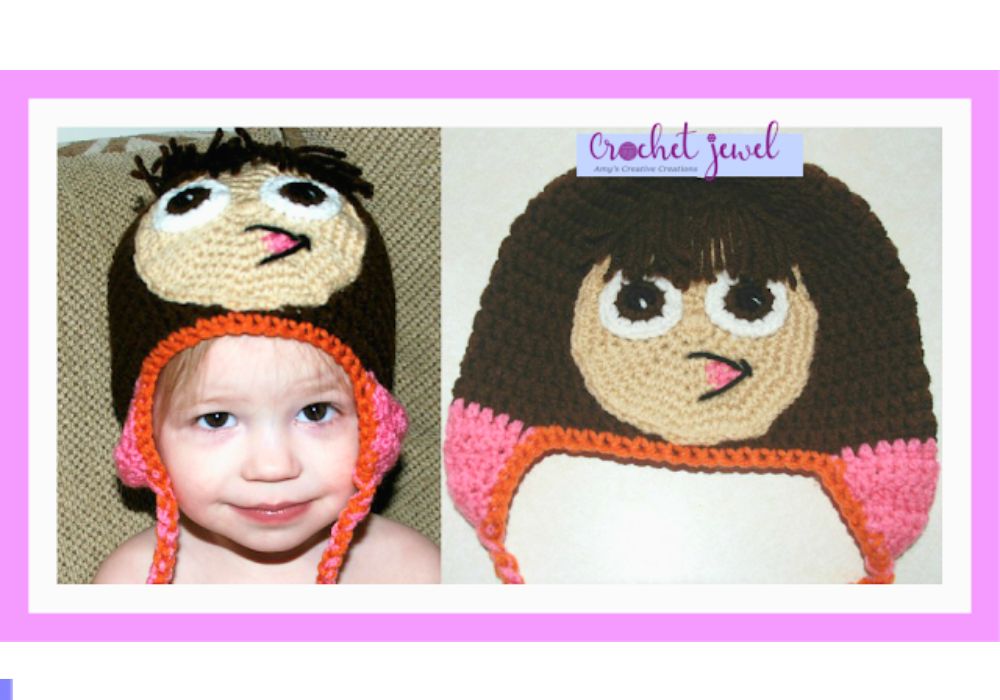
Make 2, G hook, Pink yarn,1st ear flap, you can slip stitch onto the side of the hat with your pink yarn, begin the dc stitches, (like to have the seam in the back of the hat. So I did the ear flap on the side of the hat)2nd flap, fold hat in half and sl st in dc directly across from the last dc from the other ear flap. Follow the directions below for both ear flaps.
Row 5. ch 2. dc2tog twice, dc in last st. cut yarn and pull through -3
Sc around the edge of the hat with orange yarn.
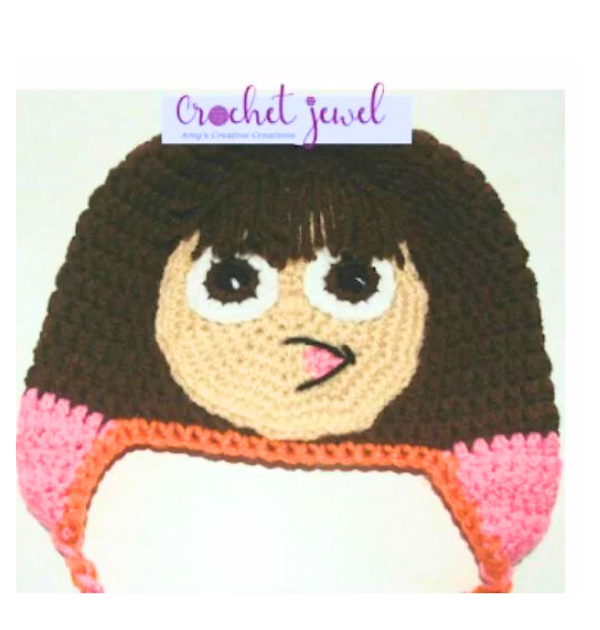
Face: G hook, Light brown yarn,
rnd 1. ch 2, work 5 sc in the 2nd chain from the hook, sl st -5 sc
rnd 2. work 2 sc in each st around, sl st -10 sc
rnd 3. work 2 sc in each st around, sl st -20 sc
rnd 4. *work 1 sc in the next sc, work 2 sc in the next sc, *Repeat around, (no slip stitch, work in continual rounds, use a marker to keep track of your rounds)
rnd 5. *work 1 sc in the next 2 sc, work 2 sc in the next sc, *Repeat around
rnd 6. *work 1 sc in the next 3 sc, work 2 sc in the next sc, *Repeat around
rnd 7. *work 1 sc in the next 4 sc, work 2 sc in the next sc, *Repeat around
rnd 8. *work 1 sc in the next 5 sc, work 2 sc in the next sc, *Repeat around
rnd 9. *work 1 sc in the next 6 sc, work 2 sc in the next sc, *Repeat around, Fasten off Attach the face onto the center of the hat, but don’t attach until you attach the eyes and mouth first.
Nose:
At the beginning of round 1: of the light brown circle you made, Now sew over that small beginning round circle over and over about 10 times to create a nose. Now below after you do the eyes, place the eyes between the nose.
Eyes:
G hook
rnd 2. Now sl st with Brown yarn, work 2 sc in each st around, sl st -10 sc
rnd 3. Now sl st with White yarn, work 2 sc in each st around, sl st -20 sc, Fasten off
Take a yarn needle, and make a white dashed line in the center of both eyes.Place the Eyes about 1/2 inch apart and about an inch down on the top part of the brown circle face.
Dark brown yarn, slip stitch two pieces of yarn folded in half, about 5 inches in length in the brown part of the hat, right above the eyes and light brown face. Do this about 10 times across the eyes. Then trim up the bangs to make sure you can see the eyes on that hat.
Print the entry at the top of the page to print the pattern!
Click Here for Crochet Hat Patterns
Click Here for the Crochet Bowl Pattern
To add a yarn or faux fur pom pom, sew it securely to the top of the hat using your yarn needle.
Weave in any remaining yarn tails using a tapestry needle to give your finished hat a polished look.
In the world of crochet hats, the Dora Hat stands out as an easy crochet hat pattern suitable for crocheters of all skill levels. Crafted with basic crochet stitches like single crochet, half double crochet, and double crochet stitches, this free crochet hat pattern is the perfect choice for a winter-season project. Depending on your preference, using worsted-weight yarn or bulky-weight yarn allows for a wide variety of yarn weights and colors, giving you the freedom to design your perfect crochet hat. Whether you choose a slouchy hat, a beanie hat, or even one of those trendy messy bun hats, the faux fur pom pom or yarn pom pom on top adds a touch of flair. If you’re a beginner crocheter, there’s no need to worry; this is an easy project. Crocheted beanies are fabulous gifts and a way to create extra income with affiliate links, earning a small commission as you share your finished hat creations on social media or in a Facebook group dedicated to crochet projects. So, grab your yarn and hooks, follow the free pattern and video tutorial, and prepare for some happy crocheting while making the perfect fit for any head size.
Crocheting a Dora Hat is a practical project for the cold weather and a fun and creative endeavor. The easy crochet hat pattern allows you to experiment with different yarn weights, colors, and textures, ensuring you’ll create a unique hat. These crocheted beanies make great gifts, and you can even join a crochet community on social media or in a Facebook group to share your creations and connect with fellow crafters.
To Find All My Crochet Jewel Patterns, Click Here

Click Here for My Ravelry Patterns


Crochet Hats for Beginners Book For Sale – Click Here

Crochet For Beginners Book for Sale – Click Here


You May Also Like
Crochet Sun Hat Pattern Tutorial: Stay Cool with Sunny Stitches

Learn How to Crochet a Witch’s Hat with Our Enchanting Tutorial
