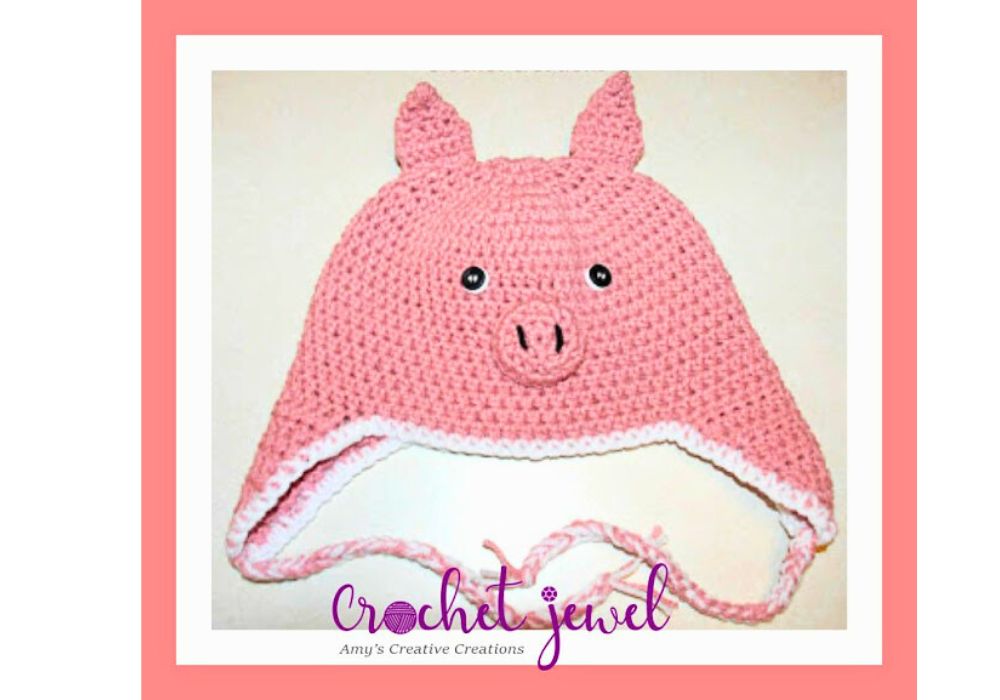
How to Crochet a Pig Hat Tutorial
How to Crochet a Pig Hat!
Crochet pig hat enthusiasts can create a cute and cozy accessory using this easy crochet hat pattern. Whether you’re a beginner or a seasoned crocheter, this free crochet pattern is perfect for crafting a pig-themed beanie. In this tutorial, we’ll guide you through the step-by-step process so that you can enjoy a fun and rewarding crochet project.
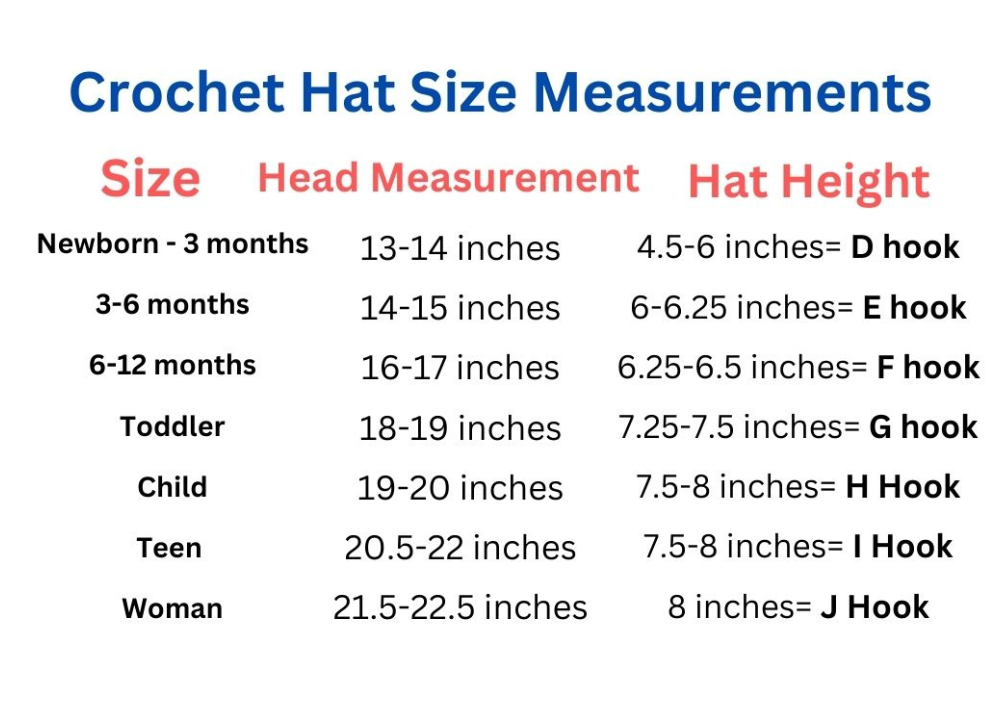
Gather your materials: worsted-weight yarn, a size J crochet hook, a tapestry needle, and a stitch marker. This pattern uses basic crochet stitches, including single and slip stitches, making it an ideal project for crocheters of all skill levels. Using our crochet hat size chart, we’ll also show you how to work in the back loop, create a foundation chain, and form a perfect fit for any head size.
This post contains affiliate links. If you purchase through these links, I may earn a modest commission at no extra cost. Please review my privacy policy for more details.

How to Watch Videos in Slow Motion – if the video is too fast!
Supplies:
Impeccable Pink and white yarn
Buttons
J Hook
H hook
Yarn needle
Abbreviations: dc=double crochet sc=single crochet sl st=slip stitch ch=chain, hdc=half double crochet, hdc2tog=half double crochet 2 together decrease, 2sctog=2 single crochet together decrease
Use the hook that is best for your hat size, as shown in the photo above.
Ear flaps:
Make 2
J hook , use pink yarn
For the first ear flap, continue from your hat. 2nd flap, fold hat in half and sl st in hdc directly across from the last hdc from the other ear flap. follow directions below for both ear flaps.
Row 1. ch 2. hdc in next 14 stitches, turn. -14 sts
Row 2. ch 2. hdc2tog, hdc in the next 9 stitches. hdc2tog. hdc in the last st., turn. -12 sts
Row 3. ch 2. hdc2tog, hdc in next 7 stitches. hdc2tog. hdc in last st., turn. -10 sts
Row 4. ch 2. hdc in each stitch across, turn. -10 sts
Row 5. ch 2. hdc2tog, hdc in the next 5 stitches. hdc2tog. hdc in the last st., turn. -8 sts
Row 6. ch 2. hdc in each stitch across, turn -8 sts
Row 7. ch 2. hdc2tog, hdc in the next 3, hdc2tog. hdc in the last st., turn -6 sts
Row 8. ch 2. hdc2tog, hdc in next 1, hdc2tog. hdc in the last st., turn. -4sts
Row 9. ch 2. hdc in each stitch across, pull through and fasten off. -4 sts.
ch 2. hdc in each stitch across, pull through and fasten off.
The braid from the center of the ear flap at the bottom, attach white and pink yarn, with a sl st in the center of the bottom of the ear flap and chain 30, and sl st it off and cut yarn. sl st with white yarn and single crochet around the edge of the hat to complete.
Trim: sc around with white yarn
Eyes:
Buttons,
Make 2, Sew on two buttons about 2 inches apart above the snout.
Snout:
H hook,
Pink yarn,
rnd 1: ch 2, work 6 hdc in the 2nd chain from the hook, sl st to join. -6 hdc
rnd 2: Work 2 hdc in each hdc around. work in continual rounds, use a marker to track your rounds.
-12 hdc
rnd 3: *hdc in next hdc, 2 hdc in next hdc; repeat from * -16 hdc
rnd 4: slip stitch in each hdc around, join, fasten off. -16 sl st
Sew with black yarn 1/2 inch vertical slits for nostrils on the snout. Attach the snout to the hat in the center below the eyes.
Ears:
Make 4,
H hook,
Pink yarn,
rnd 1: ch 7 , sc in the 2nd chain from the hook and each sc across, chain, turn -6 sc
rnd 2: 6 sc in each stitch across, chain 1 and turn -6 sc
rnd 3: 6 sc in each stitch across, chain 1 and turn -6 sc
rnd 4: 2sctog decrease, sc in the next 2 stitches, 2sctog decrease, chain 1 and turn -4 sc
rnd 5: 4 sc stitch across, chain 1 and turn -4 sc
rnd 6: 2sctog decrease twice, chain 1 and turn -2 sc
rnd 7: 2 sc in each stitch across, chain 1 and turn -2sc
rnd 8: 2sctog decrease, pull through, fasten off. -1sc
Create an Ear: Single crochet around 2 Ear pieces together to create one Ear, *Repeat for the other ear. Attach the ears on top of the hat, about 2 inches apart. Weave in the ends.
Print the Entry on the top of the page to print the pattern!
Click Here for More Crochet Hat Patterns
Follow along with the video tutorial to make the process even more accessible. Ultimately, you’ll have a cozy and stylish crochet pig hat that’s perfect for winter. You can also personalize your hat by adding a faux fur pom or a yarn pom pom for a playful touch.
Crochet hats are a fantastic and versatile accessory, perfect for winter. Whether you’re an experienced crocheter or a beginner, there’s an easy crochet hat pattern for you. From slouchy hats to messy bun hats, you can create various styles using different yarn weights and hook sizes. Follow along with a free crochet pattern, or watch a video tutorial to make the process even more enjoyable. Don’t forget to use a stitch marker to keep track of your stitches and ensure a perfect fit for your hat. With these basic crochet stitches, like single and double crochet, you’ll be on your way to creating great gifts and cozy headwear for yourself and your loved ones. Happy crocheting!


You May Also Like

How to Crochet an Easy Slouchy Hat Tutorial
Crochet a Stylish Basketweave Hat: Step-by-Step Guide