Learn to Crochet a Men’s and Boy Knight Hat: Step-by-Step Guide
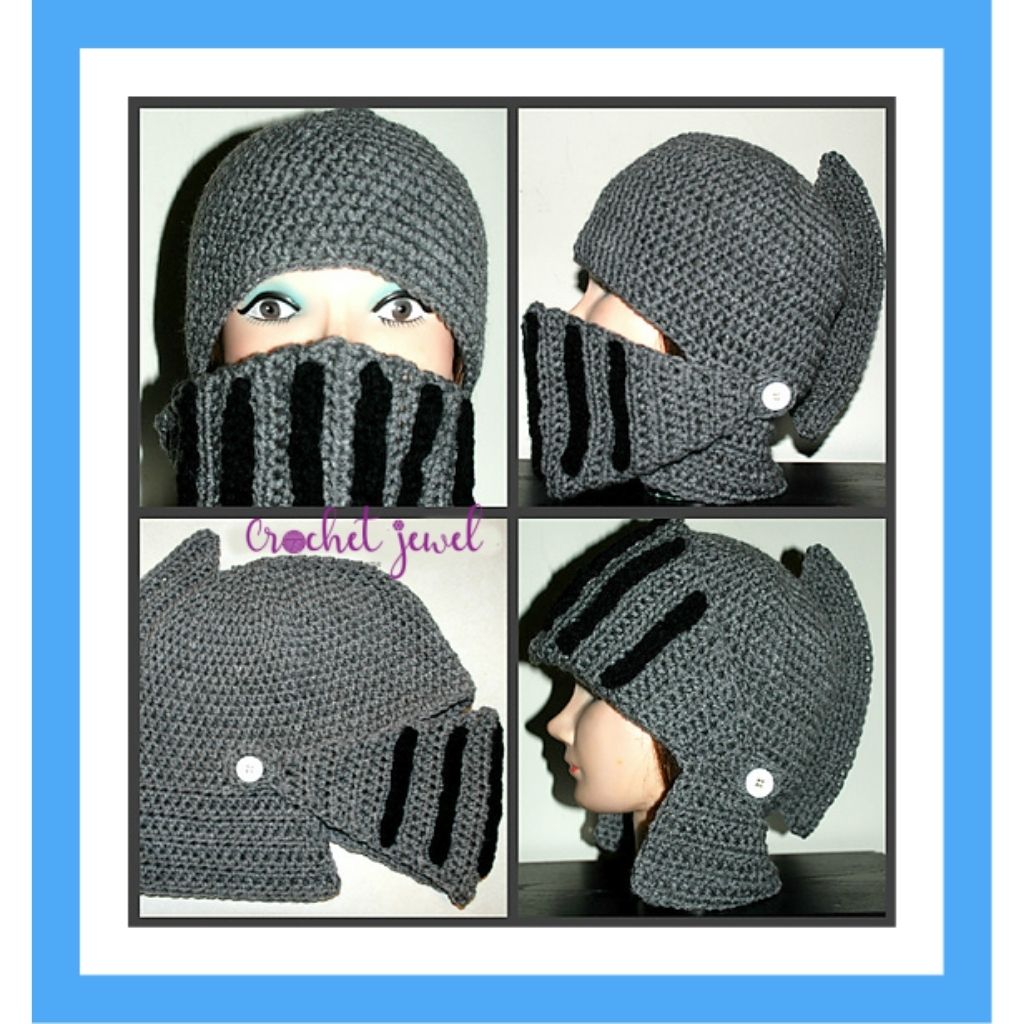
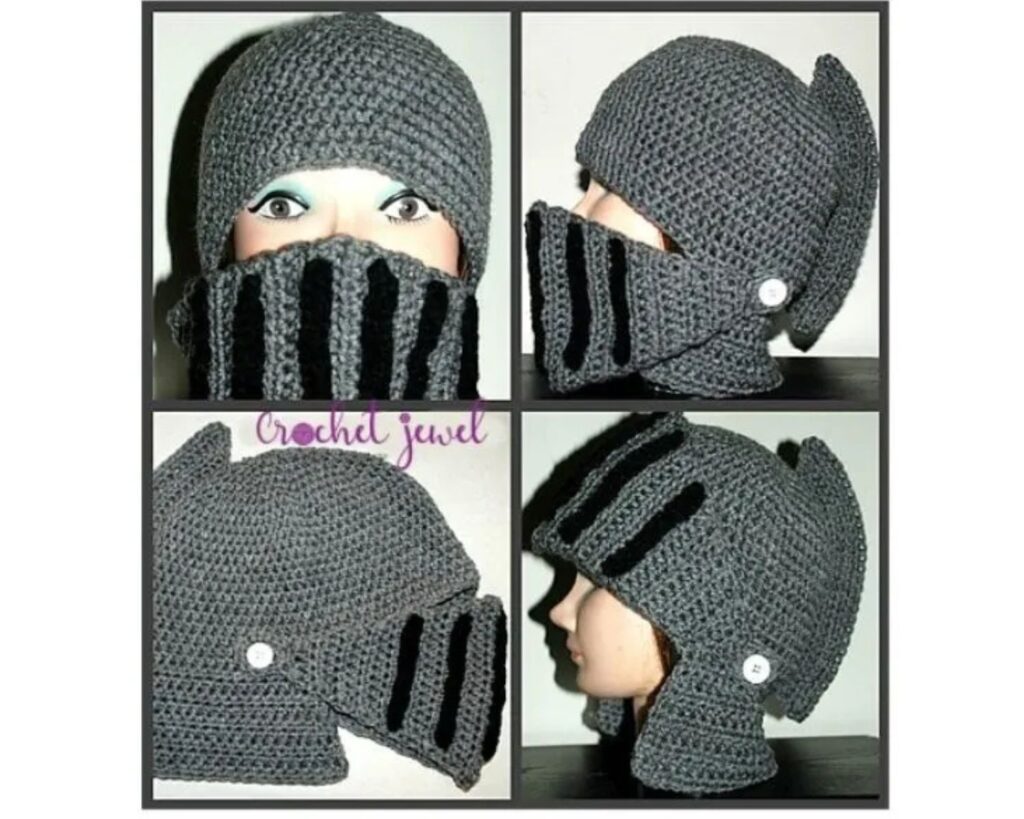
How to Crochet a Knight Helmet Hat
Welcome to our detailed tutorial on crafting a Crochet Men’s Knight Hat. This versatile pattern tutorial is designed for all crochet enthusiasts, from beginners to advanced crafters, and it’s perfect for the winter season. You’ll learn essential skills like single crochet, slip stitch, and more with a free crochet pattern. The tutorial also includes a video guide for extra help. In this pattern, you’ll work through the basics of crochet. We start with the foundation row and create various stitches in back loops, allowing you to form the perfect knight’s hat shape.
This pattern is copyrighted by Amy Lehman. Please do not copy or duplicate this pattern. You are welcome to link back to my pattern, but do NOT post the pattern on your website. Thank you for respecting my work!
Embark on a medieval adventure with the enchanting world of crochet as we unveil the magnificent crochet knight hat! This unique creation transports you to the age of chivalry and courage, where every stitch tells a tale of bravery and heroism. Join us as we don our crochet armor and wield our hooks to craft this majestic headpiece fit for young knights in shining armor. Whether for playtime adventures or themed parties, the crochet knight hat will inspire imaginative journeys and bring joy to all who wear it.
This post contains affiliate links. If you purchase through these links, I may earn a modest commission at no extra cost. Please review my privacy policy for more details.
Don’t worry if you’re a beginner; our detailed crochet hat size chart will guide you to achieve the correct head size. You can customize it with different yarn weights, choosing from worsted to super bulky. It’s a great gift idea for the cold weather season. With step-by-step instructions and clear photo tutorials, you’ll have a finished hat that’s both stylish and functional. Plus, it’s adaptable for adults, making it a perfect fit for everyone.
When crocheting this stylish Knight Hat, the choice of yarn plays a crucial role. We recommend worsted-weight yarn for the perfect combination of warmth and texture. You can create a warm, chunky knight’s hat with bulky yarn for a cozy feel. With basic crochet stitches like single and slip stitch, you’ll effortlessly craft this masterpiece, even if you’re a beginner. Our detailed photo tutorials make it easy to follow, and you’ll complete the entire hat with finesse.
This knight hat is fun to make for any man or boy! It works nicely, and videos help you along the way.
Click the Social Icons to Stay Connected
![]()
![]()
![]()
![]()

✨ We hope you enjoyed these photos! If so, please consider sharing them on Pinterest by clicking the Pin Button on each image. Your support helps us connect with more people and spread creativity. Thank you so much! 💖
I Hook
H Hook
Yarn needle, Two Buttons (black or white buttons)
Abbreviations:
sc=single crochet
sl st=slip stitch
ch=chain
hdc=half double crochet
hdc2tog=half double crochet 2 together decrease
How to Crochet For Beginners Playlist – Click Here
Instructions: I Hook, Grey yarn
ch 5, sl st, to form a ring.
rnd 1. ch 2 (count as one hdc), work 9 hdc in the ring, sl st. (10 hdc)
rnd 2. ch 2 (counts as one hdc), hdc in the same stitch as the ch2, then work 2hdc in each stitch around, Slip Stitch (start to use a marker) (20 hdc)
rnd 3. *work a hdc in the next stitch, 2hdc in the next stitch, *repeat around, continue around, no slip stitch or chain, (I would use a marker so you can keep track of your increased rounds) (30 hdc)
rnd 4. *work a hdc in the next 2 stitches, 2hdc in the next stitch, *repeat around, continue around. (40 hdc)
rnd 5. *work a hdc in the next 3 stitches, 2hdc in the next stitch, *repeat around, continue around. (50 hdc)
rnd 6. *work a hdc in the next 4 stitches, 2 hdc in the next stitch, *repeat around, continue around. (60 hdc)
rnd 7. *work a hdc in the next 5 stitches, 2 hdc in the next stitch, *repeat around, continue around. (70 hdc) Make sure you have around 70 stitches around to make it big enough for a man’s head.
rnds 8-22. *work a hdc in each stitch around,*repeat for 15 more rounds. Slip Stitch
Side Flaps: row 23. Slip Stitch into the next hdc again, Turn, ch 1, work 2 hdc in the next hdc, hdc in the next 32 hdc, work 2 hdc in the next hdc, Turn -36hdc
row 24. ch1, work 2 hdc, hdc in the next 34 hdc, work 2 hdc in the next hdc, Turn -38hdc
rows 25-31. ch 1, hdc in the next 38 hdc, Turn *Repeat this for next 6 rounds. -38hdc
Front Mask: I hook, Grey yarn (Optional, if you want to add the black strips as you go, or you can sew them on as seen below on how to make the strips) Start with Grey yarn,
row 1. Chain 5, Slip Stitch to Form a ring, Ch 2, work 11 hdc in the ring.
row 2. ch 1, hdc in the next 4 stitches, Turn -4hdc
row 3. ch 1, work 2hdc in the first hdc, hdc in the next 2 hdc, work 2 hdc in the last hdc, Turn -6hdc
row 4. ch 1, work 2hdc in the first hdc, hdc in the next next 4 hdc, work 2 hdc in the last hdc, Turn -8hdc
row 5. ch 1, hdc in the next 8 hdc, Turn -8hdc
row 6. Switch to Black yarn a slip stitch, ch 1, work 2hdc in the first hdc, hdc in the next next 6 hdc, work 2 hdc in the last hdc, Turn -10hdc
row 7. With Black yarn, ch 1, hdc in the next 10 hdc, Turn -10hdc
row 8. Switch to Grey yarn with a slip stitch, ch 1, work 2hdc in the first hdc, hdc in the next next 8 hdc, work 2 hdc in the last hdc, Turn -12hdc
row 9. With grey yarn, ch 1, hdc in the next 12 hdc, Turn -12hdc
row 10. Switch to Black yarn with a slip stitch, ch 1, work 2hdc in the first hdc, hdc in the next next 10 hdc, work 2 hdc in the last hdc, Turn -14hdc
row 11. With Black yarn, ch 1, hdc in the next 14 hdc, Turn -14hdc
row 12. Switch to Grey yarn with a slip stitch, ch 1, work 2hdc in the first hdc, hdc in the next next 12 hdc, work 2 hdc in the last hdc, Turn -16hdc
row 13. With Grey yarn, ch 1, hdc in the next 16 hdc, Turn -16hdc
row 14. Switch to Black yarn with a slip stitch, ch 1, work 2hdc in the first hdc, hdc in the next next 14 hdc, work 2 hdc in the last hdc, Turn -18hdc
row 15. Witch Black yarn, ch 1, hdc in the next 18 hdc, Turn -18hdc
row 16. Switch to Grey yarn with a slip stitch, ch 1, work 2hdc in the first hdc, hdc in the next next 16 hdc, work 2 hdc in the last hdc, Turn -20hdc
row 17. With Grey yarn, 2hdctog decrease, work hdc in the next 16 hdc, 2hdctog decrease, Turn -18hdc
row 18. Switch to Black yarn with a slip stitch, ch 1, hdc in the next 18 hdc, Turn -18hdc
row 19. With Black yarn, 2hdctog decrease, work hdc in the next 14 hdc, 2hdctog decrease, Turn -16hdc
row 20. Switch to Grey yarn with a slip stitch, ch 1, hdc in the next 16 hdc, Turn -16hdc
row 21. With Grey yarn, 2hdctog decrease, work hdc in the next 12 hdc, 2hdctog decrease, Turn -14hdc
row 22. Switch to Black yarn with a slip stitch, ch 1, hdc in the next 14 hdc, Turn -14hdc
row 23. With Black yarn, 2hdctog decrease, work hdc in the next 10 hdc, 2hdctog decrease, Turn -12hdc
row 24. Swith to Grey yarn with a slip stitch, ch 1, hdc in the next 12 hdc, Turn -12hdc
row 25. With Grey yarn, 2hdctog decrease, work hdc in the next 8 hdc, 2hdctog decrease, Turn -10hdc
row 26. Switch Black yarn with a slip stitch, ch 1, hdc in the next 10 hdc, Turn -10hdc
row 27. With Black yarn, 2hdctog decrease, work hdc in the next 6 hdc, 2hdctog decrease, Turn -8hdc
row 28. Switch to Grey yarn with a slip stitch, ch 1, hdc in the next 8 hdc, Turn -8hdc
row 29. With Grey yarn, 2hdctog decrease, work hdc in the next 4 hdc, 2hdctog decrease, Turn -6hdc
row 30. With Grey yarn, 2hdctog decrease, work hdc in the next 2 hdc, 2hdctog decrease, Turn -4hdc
row 31. With Grey yarn, hdc in next 4 hdc, -4hdc
row 32. With Grey yarn, Slip Stitch into the first 2 hdc, Chain 5, Slip Stitch in the same stitch as the chain 5, Slip Stitch into the next 2 hdc, Turn, Slip Stitch back into the next hdc after you turned, then Slip Stitch into the Chain 5, ch 1, work 12 hdc into the ring, Slip Stitch in the chain 5, Slip stitch into the next hdc. Fasten off. Weave in the ends.
Black yarn, H hook (Optional if you want to sew the strips on or slip stitch the colors in as seen up above)
Make 2 of Each. Chain 20, work sc in the 2nd chain from the hook and each stitch across, slip stitch into the last stitch. Fasten off.
Chain 18, work sc in the 2nd chain from the hook and each stitch across, slip stitch into the last stitch. Fasten off.
Chain 16, work sc in the 2nd chain from the hook and each stitch across, slip stitch into the last stitch. Fasten off.
Now Take the Two Chain 20 Strips and Sew them onto the Mask, Fold the Mask in half (This will help you find your center) and sew the black strip onto the center side by side about 1 inch apart.
Now Take the Two Chain 18 Strips and Sew them onto the Mask, Sew one Chain 18 Strip on one side of the Chain 20 strip about 1.5 inches apart and Sew the other Chain 18 Strip onto the other side of the Chain 20 strip.
Now Take the Two Chain 16 Strips and Sew them onto the Mask, Sew one Chain 16 Strip on one side of the Chain 18 strip about 1.5 inches apart and Sew the other Chain 16 Strip onto the other side of the Chain 18 strip.
Sew Two buttons on each side of the Side Flaps, Make sure the Buttons are far enough over on each side of the Side Flaps so the Button loops of the Mask is tight enough to cover your face.
Arch on top of the hat:
H hook,
row 1. Chain 25, sc in the 2nd chain from the hook, and each sc across, Turn -24 sc
row 2. work 2sc in the first sc, sc in the next 22 sc, work 2sc in the last, Turn -26sc
row 3. work 2sc in the first sc, sc in the next 24 sc, work 2sc in the last, Turn -28sc
row 4. sc in the next 28 sc, Fasten off, and Weave in the ends
Sew the Arch on top of the hat, First fold the hat in half, find the back center of the hat. Sew the arch at the center top and down the center.
Crochet Boy Knight Hat
sc=single crochet
sl st=slip stitch
ch=chain
hdc=half double crochet
hdc2tog=half double crochet 2 together decrease
Instructions: J hook ch 4, sl st, to form a ring.
row 19. ch1, work 2 hdc, hdc in the next 30 hdc, work 2 hdc in the next hdc, Turn -34hdc
rows 20-24. ch 1, hdc in the next 34 hdc, Turn *Repeat this for next 5 rounds. -34hdc
Front Mask: H hook, Grey yarn (Optional, if you want to add the black strips as you go, or you can sew them on as seen below on how to make the strips) Start with Grey yarn,
row 1. Chain 5, Slip Stitch to Form a ring, Ch 2, work 11 hdc in the ring.
row 2. ch 1, hdc in the next 4 stitches, Turn -4hdc
row 3. ch 1, work 2hdc in the first hdc, hdc in the next 2 hdc, work 2 hdc in the last hdc, Turn -6hdc
Row 4. ch 1, hdc in the next 6 hdc, Turn -6 hdc
row 5. (Optional, Switch to black yarn with a slip stitch or you can sew on the black strips at the end), ch 1, work 2hdc in the first hdc, hdc in the next next 4 hdc, work 2 hdc in the last hdc, Turn -8hdc
row 6. With black yarn, ch 1, work 2hdc in the first hdc, hdc in the next next 6 hdc, work 2 hdc in the last hdc, Turn -10hdc
row 7. Switch to grey yarn with a slip stitch, ch 1, hdc in the next 10 hdc, Turn -10hdc
row 8. With grey yarn, ch 1, work 2hdc in the first hdc, hdc in the next next 8 hdc, work 2 hdc in the last hdc, Turn -12hdc
row 9. Switch to black yarn with a slip stitch, ch 1, hdc in the next 12 hdc, Turn -12hdc
row 10. With black yarn, ch 1, work 2hdc in the first hdc, hdc in the next next 10 hdc, work 2 hdc in the last hdc, Turn -14hdc
row 11. Switch to grey yarn with a slip stitch, ch 1, hdc in the next 14 hdc, Turn -14hdc
row 12. With grey yarn, ch 1, work 2hdc in the first hdc, hdc in the next next 12 hdc, work 2 hdc in the last hdc, Turn -16hdc
row 13. Switch to black yarn with a slip stitch, ch 1, hdc in the next 16 hdc, Turn -16hdc
row 14. With black yarn, ch 1, work 2hdc in the first hdc, hdc in the next next 14 hdc, work 2 hdc in the last hdc, Turn -18hdc
row 15. Switch to grey yarn with a slip stitch, ch 1, hdc in the next 18 hdc, Turn -18hdc
row 16. With grey yarn, ch 1, work 2hdc in the first hdc, hdc in the next next 16 hdc, work 2 hdc in the last hdc, Turn -20hdc
row 17. Swithch to black yarn with a slip stitch, 2hdctog decrease, work hdc in the next 16 hdc, 2hdctog decrease, Turn -18hdc
row 18. With black yarn, ch 1, hdc in the next 18 hdc, Turn -18hdc
row 19. Switch to grey yarn with a slip stitch, 2hdctog decrease, work hdc in the next 14 hdc, 2hdctog decrease, Turn -16hdc
row 20. With grey yarn, ch 1, hdc in the next 16 hdc, Turn -16hdc
row 21. Switch to black yarn with a slip stitch, 2hdctog decrease, work hdc in the next 12 hdc, 2hdctog decrease, Turn -14hdc
row 22. with black yarn, ch 1, hdc in the next 14 hdc, Turn -14hdc
row 23. Switch to grey yarn with a slip stitch, 2hdctog decrease, work hdc in the next 10 hdc, 2hdctog decrease, Turn -12hdc
row 24. With grey yarn, ch 1, hdc in the next 12 hdc, Turn -12hdc
row 25. Switch to black yarn with a slip stitch, 2hdctog decrease, work hdc in the next 8 hdc, 2hdctog decrease, Turn -10hdc
row 26. With black yarn, ch 1, hdc in the next 10 hdc, Turn -10hdc
row 27. Switch to grey yarn with a slip stitch, 2hdctog decrease, work hdc in the next 6 hdc, 2hdctog decrease, Turn -8hdc
row 28. With grey yarn, 2hdctog decrease, work hdc in the next 4 hdc, 2hdctog decrease, Turn -6hdc
row 29. With grey yarn, 2hdctog decrease, work hdc in the next 2 hdc, 2hdctog decrease, Turn -4hdc
Black Strips on the Mask: (Optional if you want to sew the strips on or slip stitch the colors in as seen up above) Black yarn, H hook
Make 2 of Each. Chain 18, work sc in the 2nd chain from the hook and each stitch across, slip stitch into the last stitch. Fasten off.Chain 16, work sc in the 2nd chain from the hook and each stitch across, slip stitch into the last stitch. Fasten off.
Now Take the Two Chain 14 Strips and Sew them onto the Mask, Sew one Chain 14 Strip on one side of the Chain 16 strip about 1.5 inches apart and Sew the other Chain 14 Strip onto the other side of the Chain 16 strip.
G hook,
row 1. Chain 23, sc in the 2nd chain from the hook, and each sc across, Turn -22 sc
row 2. work 2sc in the first sc, sc in the next 20 sc, work 2sc in the last, Turn -24sc
row 3. work 2sc in the first sc, sc in the next 22 sc, work 2sc in the last, Turn -26sc
row 4. sc in the next 26sc, Fasten off, and Weave in the ends
Sew the Arch on top of the hat. First, fold the hat in half. Find the back center of the hat. Sew the arch at the center top and down the center.
One of the fascinating aspects of crocheting knight helmet hats is their versatility in size and style. You can create adult medium-sized hats to accommodate different head sizes with various sizes available. Additionally, you can adjust the fit to your preference, ensuring your hat sits comfortably on your head. Adding a faux fur pom-pom enhances the visual appeal and adds a playful touch to the overall design, making it perfect for winter. It’s not just a hat; it’s an expression of your creativity and a statement piece in your winter wardrobe.
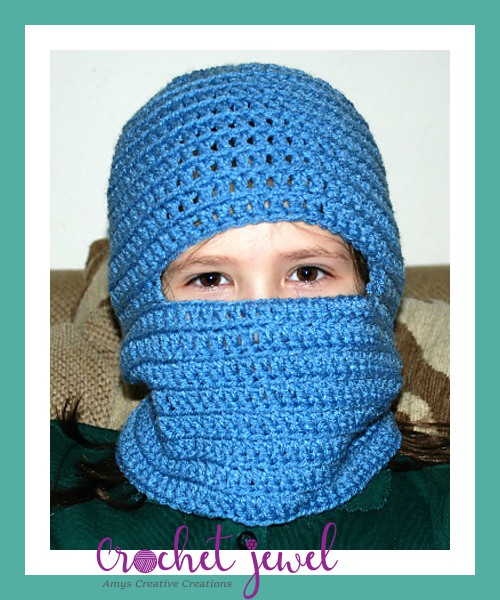
Click Here for a Crochet Ski Mask Pattern
Furthermore, this knight helmet hat project encourages experimentation with various yarns. You can choose from worsted weight, bulky weight, or even super bulky yarn to craft hats that cater to different preferences. These variations allow you to personalize your hats, creating slouchy designs or chunky beanies, all designed for cold weather. With the yarn tail and stitch marker, you can embark on an exciting journey, unleashing your crocheting prowess and creating beautiful, handmade beanies. So, grab your crochet hook and embrace the world of knight helmet hats, a perfect crochet project for the winter season.
One of the best aspects of this crochet project is that it allows you to experiment with different colors. From classic knight helmet shades to more vibrant and contrasting tones, you can customize your hat to match your style. The ability to personalize your knight’s hat and add faux fur pom-pom accents makes this project an absolute favorite among crocheters. Plus, it’s an ideal quick crochet project, allowing you to create a unique accessory quickly.
In this crochet journey, our tutorial includes a comprehensive video guide to help you grasp every detail of crafting this knight helmet hat. Whether you’re part of our social media community or just starting, our Facebook group offers support, answers questions, and shares the joy of crocheting. It’s more than just a crafting project; it’s an opportunity to connect with fellow crocheters and embark on a creative adventure during winter. Join our community and enjoy the satisfaction of completing a slouchy, warm, and stylish Knight Hat that you can proudly wear or gift to others.
So, whether you’re an experienced crocheter looking for an engaging project or a beginner eager to explore the crochet world, this Knight Hat pattern tutorial is the perfect fit. With skill levels ranging from easy crochet hat patterns to advanced techniques, it accommodates crocheters at any stage of their journey. The combination of practicality and style, enhanced by the faux fur pom-pom and the unique stitches, creates an accessory that’s a great conversation starter.
The perfect crochet hat is a work of art, and with this pattern, you can rest assured that you’re creating a piece that protects you from the cold and adds a touch of medieval flair to your wardrobe. Crocheted beanies have become a staple in winter fashion, and now you can make your own tailored to your tastes. So, whether you plan to enjoy the finished hat yourself or gift it to a loved one, you’re in for a crocheting experience like no other. Prepare to create the perfect Knight Hat with your choice of yarn, pattern, and personalized colors, and embrace the cold weather season in style. Happy crocheting!
Few projects in crochet are as satisfying as crafting the perfect hat. The Knight Hat pattern tutorial we’ve shared offers a blend of traditional and contemporary elements, making it an ideal addition to your crochet projects. Whether you’re a seasoned crocheter or just beginning your crochet journey, the accessible skill levels ensure everyone can enjoy the process. With our clear video tutorials, helpful Facebook community, and comprehensive pattern, you’ll have the support you need every step of the way.
In conclusion, this crochet project is a great way to keep warm and an enjoyable creative experience. So, grab your crochet hook, your choice of yarn, and get ready to crochet a cozy and fashionable knight’s hat. Whether you’re a seasoned crocheter or just starting, our pattern tutorial, filled with basic crochet stitches, guides you to the finished hat. Happy crocheting!
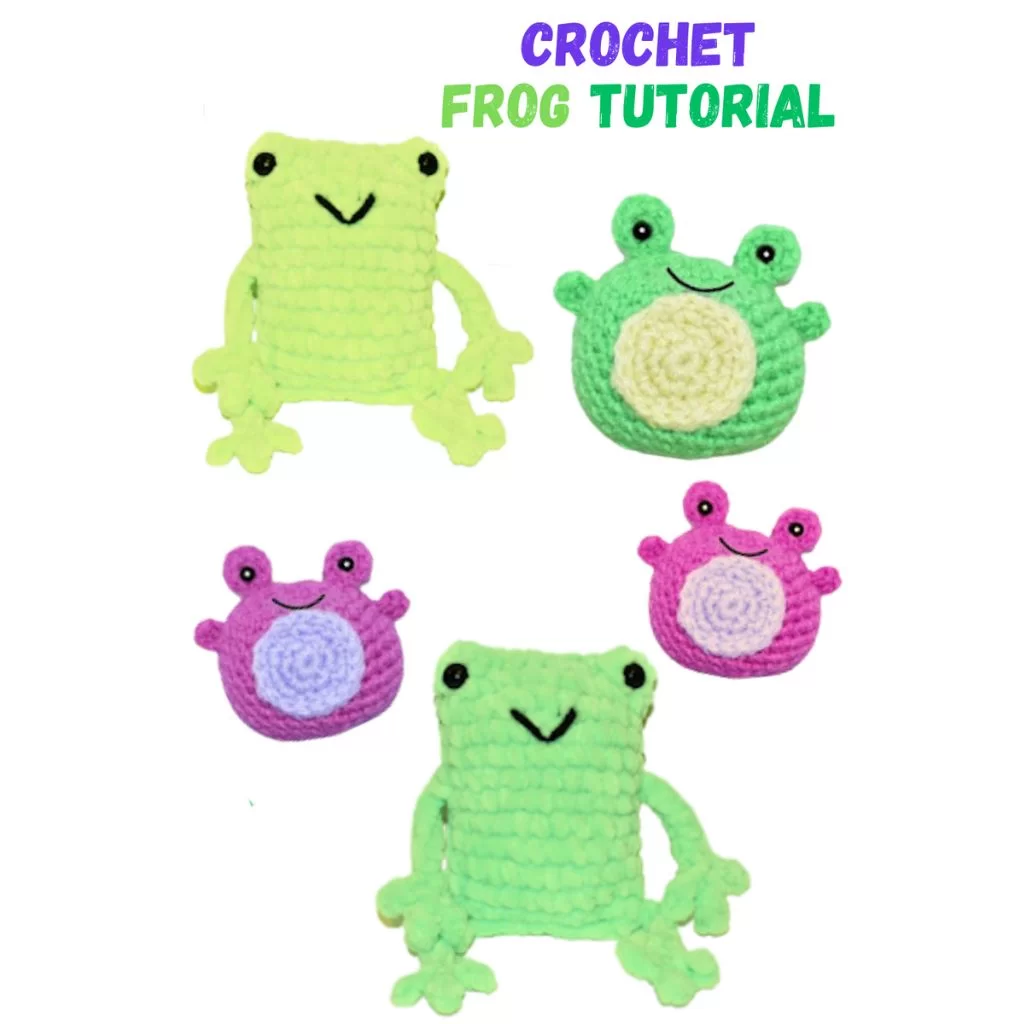
Click Here for the Crochet Frog Patterns

I absolutely love Amazon for its unbeatable Crochet deals and amazing selection!—click here to discover your next great deal!
Amazon Prime: Unlock fast, free shipping, exclusive Prime Video shows, and more with Amazon Prime! Click here to start your 30-day free trial today!
Audible Plus: Access thousands of audiobooks and podcasts with Audible Plus! Click here for Audible Plus on Amazon!
Kindle: Discover millions of books with Kindle—read anywhere, anytime! Click here to buy on Amazon!
Amazon Prime Video: Enjoy unlimited streaming of top movies and TV shows with Amazon Prime Video! Click here to start watching!
Amazon Music: Stream millions of songs and playlists with Amazon Music! Click here to start listening!
To Find All My Crochet Jewel Patterns, Click Here

Click Here for My Ravelry Patterns


Crochet Hats for Beginners Book For Sale – Click Here

Crochet For Beginners Book for Sale – Click Here
Click Here fo Lion Brand Yarn and Free Patterns

I’m using Rakuten to get Cash Back at my favorite stores. Hate for you to miss out, so join now with my invite and you’ll get $30 after you spend $30.* Click Here for Cash Back


One Comment
Matt
Hi. I was wondering how would you modify the knight pattern for an adult male?