
10 Easy Halloween Desserts to Satisfy Your Sweet Tooth
Get ready to satisfy your sweet tooth and spook your taste buds with these ten easy Halloween desserts. Whether you’re hosting a Halloween party, preparing a special treat for your family, or simply indulging in seasonal sweets, these recipes are perfect for adding a touch of spooky fun to your celebrations. From creepy cupcakes to chocolatey graveyard parfaits, we’ve gathered various dessert ideas that are both delicious and delightfully eerie.
As the spooky season approaches, it’s the best time of year to whip up some easy Halloween desserts that will surely delight your guests, especially the little goblins with a sweet tooth. These fun Halloween desserts are perfect treats for your next Halloween party.
This post contains affiliate links. If you purchase through these links, I may earn a modest commission at no extra cost. Please review my privacy policy for more details.
There is no need to be a master baker – these treats are beginner-friendly, so everyone can enjoy making and eating them. So, put on your apron and prepare some wickedly tasty desserts to make your Halloween memorable!
✨ We hope you enjoyed these photos! If so, please consider sharing them on Pinterest by clicking the Pin Button on each image. Your support helps us connect with more people and spread creativity. Thank you so much! 💖
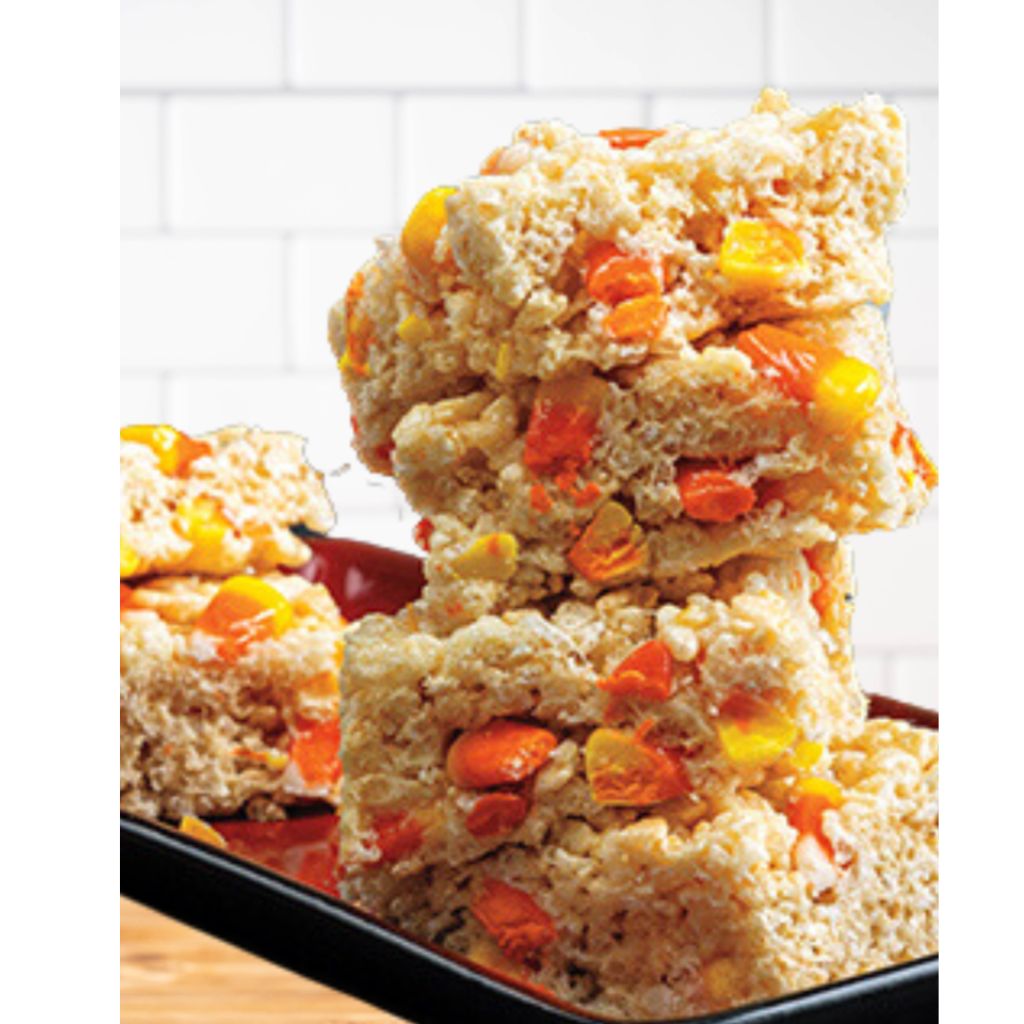
Candy Corn Rice Krispie Treats: Make traditional Rice Krispie treats but layer them with candy corn colors for a festive look.
Craft candy corn-inspired rice crispy treats in different colors to mimic classic Halloween candy. A simple frosting in vibrant colors provides the finishing touch to these easy Halloween treats, making them a favorite for party guests of all ages.
- 3 tablespoons butter
- 4 cups mini marshmallows
- 6 cups crispy rice cereal
- Yellow and orange food coloring
- Cooking spray
Instructions:
- Preparation: Grease a 9×13-inch baking pan with cooking spray and set aside.
- Melt Butter: In a large saucepan, melt the butter over low heat.
- Add Marshmallows: Add the mini marshmallows to the melted butter and stir continuously until they are completely melted and the mixture is smooth.
- Divide and Color: Divide the marshmallow mixture into three equal parts. Leave one part as it is (white). Add yellow food coloring to the second and orange food coloring to the third. Stir each until you achieve the desired colors.
- Layering: Start by pressing the white marshmallow mixture evenly into the prepared baking pan as the bottom layer.
- Yellow Layer: Press the yellow marshmallow mixture on top of the white layer. You can use a piece of wax paper or your hands, but make sure it’s evenly spread.
- Orange Layer: Press the orange marshmallow mixture on top of the yellow layer.
- Cool: Allow the Candy Corn Rice Krispie Treats to cool and set for at least 30 minutes at room temperature.
- Cut and Serve: Once completely set, cut the treats into squares or rectangles with a sharp knife. Serve and enjoy!
These Candy Corn Rice Krispie Treats are a sweet and festive addition to any Halloween gathering. The layering of colors mimics the iconic candy corn, making them a fun and visually appealing treat.
Witch Hat Cookies: To create edible witch hats, top chocolate-covered cookies with a Hershey’s Kiss and a frosting buckle.
Create a witch hat with chocolate kisses using essential ingredients. With melted chocolate chips and sugar cookies, you can craft adorable handheld treats that will be a hit at your next haunted house party.

Ingredients:
- Chocolate-covered cookies (such as Fudge Stripes or similar)
- Hershey’s Kisses (unwrapped)
- Orange frosting (store-bought or homemade)
- Optional: Halloween-themed sprinkles
Instructions:
- Prepare a clean surface, like a baking sheet or countertop, lined with parchment paper to place the cookies on after decorating.
- Flip a chocolate-covered cookie upside down so the chocolate coating is facing upward.
- Squeeze a small amount of orange frosting onto a Hershey’s Kiss’s bottom (flat side).
- Carefully press the frosted end of the Hershey’s Kiss onto the center of the chocolate-covered cookie. The frosting will act as glue to hold the two together.
- Using the same orange frosting, create a small, rectangular “buckle” on the base of the Hershey’s Kiss where it meets the cookie. This simulates the belt of the witch’s hat.
- Add Halloween-themed sprinkles or decorations to the frosting buckle for extra flair and color if desired.
- Repeat the process for as many Witch Hat Cookies as you’d like to make.
- Let the cookies sit for a little while to let the frosting set.
- Once the frosting has set, your Witch Hat Cookies are ready to be enjoyed!
These Witch Hat Cookies are a fun and delicious addition to any Halloween gathering. Enjoy your homemade Halloween treats!
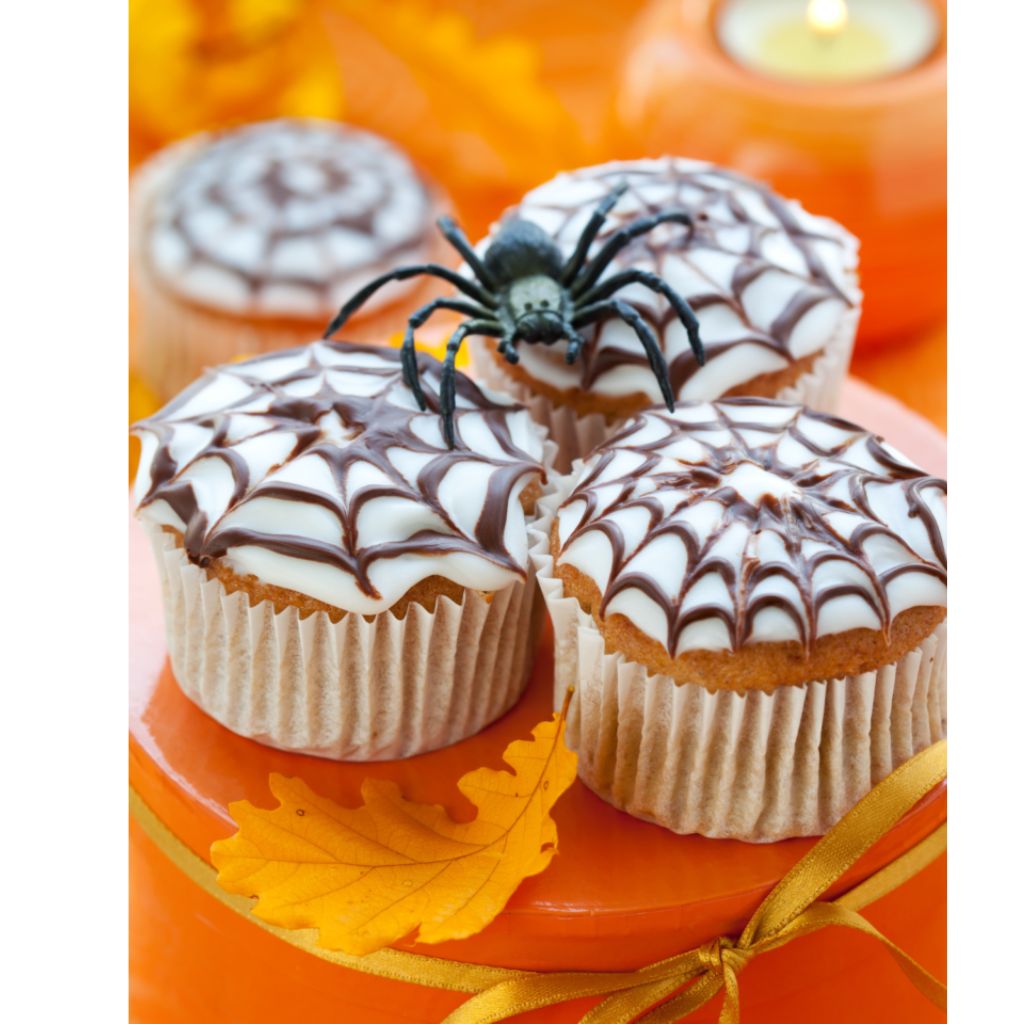
Spiderweb Cupcakes: Pipe spiderweb designs with black icing on top of white-frosted cupcakes.
Ingredients:
- Cupcakes (homemade or store-bought)
- White frosting (homemade or store-bought)
- Black icing gel or frosting (store-bought or homemade)
- Optional: Candy spiders or Halloween-themed decorations
Instructions:
- Bake or purchase your favorite cupcakes. If baking, allow them to cool completely before decorating.
- Once the cupcakes are cooled, spread a layer of white frosting evenly over each one. You can use a butter knife, offset spatula, or piping bag.
- Prepare your black icing gel or frosting. If using store-bought icing gel, ensure it’s at room temperature for easy piping. If making homemade black frosting, add black food coloring to white frosting until you achieve the desired black color. Place the black frosting in a piping bag fitted with a fine tip or a zip-top bag with a small corner cut off.
- Start by piping a small black dot in the center of the cupcake.
- Next, pipe straight lines radiating outward from the center dot to the edge of the cupcake. These lines should resemble the spokes of a wheel.
- Connect the lines by piping concentric circles around the center dot. This will create the spiderweb design.
- If you like, you can add a tiny candy spider or other Halloween-themed decoration in the center of the spiderweb.
- Repeat the process for all your cupcakes.
- Allow the icing to set for a little while, and your Spiderweb Cupcakes are ready to serve.
These Spiderweb Cupcakes are perfect for Halloween parties and will impress your guests with their spooky and delicious design! Enjoy making and eating them.
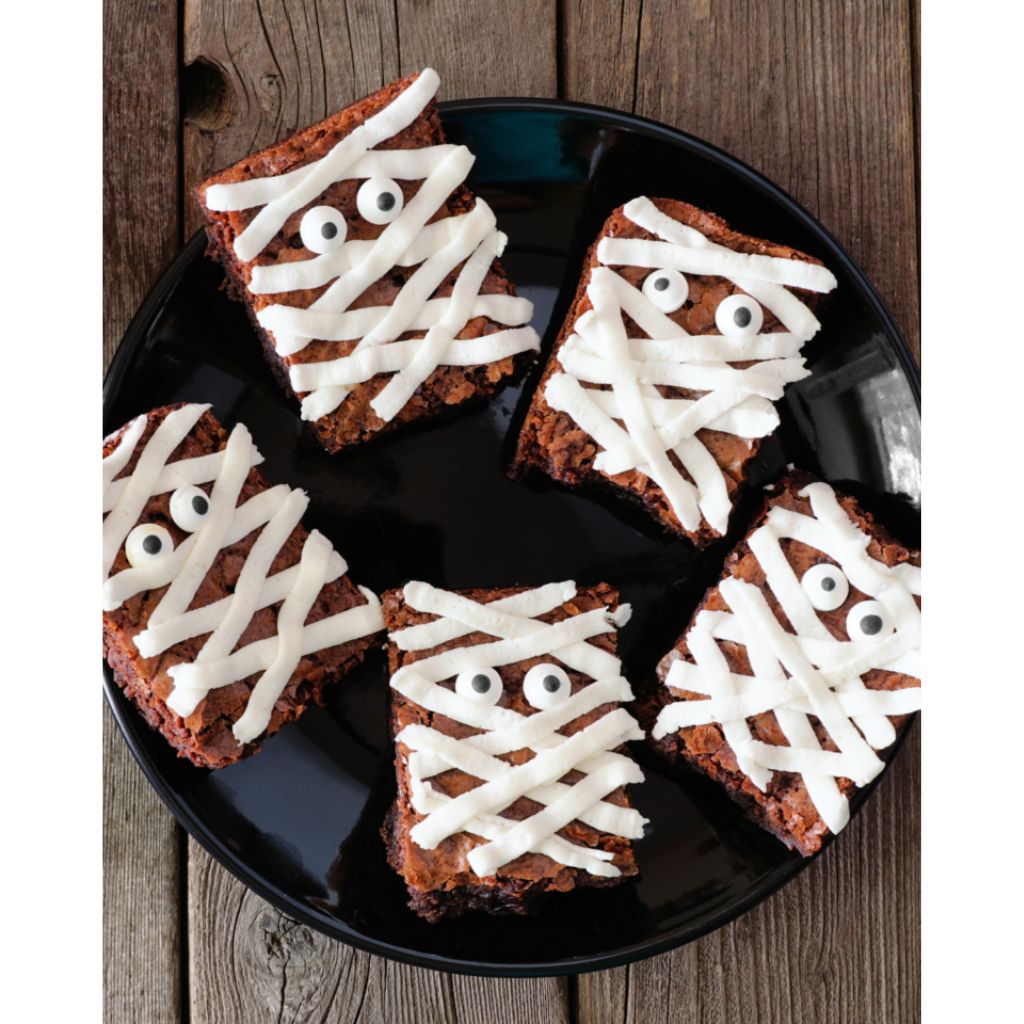
Mummy Brownies: Decorate brownies with drizzled white chocolate to resemble mummies.
Ingredients:
- 1 batch of your favorite brownies (homemade or from a mix)
- 1 cup white chocolate chips or white candy melts
- Candy eyes (edible candy eyes available at baking supply stores)
- Cooking oil or shortening (to thin the white chocolate for drizzling)
Instructions:
- Prepare a batch of brownies according to the recipe or package instructions. Allow them to cool completely in the baking pan.
- Once the brownies have cooled, cut them into squares or rectangles, whichever you prefer.
- In a microwave-safe bowl, melt the white chocolate chips or candy melts in 20-30-second intervals, stirring in between, until smooth. If the melted white chocolate is too thick, add a tiny amount of cooking oil or shortening to thin it out for easier drizzling. Stir until well combined.
- Using a spoon or a piping bag with a small round tip, drizzle the melted white chocolate over the brownie squares in a crisscross pattern to resemble mummy bandages. Leave a space for the candy eyes to go later.
- While the white chocolate is still wet, gently press candy eyes onto each brownie to create the mummy’s eyes. You can use two eyes for each mummy or get creative with different expressions.
- Allow the white chocolate drizzle to set and harden, which may take about 30 minutes at room temperature or a shorter time if you place them in the refrigerator.
- Once the white chocolate has hardened, your Mummy Brownies are ready to be served!
These adorable and tasty Mummy Brownies are a perfect treat for Halloween parties or any spooky-themed event. Enjoy making and sharing them with friends and family!
Pumpkin-Shaped Sugar Cookies: Use pumpkin-shaped cookie cutters and decorate with orange icing and chocolate chip faces.
Combine the fall flavor of pumpkin spice with the sweetness in these delightful treats. These pumpkin cookies are an easy dessert that appeals to everyone’s taste buds, making them one of the best Halloween desserts.

Ingredients:
For the Cookies:
- 2 3/4 cups all-purpose flour
- 1 teaspoon baking soda
- 1/2 teaspoon baking powder
- 1 cup unsalted butter, softened
- 1 1/2 cups white sugar
- 1 egg
- 1 teaspoon vanilla extract
For the Decoration:
- Orange icing or frosting
- Mini chocolate chips (for pumpkin faces)
Instructions:
- Whisk together the all-purpose flour, baking soda, and baking powder in a bowl. Set aside.
- In another large mixing bowl, cream the softened unsalted butter and white sugar until the mixture becomes light and fluffy.
- Beat in the egg and vanilla extract until well combined.
- Gradually add the dry and wet ingredients, mixing until a dough forms. If the dough is too sticky, you can add a bit more flour.
- Divide the dough into two portions, flatten each into a disc, and wrap them in plastic wrap. Refrigerate for at least 1 hour or until the dough is firm.
- Preheat your oven to 375°F (190°C) and line a baking sheet with parchment paper.
- Roll out one portion of the chilled dough on a lightly floured surface to about 1/4-inch thickness.
- Use pumpkin-shaped cookie cutters to cut out pumpkin shapes from the dough and place them on the prepared baking sheet. Leave some space between each cookie.
- Bake in the preheated oven for 8-10 minutes or until the edges of the cookies start to turn golden brown.
- Remove the cookies from the oven and let them cool on the baking sheet for a few minutes before transferring them to a wire rack to cool completely.
- Once the cookies are completely cool, decorate them with orange icing to cover the top surface. You can use a knife or a decorating bag with a small round tip for precision.
- Add mini chocolate chips to the pumpkins’ faces. Depending on your preference, you can create various facial expressions to make them look cute or spooky.
- Allow the icing to set before serving or storing the cookies.
Enjoy your homemade Pumpkin-Shaped Sugar Cookies, perfect for Halloween or any fall-themed occasion!
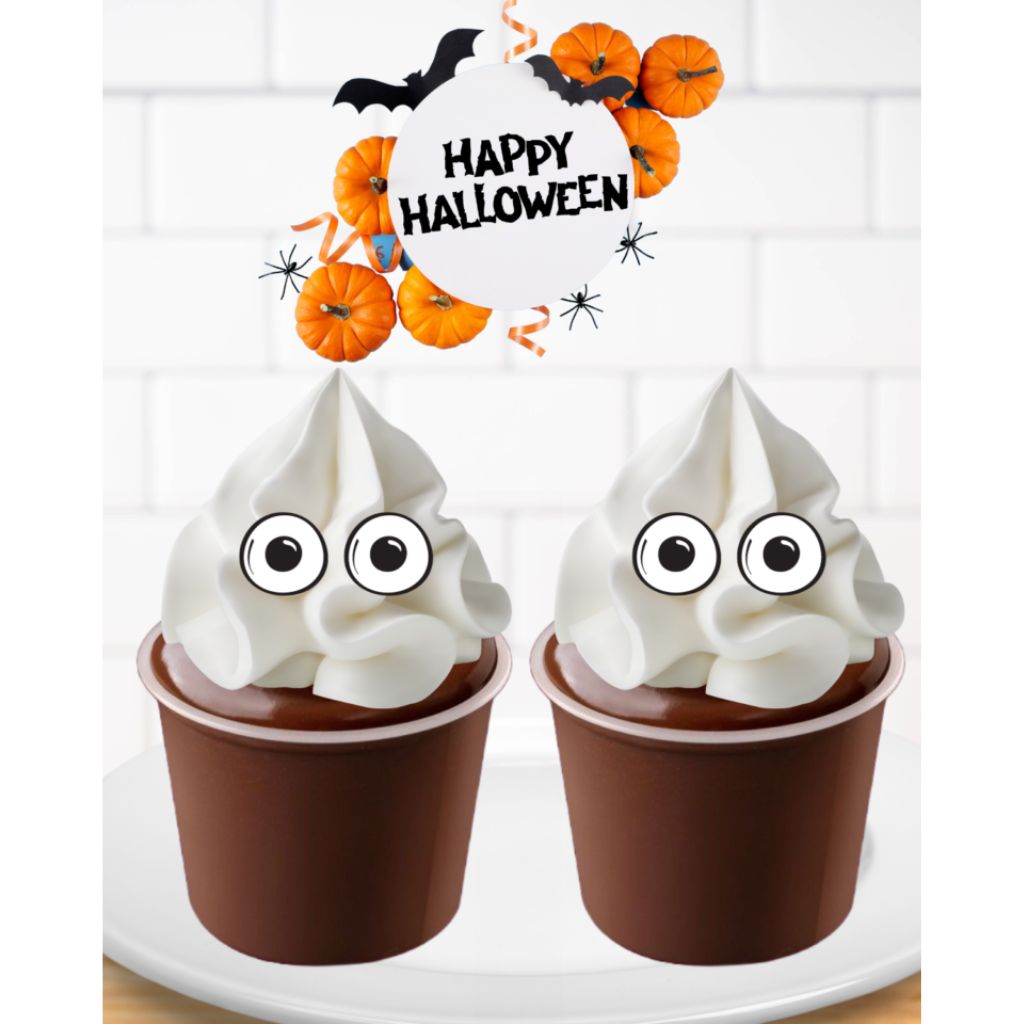
Ghostly Pudding Cups: Top chocolate pudding cups with whipped cream and add chocolate chips for ghost faces.
Ingredients:
- Chocolate pudding cups
- Whipped cream (you can use store-bought or homemade)
- Mini chocolate chips
Instructions:
- Start by preparing your chocolate pudding cups. You can use pre-packaged cups or make chocolate pudding according to the package instructions. If you’ve made pudding from scratch, let it cool.
- Once the chocolate pudding is ready and cooled, it’s time to add the whipped cream. You can use store-bought whipped cream or make your own by whipping heavy cream with a bit of sugar until it peaks stiffly.
- Carefully spoon or pipe a layer of whipped cream on each pudding cup. This will be the “ghost” part of your dessert.
- Gently press mini chocolate chips into the whipped cream to create the ghost’s eyes and mouth. Depending on your preference, you can use one chocolate chip for each eye and a few more for the mouth, creating a spooky or cute ghost face.
- Repeat the process for all of your pudding cups.
- Once you’ve decorated all the pudding cups, please place them in the refrigerator for a little while to allow the whipped cream to set.
- Serve your Ghostly Pudding Cups chilled, and enjoy your fun and spooky Halloween dessert!
These Ghostly Pudding Cups are a quick and delightful treat for Halloween parties or a spooky-themed dessert.
Spooky Black Caramel Apples: Turn traditional candy apples into spooky Halloween desserts by dipping them in a sinister black caramel candy coating. Edible eyes add a playful yet eerie touch, making them a delicious treat that captures the spirit of Halloween.
Dip apples in caramel and decorate them with colorful sprinkles or crushed candies.

Ingredients:
- 6 medium-sized apples (preferably tart varieties like Granny Smith)
- 1 cup granulated sugar
- 1/2 cup light corn syrup
- 1/4 cup water
- 1/4 teaspoon red food coloring (optional for traditional red candy apples)
- 1 teaspoon vanilla extract (optional for flavor)
- Assorted colorful sprinkles or crushed candies for decorating
- Wooden sticks or skewers for handling the apples
Instructions:
- Wash and thoroughly dry the apples. Remove any stems, and insert wooden sticks or skewers into the top center of each apple. Set them aside on a parchment paper-lined baking sheet.
- Combine granulated sugar, light corn syrup, and water in a medium saucepan. At this stage, add the red food coloring if you want to make traditional red candy apples. Stir well.
- Place the saucepan over medium-high heat and bring the mixture to a boil. Attach a candy thermometer to the saucepan’s side, ensuring it doesn’t touch the bottom.
- Continue boiling the mixture without stirring until it reaches the “hard crack” stage on the candy thermometer, around 300°F (150°C). This usually takes about 20-25 minutes.
- Remove the saucepan from the heat immediately once it reaches the desired temperature. Stir in the vanilla extract if you’d like to add flavor.
- Working quickly, carefully dip each apple into the hot caramel, tilting the saucepan to coat the apples evenly. Allow any excess caramel to drip back into the saucepan.
- Place the caramel-coated apples onto the parchment paper-lined baking sheet. While the caramel is still warm, sprinkle colorful sprinkles or crushed candies onto the coated apples, turning them to coat all sides.
- Let the candy apples cool and harden completely at room temperature. This may take about 30 minutes to an hour.
- Once the candy coating has hardened, your Candy Apples are ready to enjoy! You can serve them as a delicious treat at Halloween parties or wrap them in cellophane for a fun homemade gift.
Please exercise caution when working with hot caramel, which can cause severe burns. Supervise children when handling candy apples and allow them to cool before consuming. Enjoy your homemade Candy Apples!
Eyeball Cake Pops: Create cake pops and use edible gel to make them look like eerie eyeballs.

Ingredients:
For the Cake Pops:
- 1 baked cake (any flavor), cooled
- 1/2 cup frosting (cream cheese or buttercream)
- Candy eyeball decorations
- Lollipop sticks
- White chocolate or candy melts for coating
For the Decoration:
- Red gel food coloring
- Edible black marker or black frosting
Instructions:
- Prepare the Cake:
- Bake your favorite cake according to the package instructions or recipe.
- Let the cake cool completely.
- Crumble the Cake:
- Crumble the cooled cake into fine crumbs in a large bowl. You can use your hands or a fork to do this.
- Add Frosting:
- Add the frosting to the crumbled cake. Start with about 1/2 cup, and you can add more as needed to achieve the right consistency.
- Mix the frosting and cake crumbs until they are dough-like. They should stick together when you press them.
- Form Eyeball Shapes:
- Take small portions of the cake mixture and roll them into round balls. These will be the base of your eyeballs.
- Insert lollipop sticks into each cake ball, making sure they are secure.
- Chill the Cake Pops:
- Place the cake pops on a baking sheet lined with parchment paper and refrigerate them for at least 1 hour. This will help them firm up.
- Coat with White Chocolate:
- Melt the white chocolate or candy melts in a microwave-safe bowl per the package instructions.
- Dip each cake pop into the melted white chocolate, ensuring it’s fully coated. Allow any excess chocolate to drip off.
- Create Eyeball Design:
- While the white chocolate is still wet, gently press a candy eyeball decoration onto the center of each cake pop.
- Allow the chocolate to set slightly.
- Add Bloodshot Veins:
- Draw “bloodshot” veins around the eyeball decoration on each cake pop using red gel food coloring. You can use a toothpick or a fine brush for precision.
- Detail the Eyes:
- Use an edible black marker or black frosting to add the pupil and any additional details to the eyeballs.
- Let Them Set:
- Place the decorated cake pops back on the parchment-lined baking sheet and allow them to set completely. You can refrigerate them briefly to speed up the process.
- Serve:
- Your Eyeball Cake Pops are now ready to be served at your Halloween party or as a spooky treat. Enjoy!
Frankenstein Rice Krispie Treats: Shape Rice Krispie treats into Frankenstein’s faces and decorate them with green icing.
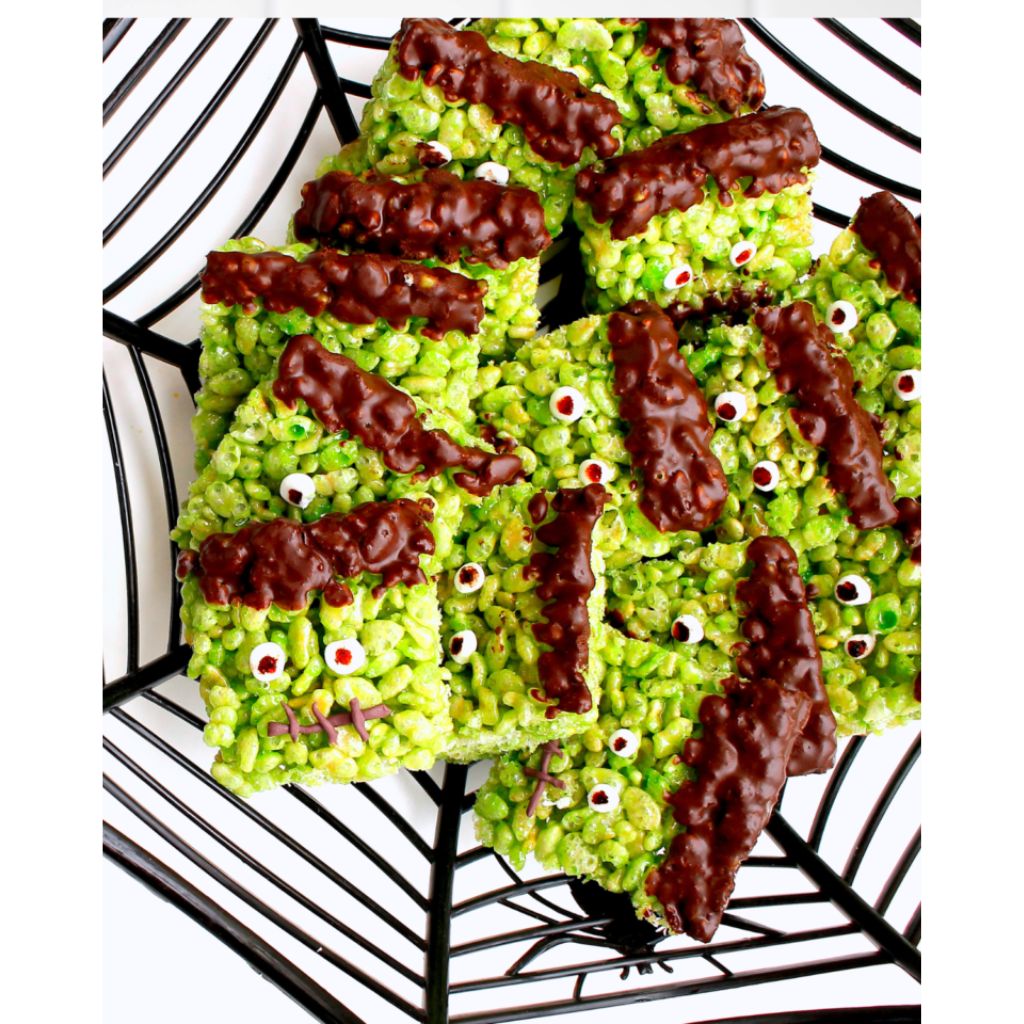
Ingredients:
For the Rice Krispie Treats:
- 6 cups Rice Krispies cereal
- 10 oz marshmallows
- 3 tbsp unsalted butter
- Green food coloring
- Black icing gel
For Decorating:
- Candy eyeballs
- Pretzel sticks (for bolts)
- Red icing gel
Instructions:
- Prepare Rice Krispie Treats:
- In a large saucepan, melt the butter over low heat.
- Add the marshmallows and stir until completely melted and smooth.
- Add a few drops of green food coloring to achieve the desired Frankenstein green color.
- Remove the saucepan from heat and stir in the Rice Krispies cereal until well coated.
- Press into a Pan:
- Press the green Rice Krispie mixture into a greased 9×13-inch baking pan, spreading it evenly.
- Allow it to cool and set for about 30 minutes.
- Cut into Rectangles:
- Once the Rice Krispie mixture has cooled and set, cut it into rectangles approximately 2×3 inches in size.
- Decorate as Frankenstein:
- Take each Rice Krispie rectangle and use black icing gel to draw Frankenstein’s “hair” on top.
- Attach candy eyeballs using a small amount of icing gel.
- Insert pretzel sticks on each side of the Rice Krispie rectangle to create Frankenstein’s “bolts.”
- Use red icing gel to add a stitched mouth or scars if desired.
- Let Them Set:
- Allow the decorations to set and the icing to dry for a little while.
- Serve and Enjoy:
- Your Frankenstein Rice Krispie Treats are now ready to be served at your Halloween party or as a spooky snack. Enjoy these adorable and delicious treats!
These Frankenstein Rice Krispie Treats are a fun and creative way to celebrate Halloween with a classic treat that has a monstrous twist!
Mummy Cupcakes: Wrap cupcakes with strips of white fondant or icing to resemble mummies.
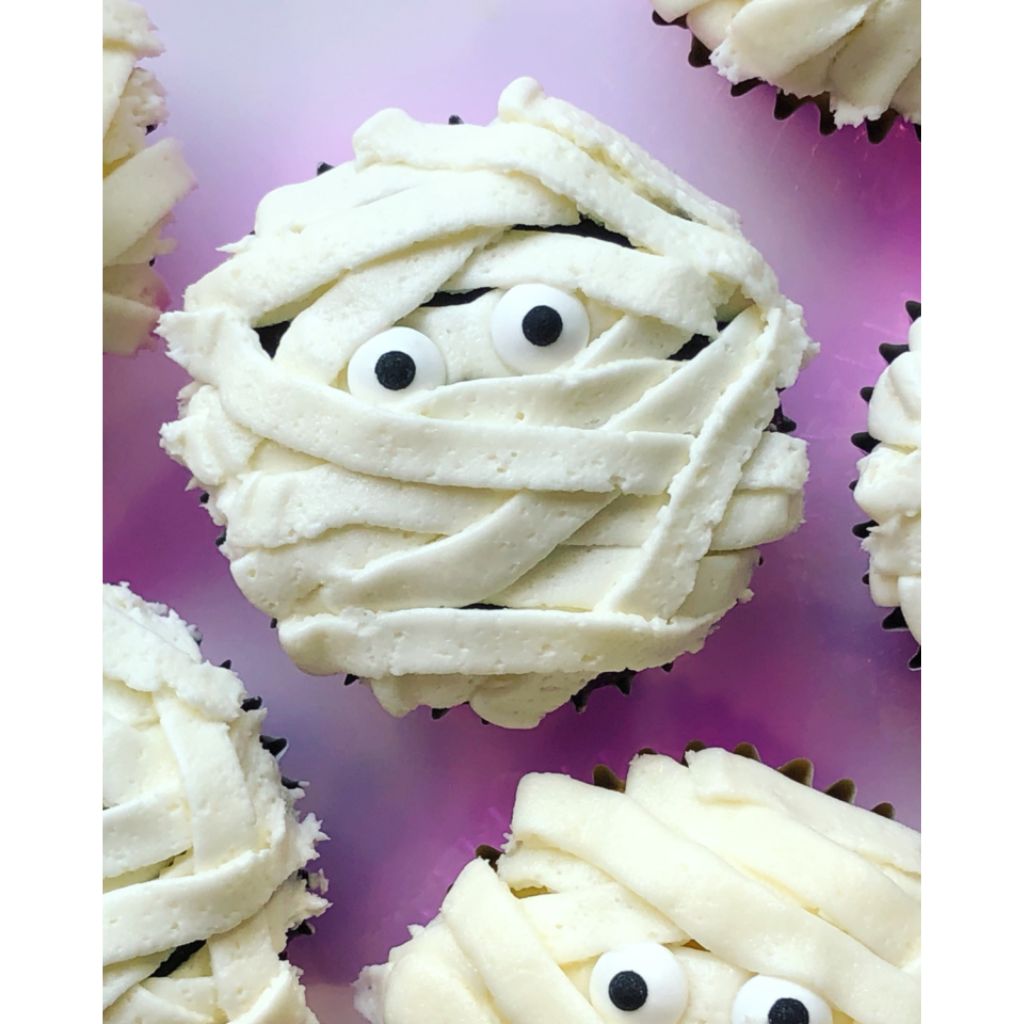
Ingredients:
For the Cupcakes:
- Your favorite cupcake recipe or mix (enough for 12 cupcakes)
For the Mummy Decoration:
- 1 cup white frosting (homemade or store-bought)
- Candy eyeballs
- Piping bag and tip (or a plastic sandwich bag with a small corner snipped off)
Instructions:
- Bake the Cupcakes:
- Prepare and bake your favorite cupcake recipe or follow the instructions on a cupcake mix.
- Allow the cupcakes to cool completely before decorating.
- Prepare the Frosting:
- If you’re using store-bought frosting, transfer it to a bowl.
- If you’re making homemade frosting, ensure it’s smooth and ready to use.
- Decorate the Cupcakes:
- Using a piping bag fitted with a small round tip or a plastic sandwich bag with a small corner snipped off, pipe the white frosting in a zigzag pattern across the top of each cupcake to create the mummy’s bandages. Leave a small space for the eyes.
- In the space left for the eyes, place two candy eyeballs on each cupcake. Press them lightly into the frosting to secure them.
- Continue piping the frosting “bandages” over the eyes, leaving some space to reveal the eyes.
- Finish the Mummy Look:
- If you want to add character, you can use additional frosting to create a “mouth” or “smile” beneath the eyes.
- Serve and Enjoy:
- Your Mummy Cupcakes are now ready to be served at your Halloween party or enjoyed as a spooky treat.
These Mummy Cupcakes are a delightful and fun addition to your Halloween dessert spread, perfect for kids and adults alike. Enjoy your adorable and tasty mummy-themed treats!
These easy Halloween desserts offer a delightful and creative way to add spooky fun to your celebrations. Whether you’re making pumpkin-shaped sugar cookies, mummy brownies, or ghostly pudding cups, these treats will surely be a hit for kids and adults alike. With simple recipes and festive decorations, you can transform your dessert table into a ghoulishly delicious showcase for the Halloween season. These easy Halloween desserts are the perfect blend of fun and flavor. Whether you’re hosting a Halloween party or want to enjoy some spooky treats with your family, these Halloween dessert recipes offer a variety of choices to suit the occasion.


You May Also Like

Vegan Crispy Potato Tacos: A Flavorful and Crunchy Plant-Based Delight
Garlic Butter Steak Bites & Potatoes