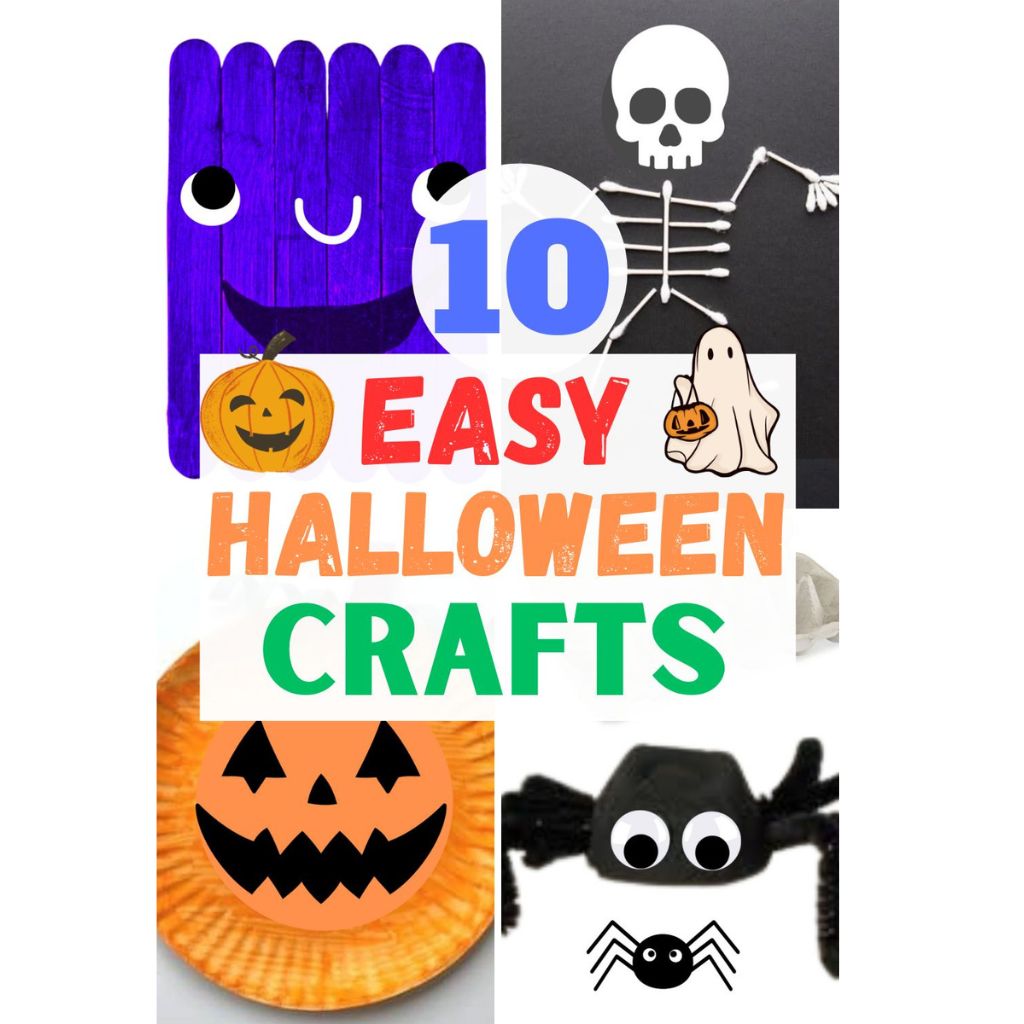
12 Easy Halloween Crafts to Spook Up Your Season
Halloween Crafts
Halloween, a beloved holiday filled with spooky decorations, creative costumes, and an air of enchantment, offers the perfect opportunity for crafting enthusiasts to let their imaginations run wild. Whether you want to add an eerie ambiance to your home or create unique accessories for your Halloween costume, these 20 easy Halloween crafts will ignite your creativity.
From adorable cotton ball ghosts to creepy crawly spiders made from everyday household items, this collection has something for crafters of all ages and skill levels. Get ready to embark on a crafting adventure that will bring the spirit of Halloween to life in your home. So gather your supplies, set the mood with some eerie music, and dive into these spooktacular DIY projects!
As the spooky season approaches, it’s the perfect time to engage in easy Halloween crafts to get you in the Halloween spirit. These fun craft ideas are a great way to decorate your home for Halloween or prepare for a Halloween party. Here are some of the best Halloween craft ideas suitable for all ages, from young to older kids and even the whole family.
This post contains affiliate links. If you purchase through these links, I may earn a modest commission at no extra cost. Please review my privacy policy for more details.
✨ We hope you enjoyed these photos! If so, please consider sharing them on Pinterest by clicking the Pin Button on each image. Your support helps us connect with more people and spread creativity. Thank you so much! 💖
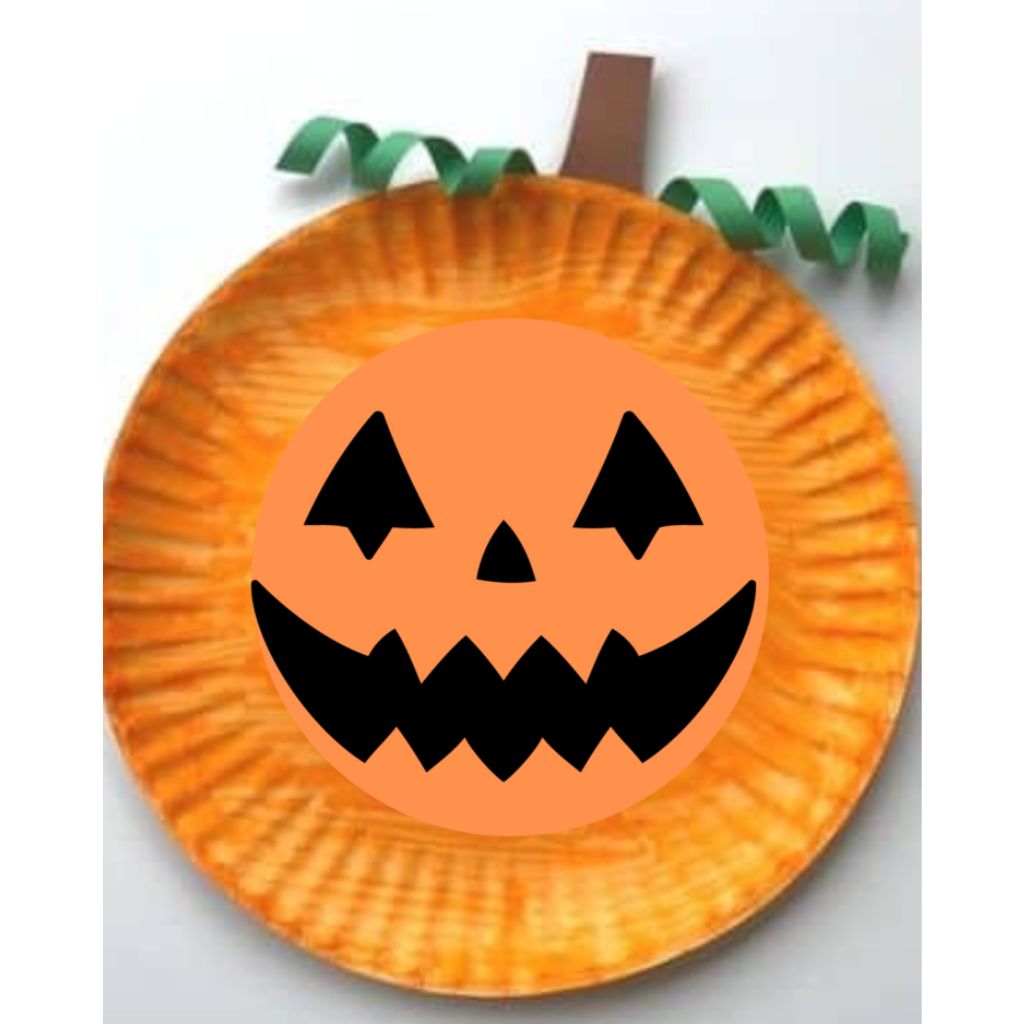
Paper Plate Jack-o’-Lanterns: Paint or color paper plates to create smiling Jack-o’-Lanterns.
Supplies:
Paper plates
Orange paint or markers
Black paint, markers, or crayons
Paintbrushes (if using paint)
Water and a palette (if using paint)
Painting or Coloring:
Take a paper plate and either paint it orange or use orange markers to color it.
Let the orange base dry completely before moving on to the next step.
Once dry, use black paint, markers, or crayons to draw a classic Jack-o’-Lantern face on the orange surface. This can include triangle eyes, a nose, and a smiling mouth with jagged teeth
Final Touches:
Allow the black details to dry.
You can optionally add some green paint or markers to the top of the plate to create a stem.
Once everything is dry, your smiling Jack-o’-Lantern paper plate will be displayed as a charming Halloween decoration.
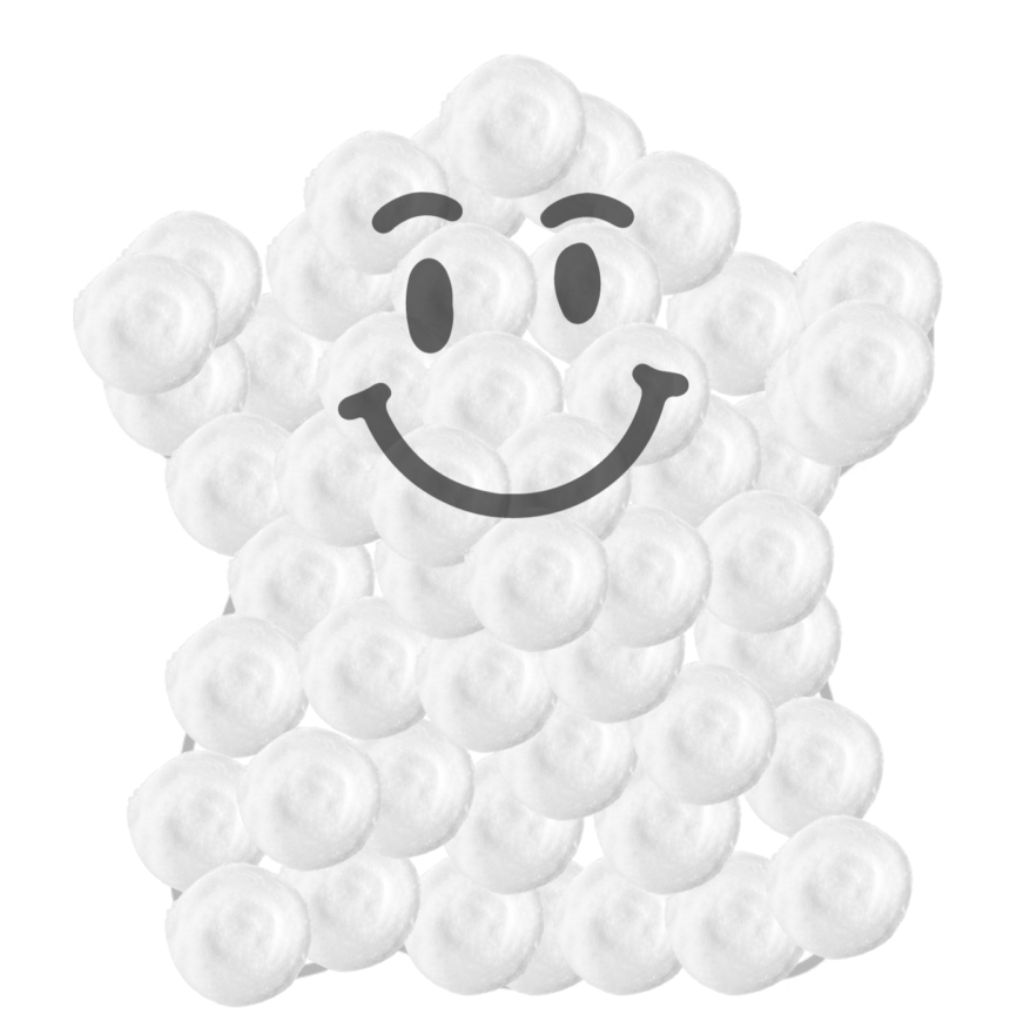
Cotton Ball Ghosts: Glue cotton balls onto paper to make cute ghost shapes.
Create adorable cotton ball ghosts by gluing cotton balls onto paper ghost shapes. Using black construction paper or markers, add spooky facial features. These DIY decorations are perfect for adding a touch of Halloween charm to your home or classroom.
-
Prepare your workspace: Lay down some newspaper or a plastic tablecloth to protect your work surface from glue and any potential mess.
-
Draw ghost shapes: Start by drawing ghost shapes on your plain white paper or cardstock using a pencil. Ghost shapes are typically oval with a rounded bottom, resembling a teardrop. Make them as big or small as you’d like. These will serve as the base for your cotton ball ghosts.
-
Apply glue: Take one cotton ball at a time and apply a small amount of white glue. You can dip the cotton ball into a shallow glue container or use a paintbrush to apply the glue evenly to the cotton ball.
-
Stick cotton balls to the ghost shape: Place the glue-covered cotton balls onto the ghost shape you’ve drawn, pressing gently to adhere them. Overlap the cotton balls slightly to ensure full coverage and create a fluffy, cloud-like appearance. Continue this process until the entire ghost shape is covered with cotton balls. Make sure there are no gaps.
-
Let it dry: Allow the glue to dry completely. This may take a few hours, depending on how thickly you applied the glue and the humidity in your area. You can speed up the drying process by using a hairdryer in a low, relaxed setting.
-
Cut out the ghost: Once the glue has dried and the cotton balls are secure, carefully cut the ghost shape along the pencil lines. Be sure to trim away any excess paper.
-
Add facial features: Use black construction paper or a marker to create eyes and a mouth for your cotton ball ghost. You can make them spooky, cute, or silly—let your creativity shine!
-
Display your cotton ball ghosts: You can hang them with string or thread, tape them to windows, or arrange them as decorations on a tabletop or mantel.
Q-Tip Skeletons: Arrange Q-tips into skeleton shapes on black paper and add cotton ball heads.
For a Halloween-themed art project, create spooky Q-tip skeletons by arranging Q-tips into skeleton shapes on black paper and adding cotton ball heads.
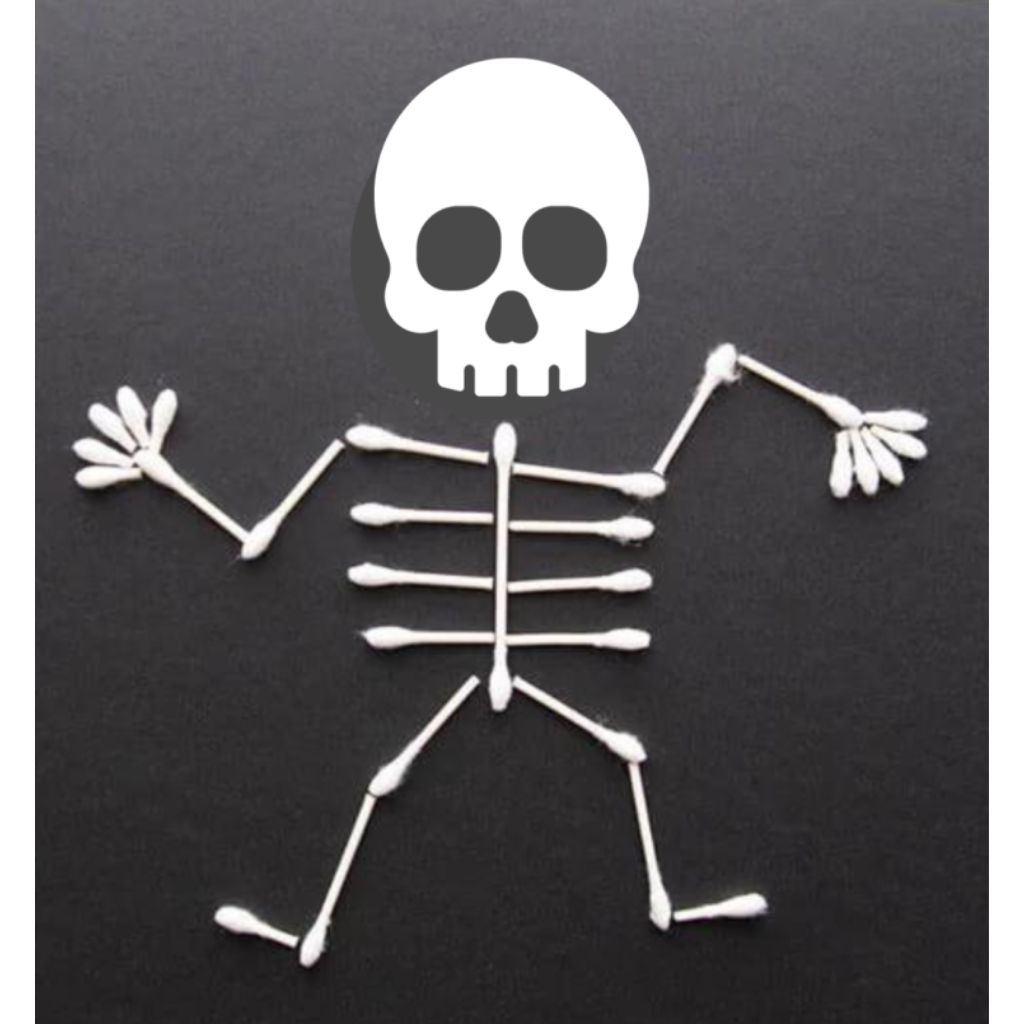
Materials You’ll Need:
-
Black construction paper or cardstock
-
White Q-tips (cotton swabs)
-
White glue
-
Scissors
-
Black marker
Directions:
-
Prepare Your Workspace: Find a clean and well-lit area to work on your project. Lay down some newspaper or a plastic tablecloth to protect your work surface.
-
Draw the Skeleton: On black construction paper, outline a skeleton using a black marker. You can create a simple skeleton shape with a skull, ribcage, arms, and legs. Be creative with the pose and size of your skeleton.
-
Cut the Q-tips: Carefully cut the Q-tips into various lengths to create the bones for your skeleton. You’ll need longer pieces for the leg and arm bones and shorter pieces for the fingers and toes.
-
Glue the Bones: Apply white glue to the back of each Q-tip piece and stick them onto the skeleton outline you drew earlier. Arrange them to resemble the bones of a skeleton. Use the longer pieces for the arms and legs and the shorter ones for the fingers and toes. Leave some space between the bones to mimic joints.
-
Create the Skull: For the skull, you can glue a small bundle of Q-tip pieces together to form a circular shape. Place it at the top of the skeleton’s neck.
-
Add Details: You can use the black marker to add eyes, a nose, and a mouth to the skull. You can also add any other details you like, such as clothing or accessories.
-
Let It Dry: Allow your Q-tip skeleton to dry completely. This might take some time, so be patient.
-
Display Your Art: Once the glue is dry, your Q-tip skeleton art is ready to be displayed. You can frame it, attach it to a larger piece of construction paper as a background, or simply hang it up.
Popsicle Stick Monsters: Paint popsicle sticks and add googly eyes to make colorful monsters.
Create a delightful craft activity by painting popsicle sticks and attaching googly eyes to craft colorful and imaginative monsters
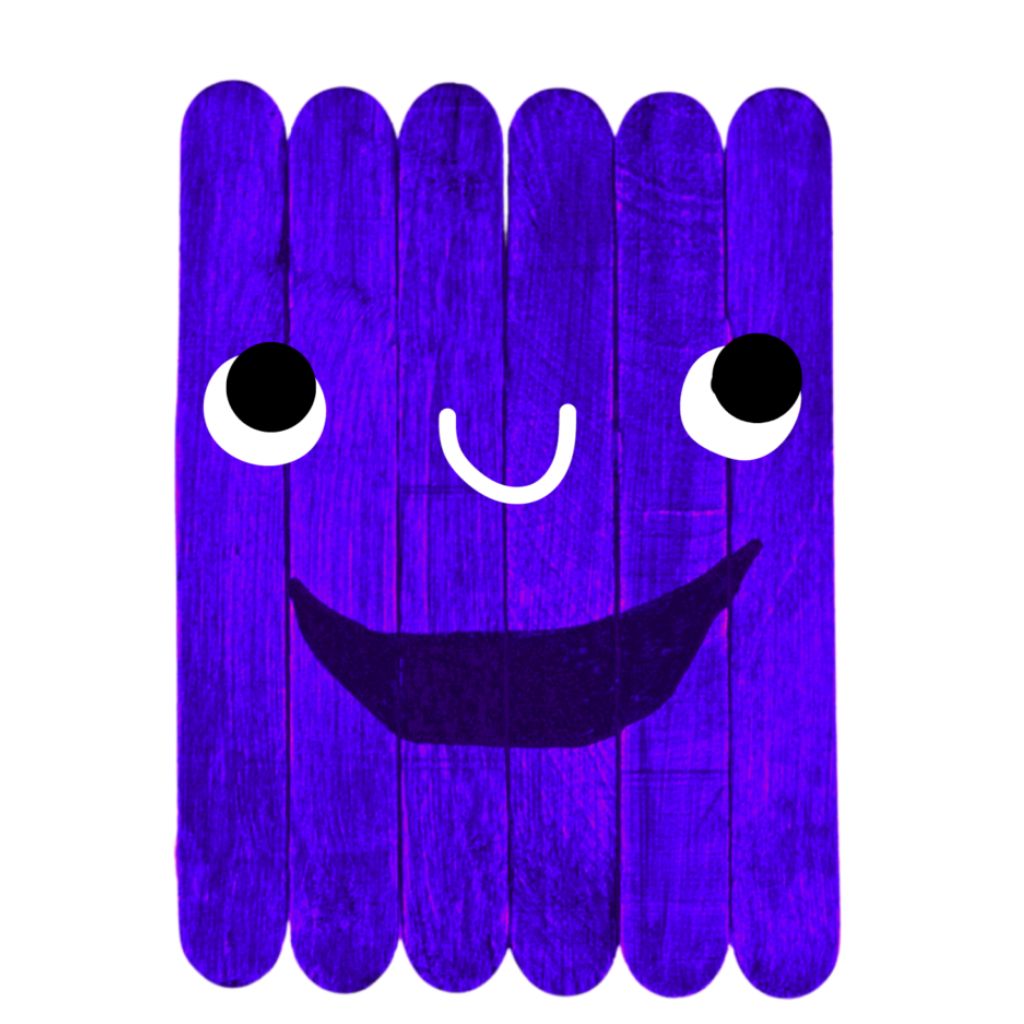
To make Popsicle Stick Monsters:
Materials you’ll need:
-
Popsicle sticks
-
Acrylic paints in various colors
-
Paintbrushes
-
Googly eyes
-
Glue
-
Markers or felt-tip pens
Steps:
-
Lay out a few Popsicle sticks, as many as you want for each monster. These will be the bodies of your monsters.
-
Paint the Popsicle sticks in different colors and allow them to dry. You can get creative with your color choices to make unique monsters.
-
Once the paint is dry, glue and attach googly eyes to each monster. You can use different sizes of googly eyes for added character.
-
Draw mouths, noses, and any other facial features using markers or felt-tip pens. You can make your monsters smile, frown, or even give them sharp teeth – it’s up to you!
-
Let your Popsicle Stick Monsters dry completely.
-
Once they are dry, your colorful and whimsical monsters are ready to display. You can stick them onto black construction paper to create a spooky or colorful monster scene.
-
Get creative and experiment with different shapes and sizes of Popsicle sticks to make a variety of Popsicle Stick Monsters.
Spiderweb Plates: Use white paper plates and black yarn to make spiderwebs.
Create spooky spider decorations for your front door with black-and-white paper plate spiders. Add googly eyes for a fun and eerie touch. This fun Halloween craft is a great addition to your Halloween décor.
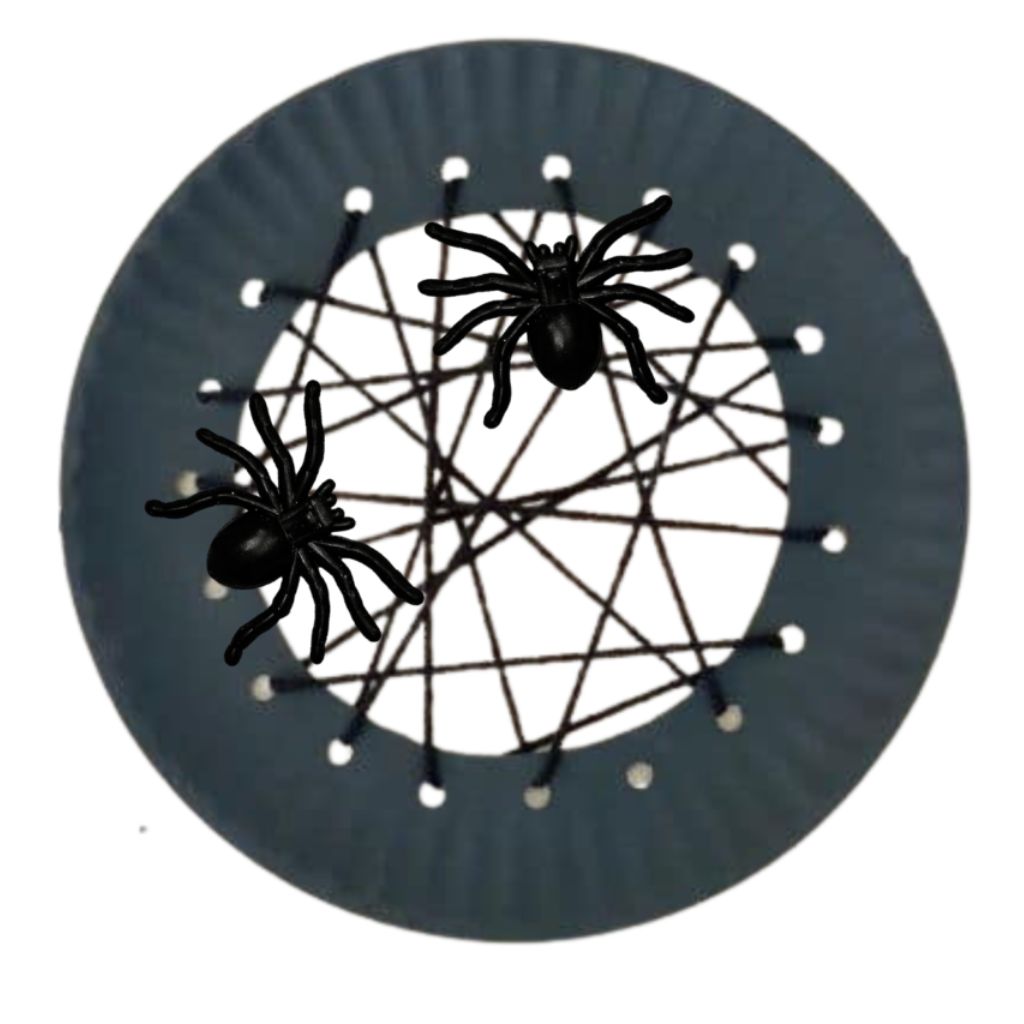
Materials you’ll need:
-
White paper plates
-
Black yarn
-
Scissors
-
Tape or glue
Instructions:
Cut out the center of the plate.
Create punch holes on the outside of the paper plate. Tape your yarn onto the first hole, weave your yarn from hole to hole to create webs, and secure it with a knot and tape.
Egg Carton Spiders: Cut and paint egg carton sections to make spider bodies, then add pipe cleaner legs.
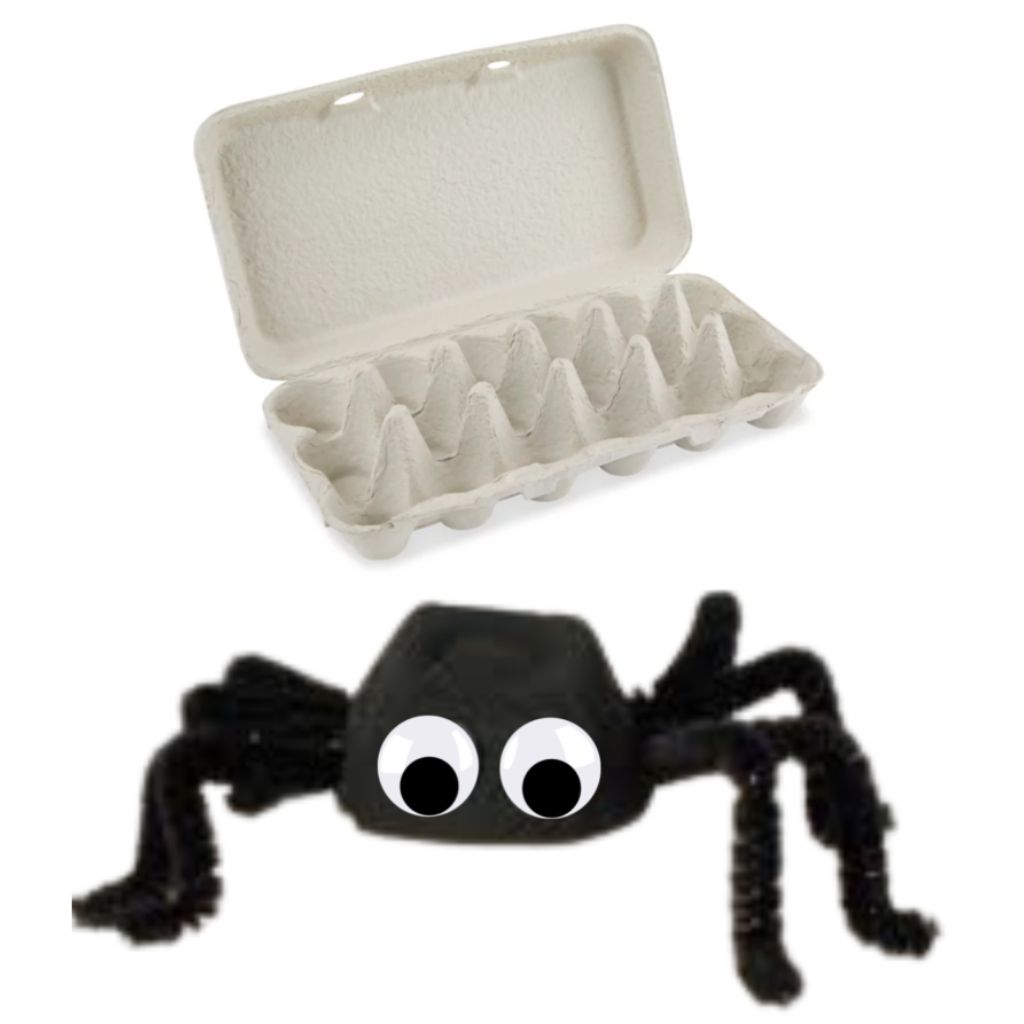
Materials you’ll need:
-
Empty egg carton
-
Scissors
-
Acrylic paint (black or your preferred spider color)
-
Paintbrush
-
Googly eyes
-
Pipe cleaners (black or matching spider color)
-
Glue (craft or hot glue)
Instructions:
-
Prepare the Egg Carton:
-
Cut out individual sections (cups) from the egg carton. Each section will become a spider body.
-
-
Paint the Spider Bodies:
-
Use acrylic paint to coat the outside of each egg carton section in your chosen spider color. Black is a classic choice, but you can get creative with different colors.
-
Allow the paint to dry completely. You may need to apply more than one coat for good coverage.
-
-
Attach Googly Eyes:
-
Once the paint is dry, glue googly eyes onto the front of each spider’s body. You can use different sizes of googly eyes for added character.
-
-
Add Spider Legs:
-
Cut eight pieces of pipe cleaner to create the spider’s legs. The length of each pipe cleaner piece will depend on your preferred leg length.
-
Bend each pipe cleaner piece in half to create an angle, making them resemble spider legs.
-
Use glue to attach the bent ends of the pipe cleaners to the underside of each egg carton spider body. Four legs on each side, for a total of eight legs.
-
-
Let It Dry:
-
Allow the glue to dry completely to securely attach the legs.
-
-
Display Your Egg Carton Spiders:
-
Once the spiders are dry and the legs are secure, you can display them as Halloween decorations. They can be placed on tabletops, hung from strings as hanging decorations or used in various creative ways to add a spooky touch to your Halloween decor.
-
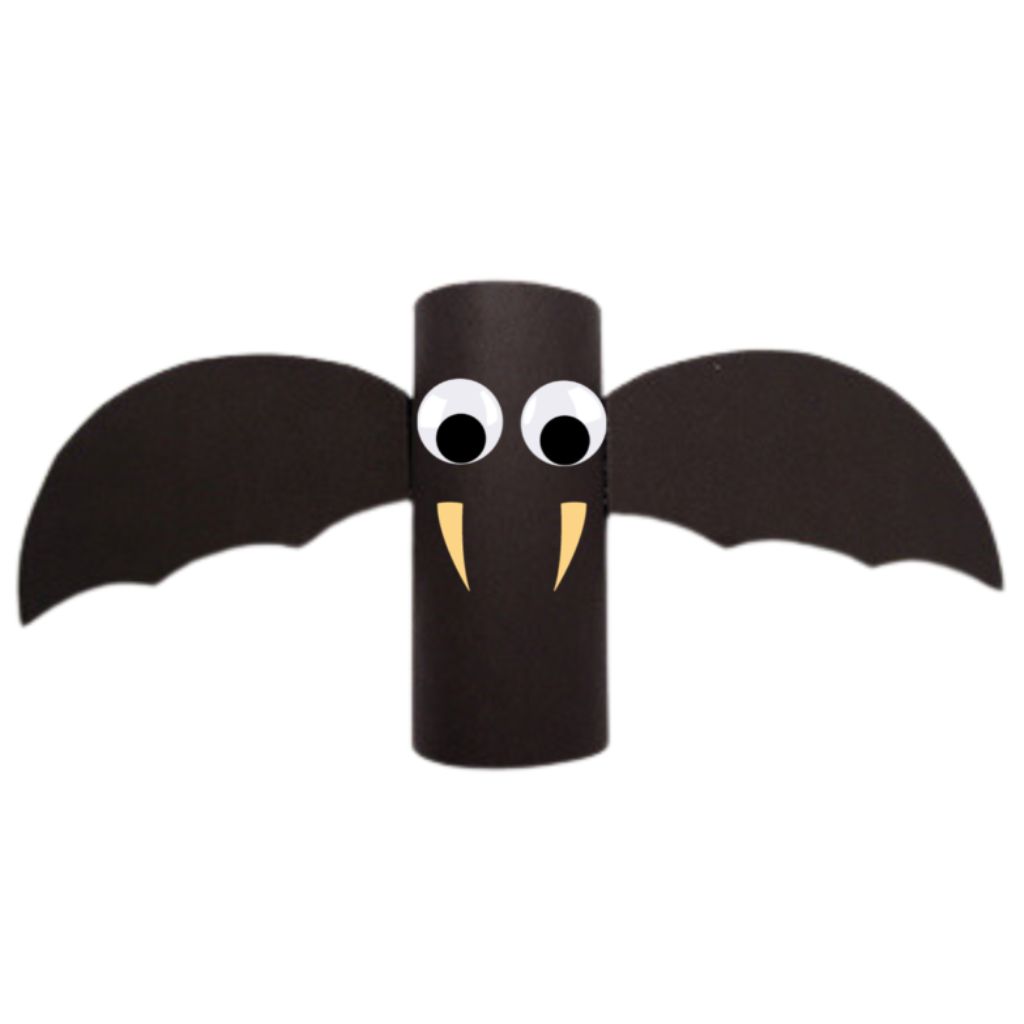
Toilet Paper Roll Bats: Paint empty toilet paper rolls black and add paper wings to make bats.
Materials You’ll Need:
-
Empty toilet paper rolls (one for each bat)
-
Black paint (acrylic or tempera)
-
Paintbrush
-
Black construction paper or cardstock
-
Googly eyes
-
Scissors
-
Glue
-
String or yarn (optional for hanging)
Directions:
-
Paint the Toilet Paper Rolls:
-
Start by painting the empty toilet paper rolls black. You can use acrylic or tempera paint, whichever you have on hand. Make sure to cover the entire surface of the rolls with black paint.
-
Let the painted rolls dry completely. If the cardboard is still visible after the first coat dries, you may need to apply a second coat.
-
-
Cut Bat Wings:
-
While the painted rolls are drying, prepare the bat wings. Cut bat wing shapes out of black construction paper or cardstock. These wings should be wide and curved, resembling bat wings.
-
You’ll need two wings for each bat.
-
-
Attach the Wings:
-
Once the painted rolls are dry, attach the bat wings to the sides of the roll. Use glue to secure the wings in place. Position them near the top of the roll so they resemble bat wings when the bat is hanging upside down.
-
-
Add Googly Eyes:
-
Glue a pair of googly eyes to the front of the toilet paper roll, just above the wings. This will give your bat some personality.
-
-
Create Ears (Optional):
-
To add ears to your bats, cut small ear shapes out of black paper and glue them on top of the roll near the eyes.
-
-
Create Hanging Loop (Optional):
-
If you want to hang your bats, punch a small hole at the top of the roll and thread a piece of string or yarn through it. Tie a knot to create a loop for hanging.
-
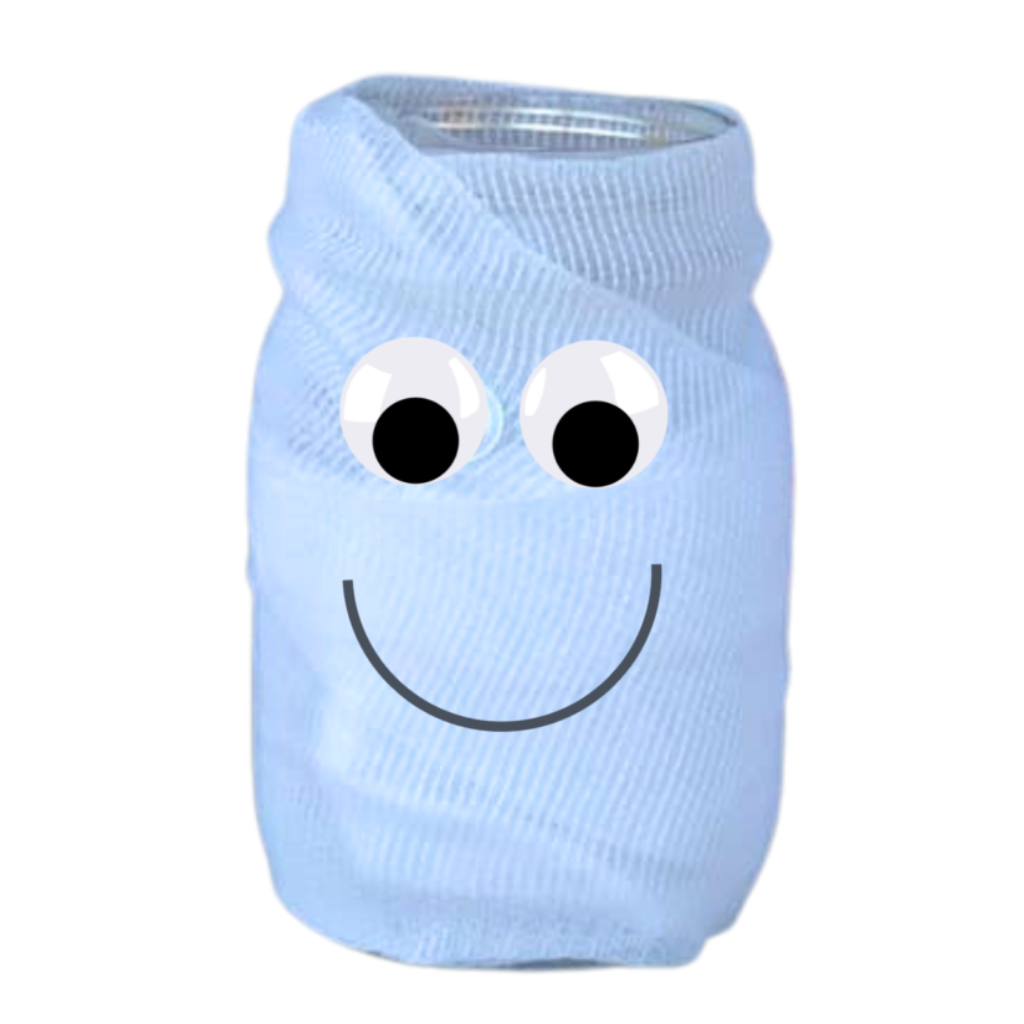
Mummy Mason Jars: Wrap mason jars in gauze or white paper strips to create mummy jars.
Materials You’ll Need:
-
Clean, empty mason jars (with lids)
-
Gauze bandages or white paper strips (torn from old newspapers or white tissue paper)
-
Googly eyes
-
Glue or adhesive dots
-
Scissors
Directions:
-
Prepare Your Materials:
-
Ensure that your mason jars are clean and dry. Remove any labels or sticky residue from the jars. Make sure you have all your materials ready.
-
-
Wrap the Jars:
-
Start by taking a piece of gauze bandage or a white paper strip. If you’re using white paper, you can tear it into thin strips. The strips should be long enough to wrap around the mason jar several times.
-
Apply a small amount of glue or use adhesive dots to secure the end of the gauze or paper strip to the bottom of the jar.
-
-
Wrap Like a Mummy:
-
Begin wrapping the gauze or paper strip around the jar, leaving some gaps and irregularities to resemble mummy bandages. You can crisscross the strips or wrap them loosely to create a more authentic mummy look.
-
Continue wrapping until you’ve covered most of the jar, leaving a small area at the top open for the mummy’s “face.”
-
-
Attach the Eyes:
-
Once you’ve wrapped the jar to your satisfaction, it’s time to attach the mummy’s eyes. Use adhesive dots or a small dab of glue to secure googly eyes onto the exposed area of the jar where the face will be.
-
Position the eyes as you like, creating a whimsical or spooky expression for your mummy.
-
-
Let Dry:
-
Allow the glue to dry completely to keep the eyes in place.
-
-
Optional: Add a Candle:
-
If you want to turn your mummy jars into lanterns, place battery-operated tea lights or small LED candles inside the jars. These will create a warm, eerie glow that shines through mummy bandages.
-
-
Display Your Mummy Mason Jars:
-
Once your mummy jars are complete and dry, you can display them around your home as Halloween decorations. They look great on windowsills, mantels, or as part of a Halloween centerpiece.
-
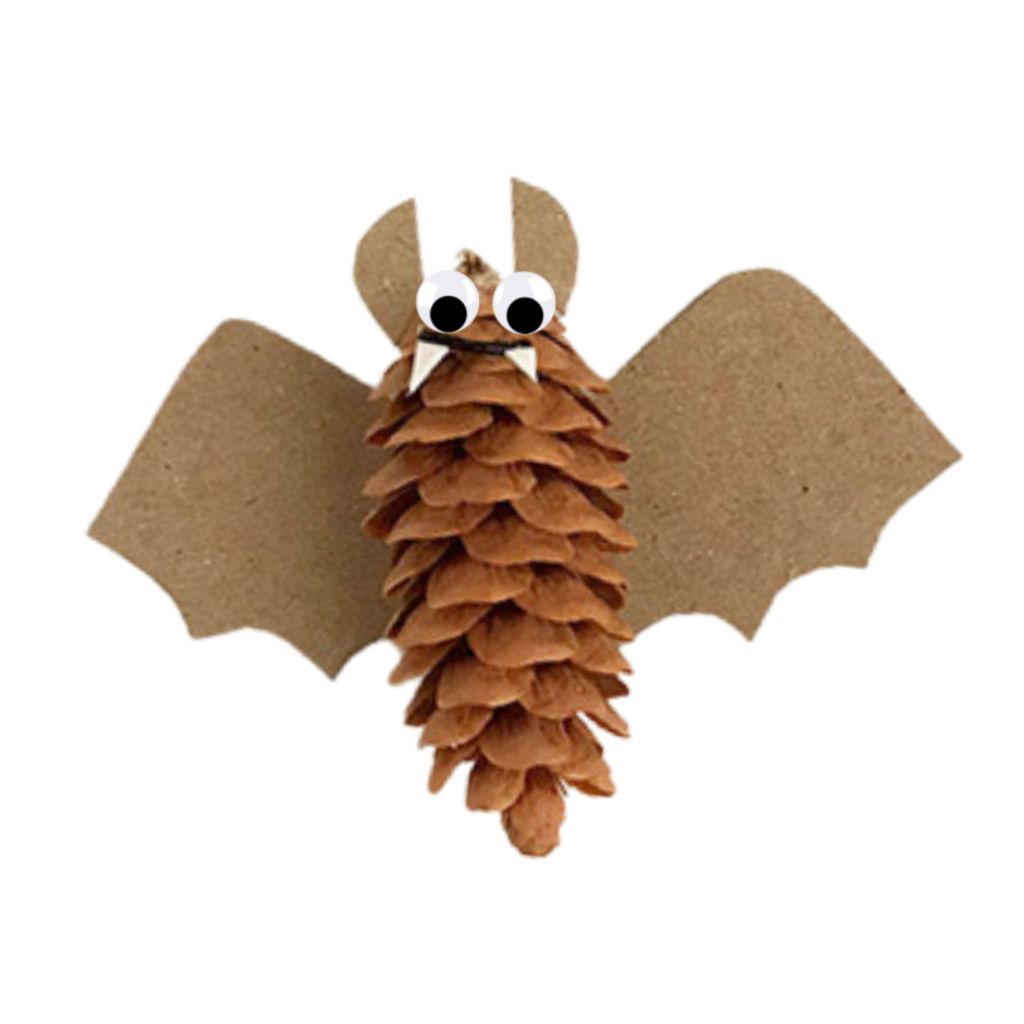
Pinecone Bats: Paint pinecones black and add paper wings and googly eyes to make bats.
Materials You’ll Need:
-
Pinecones
-
Black paint
-
Paintbrush
-
Construction paper or black craft foam
-
Googly eyes
-
Glue
-
Scissors
Instructions:
-
Prepare Your Pinecones:
-
Start by collecting or purchasing pinecones. Please make sure they are clean and dry. If they are dirty or have debris, gently clean them and let them dry.
-
-
Paint the Pinecones:
-
Using a paintbrush and black paint, cover entirely the pinecones with black paint. This will be the body of your bats.
-
Allow the paint to dry completely. Depending on the paint used, this may take an hour or more.
-
-
Cut Out Bat Wings:
-
While the paint is drying, you can work on the bat wings.
-
Take a piece of black construction paper or black craft foam. Fold it in half.
-
Draw half of a bat wing shape on the folded paper. The folded edge of the paper should be the center of the wing. This way, you’ll have symmetrical wings when you cut it out.
-
Cut out the bat wing shape, and you should have a pair of bat wings when you unfold the paper.
-
-
Attach Wings to Pinecones:
-
Once the pinecones are dry, use glue to attach the bat wings to the sides of the pinecones. The wings should be glued near the top of the pinecone.
-
Hold the wings in place until the glue dries and they are secure.
-
-
Add Googly Eyes:
-
Apply glue to the front of the pinecone, near the top.
-
Attach googly eyes to the glue. You can use one googly eye for each bat or get creative and use different sizes for each eye.
-
-
Let Them Dry:
-
Allow your Pinecone Bats to dry completely. This ensures that all the glued parts are secure.
-
-
Display Your Pinecone Bats:
-
Once everything is dry, your Pinecone Bats are ready to be displayed. You can place them on a table, hang them from strings, or incorporate them into your Halloween decorations.
-
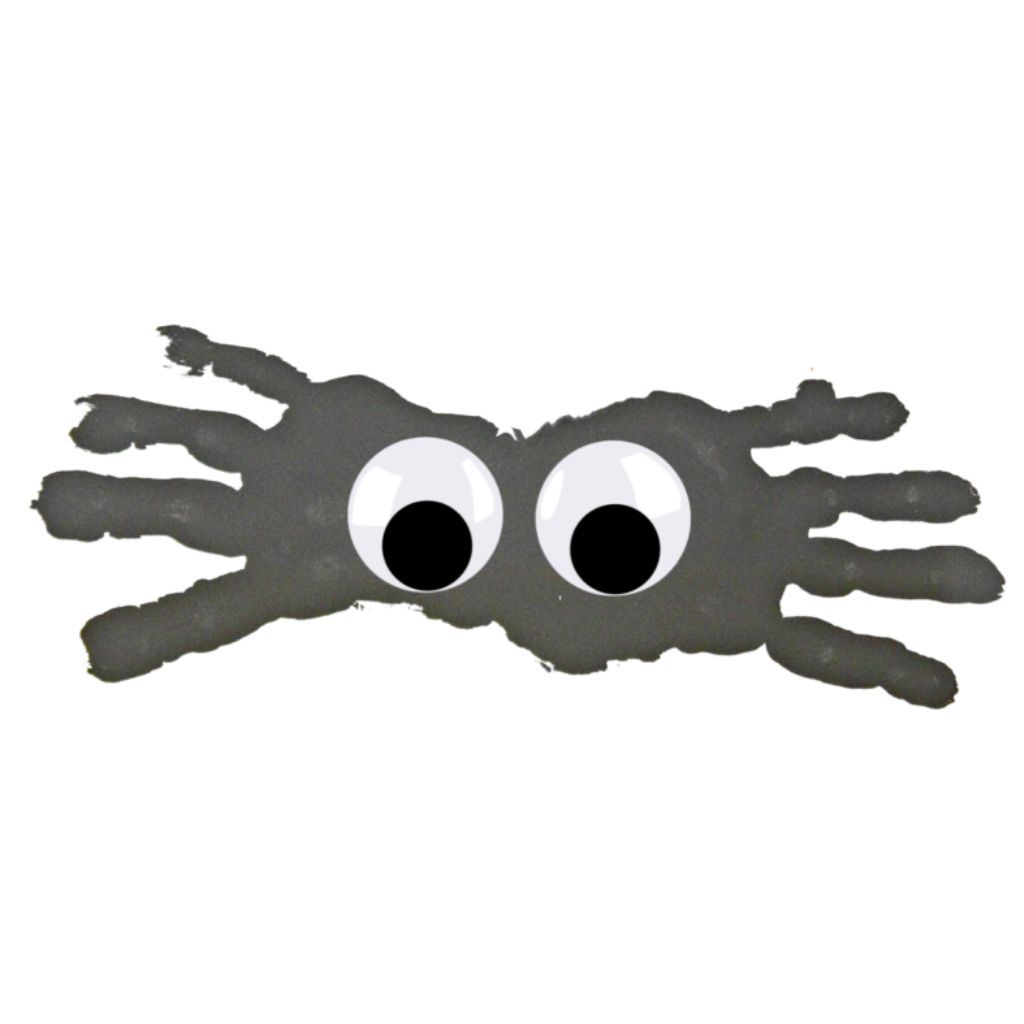
Handprint Spiders: Dip your hand in paint and create handprint spiders on paper.
Materials You’ll Need:
-
White paper or black construction paper
-
Washable black paint
-
Paintbrush or painttray
-
Water and paper towels for cleaning hands
-
Googly eyes (optional)
-
Glue (if using googly eyes)
Instructions:
-
Prepare Your Workspace:
-
Lay out your white paper or black construction paper on a flat surface. Ensure you have all your materials within reach.
-
-
Pour Paint:
-
Pour a small amount of washable black paint onto a paint tray or palette. You can use a disposable plate if you don’t have a palette.
-
-
Paint Your Hand:
-
Carefully dip your hand into the black paint, evenly covering your entire palm and fingers.
-
-
Make the Handprint:
-
Press your painted hand firmly onto the paper. This will create the spider’s body. You can place your handprint in the center of the paper or at any desired location.
-
-
Add Spider Legs:
-
After making the handprint, clean your hand thoroughly with water and paper towels.
-
Add eight spider legs to your handprint using a paintbrush or your fingers. Like spider legs, you can paint these legs extending out from the body.
-
Allow the paint to dry completely.
-
-
Optional: Attach Googly Eyes:
-
If you want to give your handprint spiders googly eyes for a more playful and spooky look, you can do so. Apply a small amount of glue to the paper where you want the eyes and attach the googly eyes.
-
-
Let It Dry:
-
Allow your Handprint Spiders to dry completely. This ensures that the paint and any glued-on elements are secure.
-
Popsicle Stick Haunted House: Use popsicle sticks, black paint, and a little creativity to decorate a haunted house. Add spooky ghosts, black cats, and laser beams for a genuinely haunted feel. This craft is a perfect way to set the Halloween spirit.
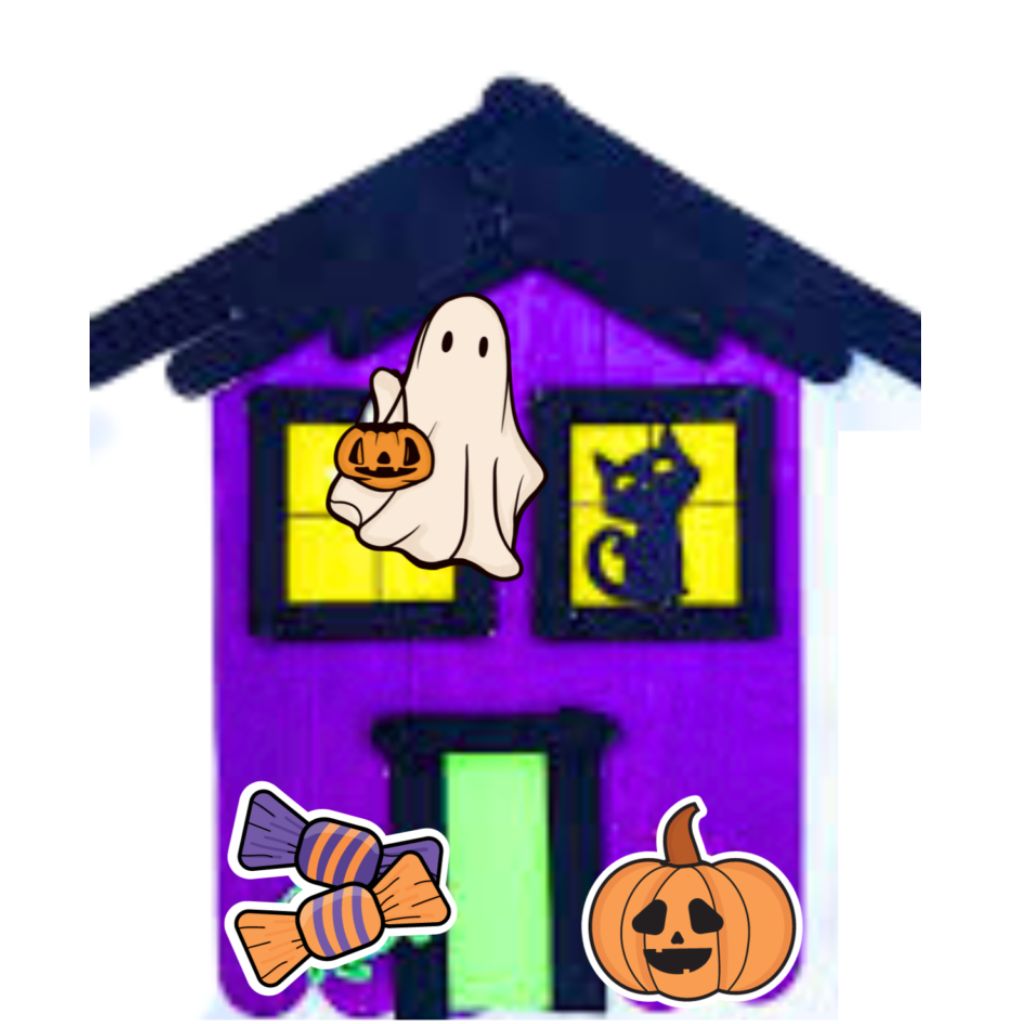
Materials You’ll Need:
- Popsicle sticks (about 12-15)
- Black paint
- White paint
- Paintbrushes
- Black construction paper
- Glue
- Scissors
- Googly eyes
- Other Halloween-themed decorations (optional)
Instructions:
-
Prepare Your Work Area: Lay out a newspaper or a plastic tablecloth to protect your work surface.
-
Assemble the House Structure: Create the basic shape of your haunted house by arranging the popsicle sticks in the form of a house, with one stick as the base and the others forming the roof and walls. Glue them together, ensuring the sticks are aligned evenly to create a stable structure.
-
Paint the House: Use black paint to make your haunted house look spooky, dark. Paint both the exterior and interior, covering the entire structure. Allow the black paint to dry completely before moving on to the next step.
-
Add Windows and Doors: Cut shapes from black construction paper to create windows and doors for your haunted house. Glue them onto the black-painted popsicle sticks. You can make the windows and doors as simple or detailed as possible.
-
Paint the Details: Use white paint to add spooky details to your haunted house. You can create features like ghostly faces, cobwebs, or even gravestones. Get creative with your design. Let your imagination run wild!
-
Glue on Googly Eyes: Glue googly eyes to your haunted house to give it a playful, eerie look. You can use different sizes of googly eyes to create variety.
-
Optional Decorations: Enhance your haunted house with other Halloween-themed decorations, such as plastic spiders, bats, or miniature skeletons. These can be glued onto the house or placed in the surrounding area for added spookiness.
-
Let It Dry: Allow your haunted house to dry completely before displaying it.
-
Display Your Haunted House: Once your Popsicle Stick Haunted House is dry, place it on your front porch as part of your Halloween decorations or use it as a fun centerpiece for a Halloween party.
This easy craft is a perfect way to set the Halloween spirit, and you can customize it with your favorite spooky details to make it your own haunted house creation. Enjoy your Halloween crafting!
Tissue Paper Pumpkin: Kids of all ages will have fun making tissue paper pumpkins. You can create cute pumpkins that are a great addition to your Halloween decorations using orange tissue paper, green pipe cleaner stems, and googly eyes.

Materials You’ll Need:
- Orange tissue paper
- Green pipe cleaners (for the stem)
- Googly eyes
- Glue
- Scissors
- Pencil (optional for shaping)
Instructions:
-
Prepare Your Work Area: Lay out a newspaper or a plastic tablecloth to protect your work surface.
-
Cut Tissue Paper Strips: Take the orange tissue paper and cut it into long strips. The length of the strips will determine the size of your pumpkin. Make sure the strips are roughly the same width.
-
Lay Out Strips: Lay the tissue paper strips flat on your work surface, stacking them on each other. Depending on the size of your pumpkin, you can use 6 to 10 strips.
-
Fold and Shape: Fold the stacked tissue paper strips in half lengthwise, with a folded edge at the top and loose ends at the bottom. If you’d like to create a more rounded pumpkin shape, you can use a pencil to roll the folded tissue paper around it gently.
-
Secure the Bottom: Use a green pipe cleaner to secure the loose ends at the bottom of the folded tissue paper. Twist it around the tissue paper and give it a couple of turns to ensure it’s secure. This will create the pumpkin’s stem.
-
Fluff the Tissue Paper: Carefully start fluffing out the tissue paper layers. Gently separate and pull the tissue paper strips upwards and outwards to create a rounded, pumpkin-like shape.
-
Add Googly Eyes: Use glue to attach googly eyes to your tissue paper pumpkin to give it a fun, playful appearance. You can place the eyes wherever you’d like on your pumpkin.
-
Optional Details: You can get creative by adding a paper mouth or other facial features to your pumpkin using colored paper. Feel free to use your imagination and personalize your tissue paper pumpkin.
-
Let It Dry: Allow any glue you’ve used to dry completely before moving or displaying your tissue paper pumpkin.
-
Display Your Pumpkin: Once your tissue paper pumpkin is dry, place it on your table as a centerpiece, use it as part of your Halloween or fall decorations, or even hang it from the ceiling for a festive touch.
Tissue paper pumpkins are a great craft for kids of all ages and provide a cute and colorful addition to your Halloween or fall decor. Enjoy your crafting, and let your creativity shine!
These 10 easy Halloween crafts offer a delightful way to infuse the season’s spirit into your home. Whether crafting with kids and friends or simply enjoying solo creative time, these projects provide a perfect balance of fun and spookiness. From playful Jack-o’-Lanterns to adorable cotton ball ghosts, there’s something for everyone to enjoy. So, roll up your sleeves, gather your crafting supplies, and get ready to add a touch of Halloween magic to your decorations and festivities with these fantastic DIY projects. Embrace the season’s creativity and have a spooktacular time crafting!
These Halloween craft ideas are a perfect way to add a touch of Halloween to your home without spending much time or money. They offer a fun and creative outlet for kids and adults alike and will surely get everyone in the Halloween spirit. Whether you’re looking for decorations for your front door, a Halloween party, or want to enjoy some fun DIY crafting, these Halloween crafts have got you covered.


You May Also Like
Christmas Mantel Decor Ideas: Bring Festive Cheer to Your Home
10 Cute and Creative Gingerbread House Ideas to Spark Your Holiday Spirit