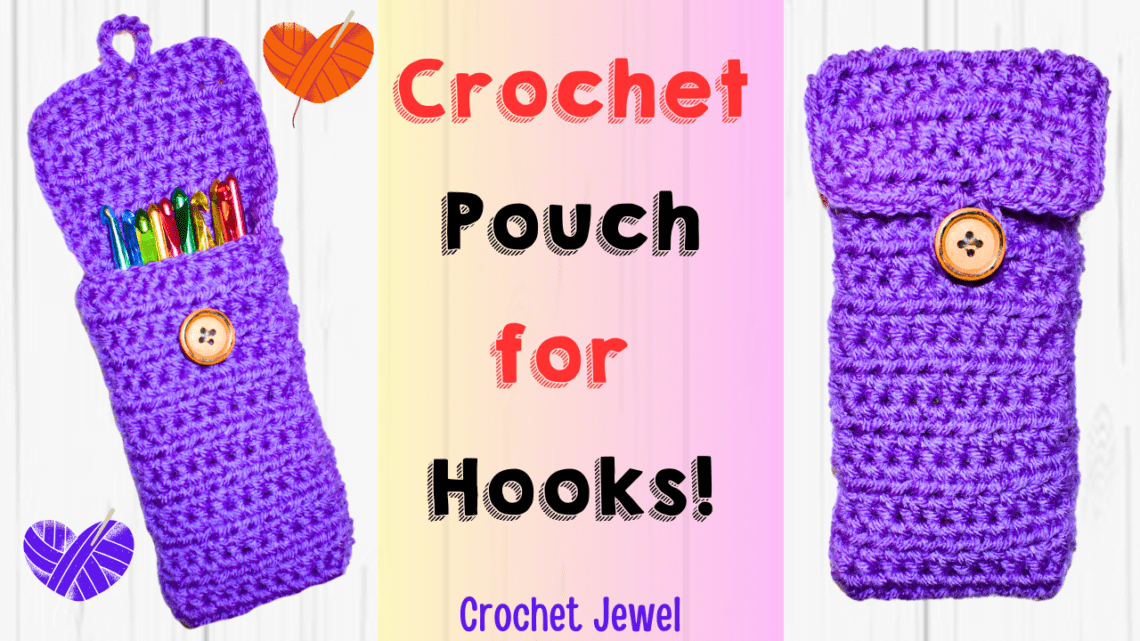
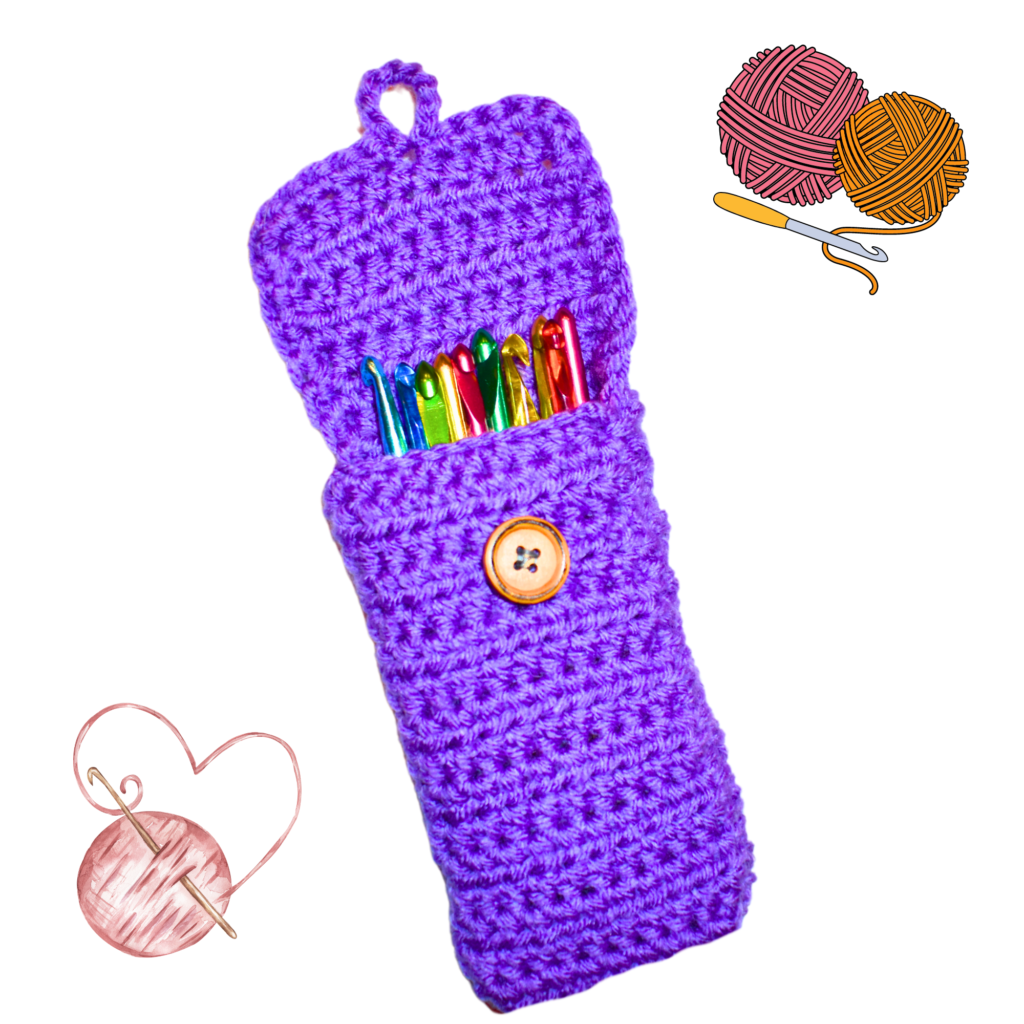
Crochet Your Own Hook Pouch: A Step-by-Step Guide
Crochet Hook Pouch!
Crochet hooks are essential tools for any enthusiast, and having a dedicated crochet hook case can significantly enhance your crocheting experience. Whether you are working on a single or double crochet, keeping your hooks organized ensures you can focus more on your projects and less on searching for tools. This guide will explore a practical and creative way to craft your crochet hook case using simple stitches and techniques.
This post contains affiliate links. If you purchase through these links, I may earn a modest commission at no extra cost. Please review my privacy policy for more details.
Crochet hooks are essential tools for any enthusiast, and having a dedicated crochet hook case can significantly enhance your crocheting experience. Whether you are working on a single or double crochet, keeping your hooks organized ensures you can focus more on your projects and less on searching for tools. This guide will explore a practical and creative way to craft your crochet hook case using simple stitches and techniques.
Creating a crochet hook case is a fun and rewarding project that requires only a few materials and basic crochet skills. You’ll need some yards of worsted weight yarn, a suitable mm crochet hook, and additional supplies like a yarn needle, stitch marker, and a button for the closure. For this project, we’ll follow a simple square pattern with the Suzette stitch, combining single and double crochet stitches for a beautiful texture.
Start by making a slip knot and chaining several stitches to achieve the desired width of your case. Work the first row in single crochet, placing the first sc in the second ch from the hook. Continue to work single crochet stitches across, ending with a slip stitch in the last stitch of the row. For the next row, turn your work and follow the pattern: single crochet in the first stitch, double crochet in the next stitch, and repeat this sequence until the end of the row.
✨ We hope you enjoyed these photos! If so, please consider sharing them on Pinterest by clicking the Pin Button on each image. Your support helps us connect with more people and spread creativity. Thank you so much! 💖
How to Watch Videos in Slow Motion – if the video is too fast – Click Here!
How to Crochet For Beginners Playlist – Click Here
Abbreviations:
sc=single crochet
sl st=slip stitch
ch=chain
sts=stitches
hdc=half double crochet
Click the Links for Your Materials
– Crochet hook
– Tapestry needle
– Stitch marker
G hook (go up on a hook size to make it bigger)
Medium Worsted Purple Yarn
Tip: You could single-crochet instead of half-double-crochet for a tighter stitch. Just add more rows.
Row 1: ch 13, hdc in each chain across, Turn
Rows 2-40: ch 2, hdc in each hdc across, Turn, *Repeat for a total of 39 rows
Fold 15 rows in half, leaving the top unworked for the flap. Join your yarn at the bottom with a slip stitch. Single crochet (sc) the folded ends together up to the top, and when you reach the top (which is the flap), sc in the next 6 sc, Chain 8 for the button loop and slip stitch into the same stitch. Continue single crocheting around and back down to the bottom. Fasten off and weave in your ends.
Turn right side out.
Click Here for Crochet Hat Patterns
As you continue to work in rows, keep track of your stitch counts and adjust as needed. Use measuring tape to ensure your crochet hook case reaches the perfect size. When you have reached the desired length, work on the edging by crocheting around the entire piece. Place sc stitches evenly along each edge, adding extra stitches in the corner stitch space for a smooth curve.
For the buttonhole, leave an appropriate spot in the final row by chaining a few stitches and skipping the corresponding number of stitches. Secure the button on the opposite side, ensuring it fits snugly through the hole. If you prefer a more personalized touch, consider adding a little pocket inside the pouch for reading glasses or a pair of scissors.
Crafting your crochet hook case is practical and a great way to express creativity. Whether you choose a friendly version for beginners or add your creative spin with special stitch tutorials, the possibilities are endless. Using a video tutorial can also be helpful for visual learners. Following these steps, you’ll have a custom crochet hook holder that keeps your tools organized and easily accessible. Plus, you’ll be reminded of the joy of creating something with your hands whenever you use it. You can make a personalized crochet pouch that suits your needs with affiliate links for materials and free crochet patterns.
To Find All My Crochet Jewel Patterns, Click Here

Click Here for My Ravelry Patterns


Crochet Hats for Beginners Book For Sale – Click Here

Crochet For Beginners Book for Sale – Click Here
Click Here fo Lion Brand Yarn and Free Patterns

I’m using Rakuten to get Cash Back at my favorite stores. Hate for you to miss out, so join now with my invite and you’ll get $30 after you spend $30.* Click Here for Cash Back


You May Also Like
Crochet a Kitty Cup Cozy with Our Adorable Pattern Tutorial

How to Crochet a Lovely Mason Jar Cozy Pattern
